
Guides
Mar 15, 2025

Albert Mao
Co-Founder
Transform your organization with AI
Discover how VectorShift can automate workflows with our Secure AI plarform.
In today's fast-paced business environment, effective employee onboarding is crucial for retention and productivity. For a ~$100M revenue hardware technology company, VectorShift implemented an onboarding AI assistant directly in the company’s Slack. New joiners use the Slack onboarding assistant to learn standards of procedure, company policies, and training materials.
In this guide, we will walkthrough how to build an employee onboarding slackbot in VectorShift (the example we will use will be for onboarding customer support reps).
Designing the Solution
There are three parts in building this solution: 1) setting up the knowledge base (relevant data that is useful for onboarding), 2) building the workflow, and 3) deploying to Slack.
Create knowledge bases: we will create three knowledge bases representing different categories of questions that can be expected to be asked (administrative information, company info, and customer service / job related information).
Building the workflow: we will create a workflow that orchestrates the question / answer process:
We will route a given question to the relevant knowledge bases by using a LLM to classify the question and a condition node (if / else logic)
The relevant information from the knowledge node will be leveraged by a LLM to answer the user question
The generated answer will be exposed through an output node
Export as Chatbot in Slack: the chat assistant will be accessible through Slack
1. Building Knowledge Bases
The foundation of your AI support assistant is a well-organized knowledge base. VectorShift allows you to import data from various sources, including your existing documentation, FAQs, and manuals. There are three knowledge bases we are going to build: “Administration Information”, “Company Information”, and “Customer Service Representative” (job specific information).
Administration Information Knowledge Base
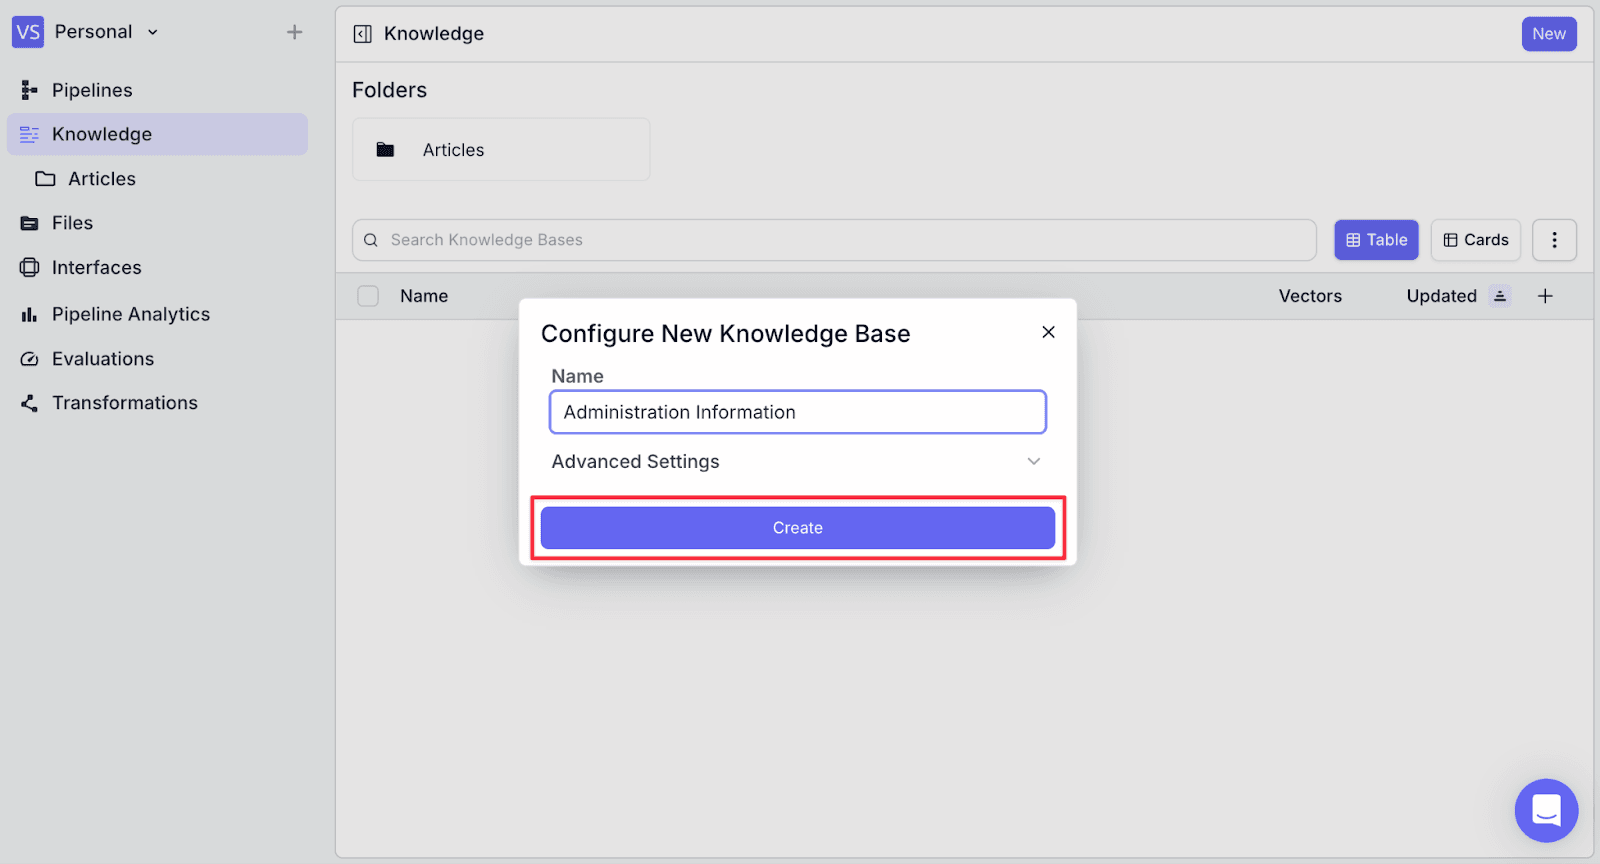
Step 1: Go to the “Knowledge” menu on the left, and click “New” on the top right.

Step 2: Give the knowledge base a name then click “Create”.
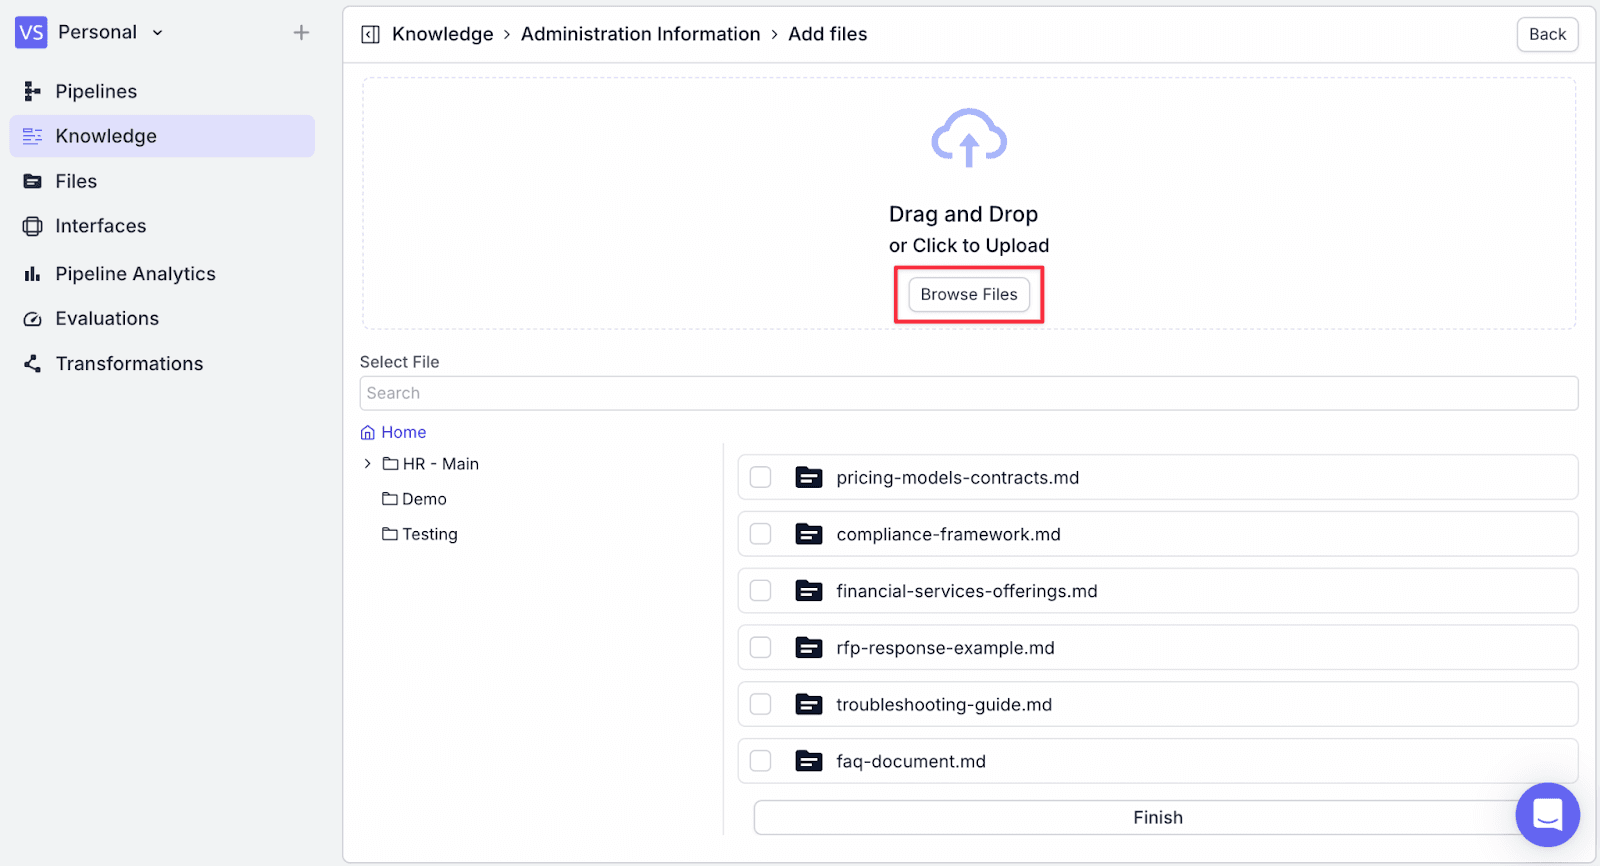
Step 3: Now, click on “Add Document” on the top right, then click “Choose/Upload Files”.

Step 4: Click on “Browse Files”, then choose the relevant document.
Step 5: After selecting the documents, click on “Finish”. You will then see a confirmation screen of the documents that have been successfully added.
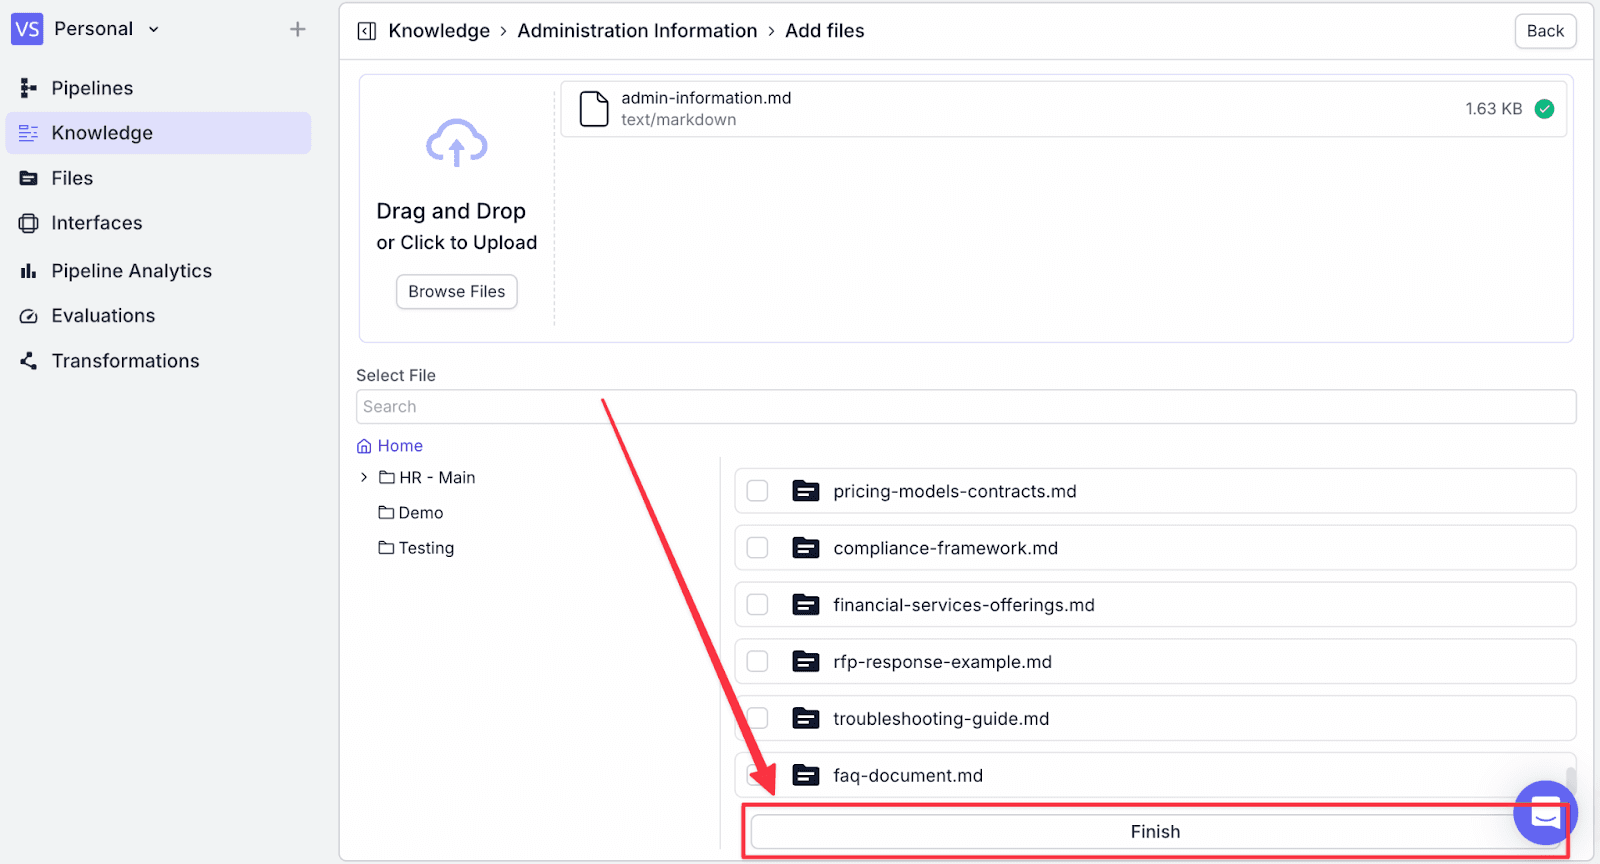
You will see the document has been added to the knowledge with the number of vectors, last sync, and status.

Company Information
We will create a new Knowledge Base called “Company Information”. This knowledge base will use documents from Google Docs.
Step 1: First, create a new knowledge base called “Company Information”.

Step 2: Go to Add Document on the top-right, then click “Choose/Add Integration”.

Step 3: Click on “Connect New App”, we will need to connect with “Google Docs”.

Step 4: Look for “Google Docs”, then click on “Connect”.

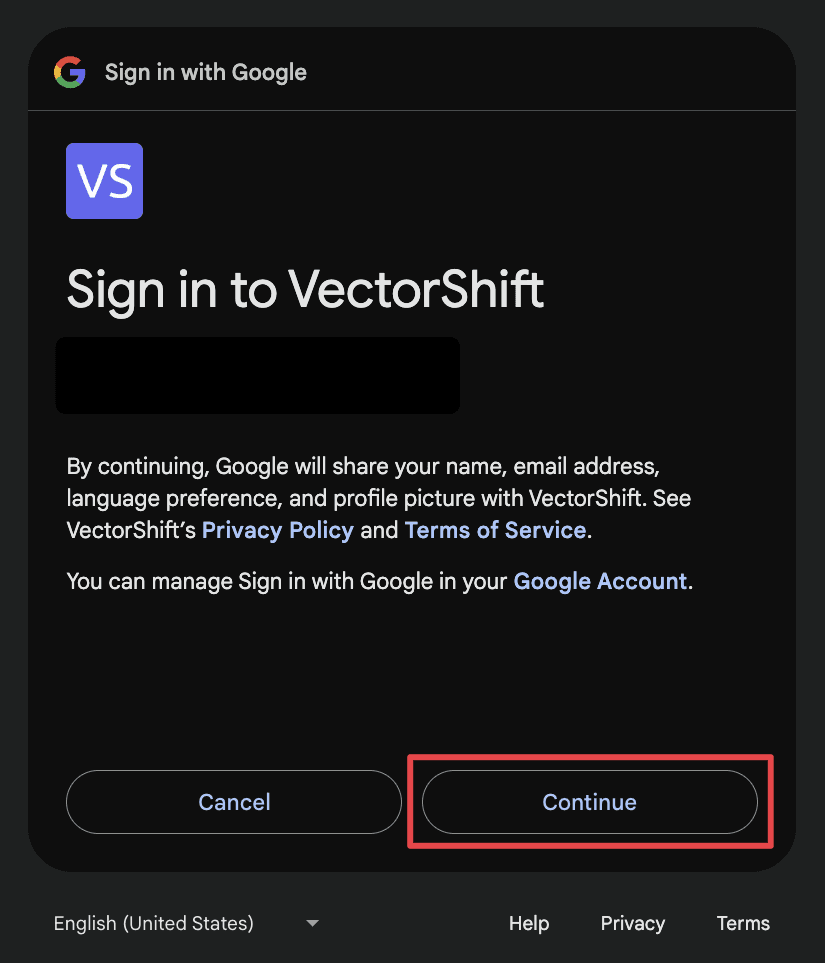
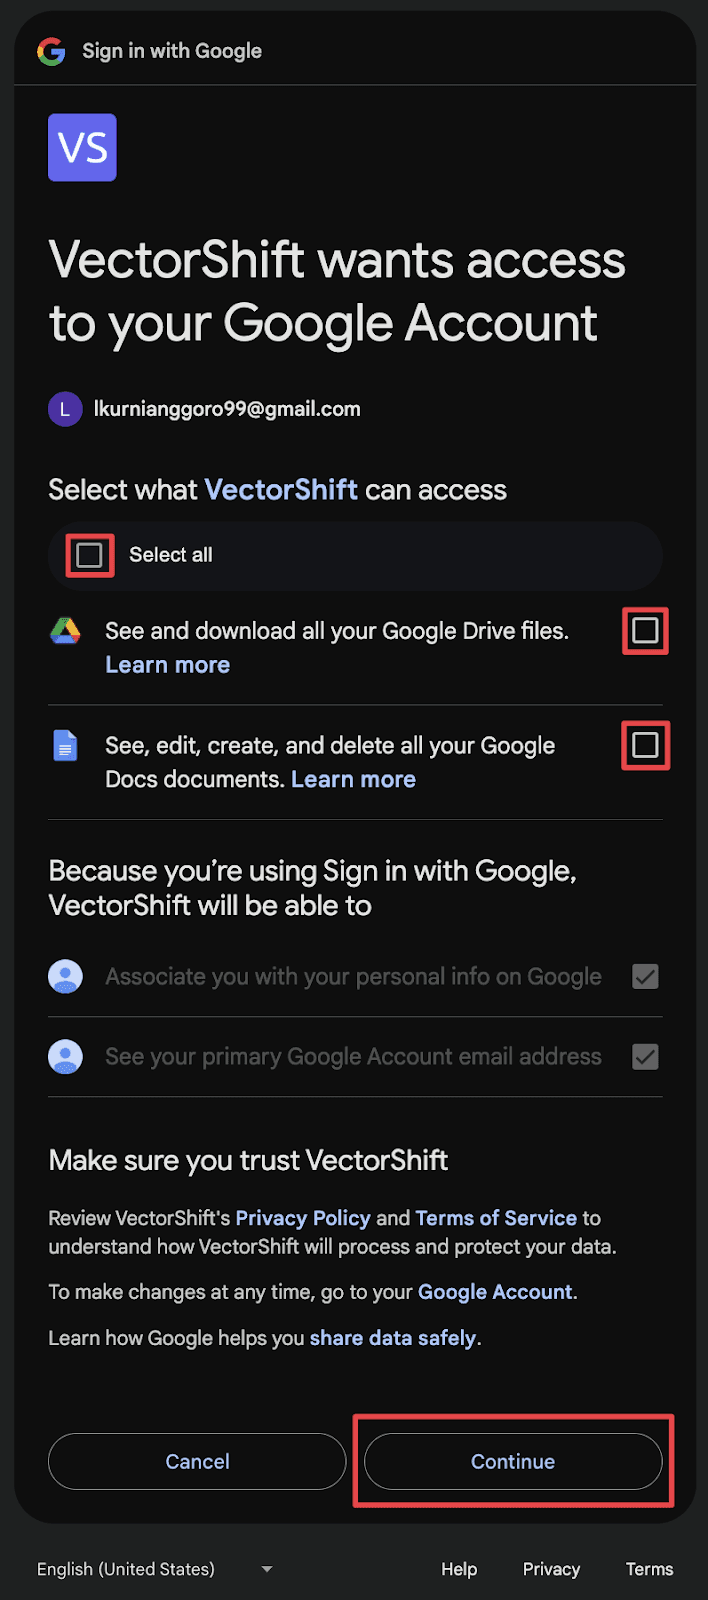
Step 5: You will be asked to grant permission. Click “Select All” to grant permissions. Then click “Continue”.
Step 6: You will see the complete directory of your Google Drive. Select folders and/or drill down to individual files for VectorShift to sync with. To find a document within a folder, click “View Folder”.

Step 7: When you find the file you’re looking for, click on the checkbox next to the file name, then click on “Confirm Selection”.
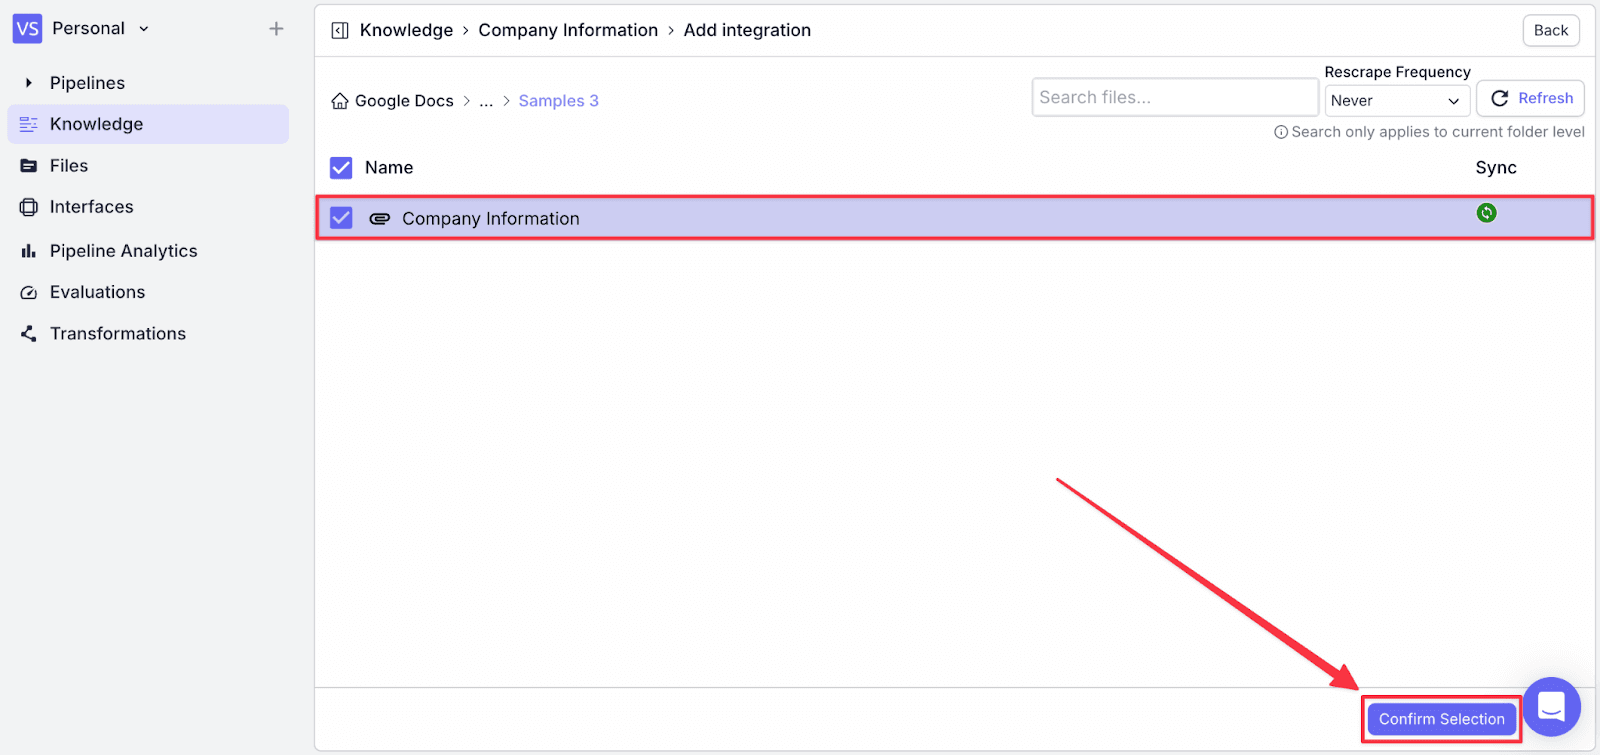
You will see the document has been added to the knowledge base.

Customer Service Representative Knowledge Base
The last knowledge base we need to create is the “Customer Service” knowledge base. Here, we will place job specific information about being a customer support rep. We will sync with Notion to fetch relevant data.
Step 1: Create a new knowledge base
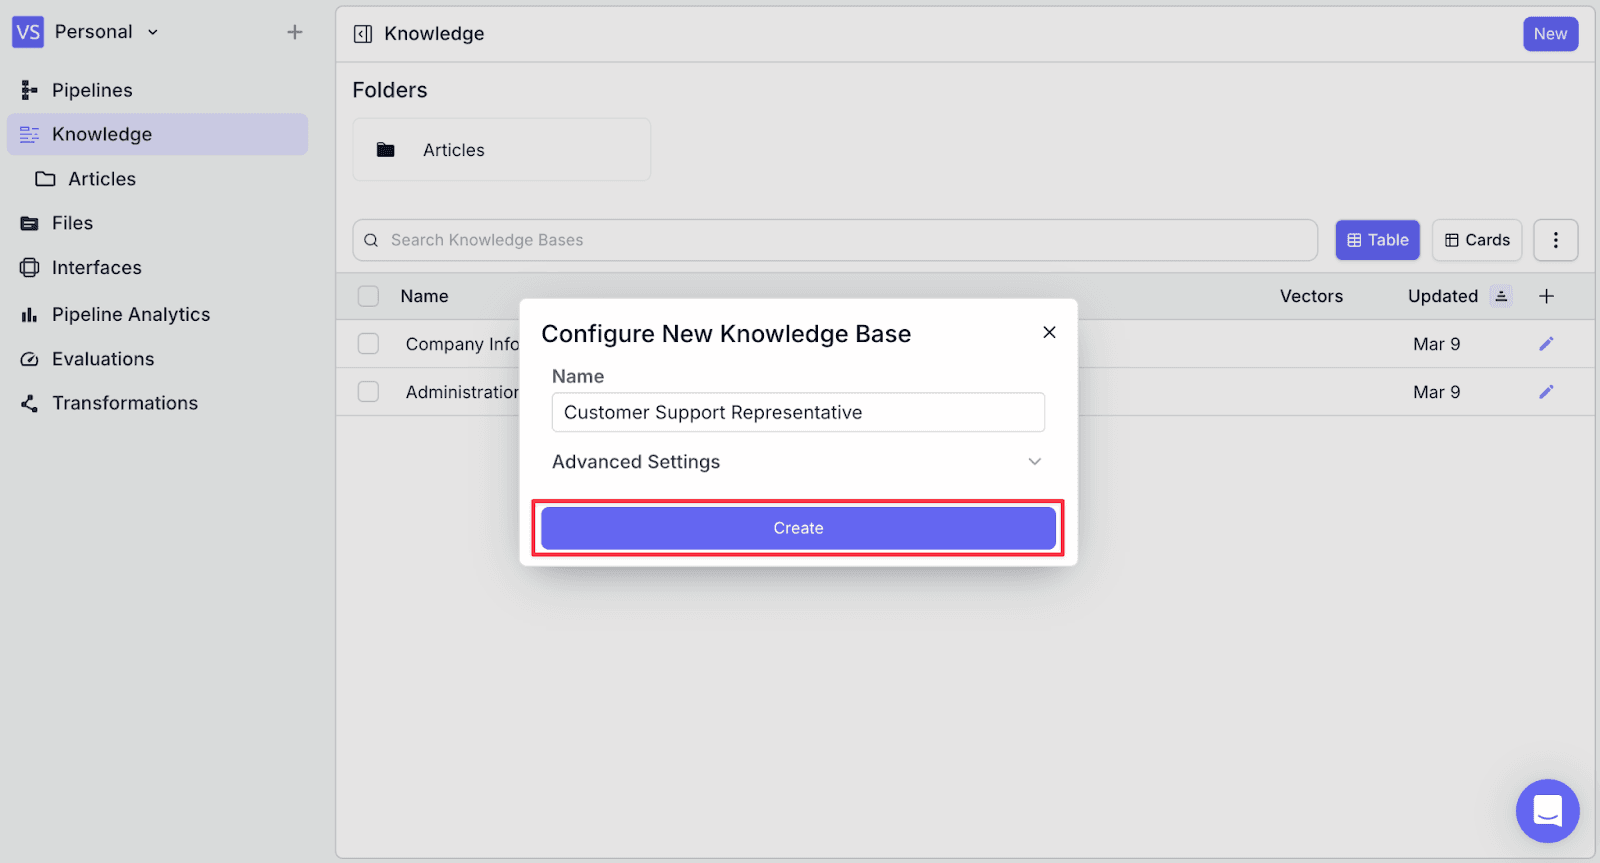
Step 2: Click on “Add Document” on the top-right, and then click on “Choose/Add Integration”

Step 3: Click on “Connect New App” to add an integration with “Notion”.

Step 4: Click on “Connect” in the Notion option.

Step 5: Notion will ask for permission. Click on “Select Pages” to continue, then choose any page you want to integrate with (in this case: “Customer Success Representative”). Then click “Allow Access”.

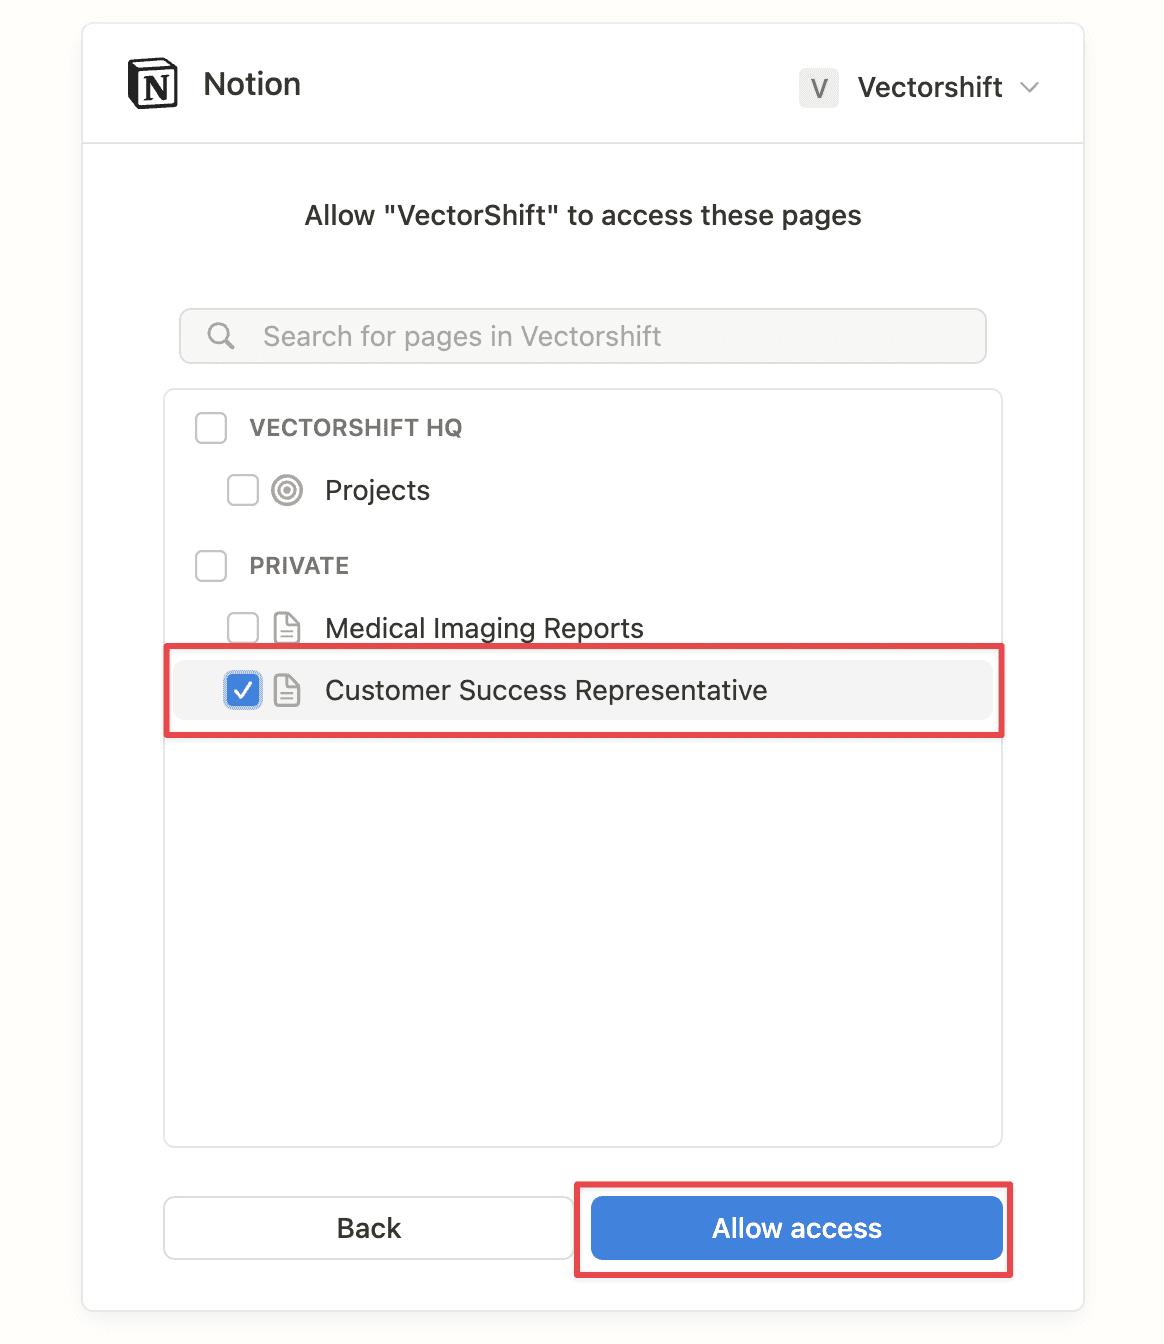
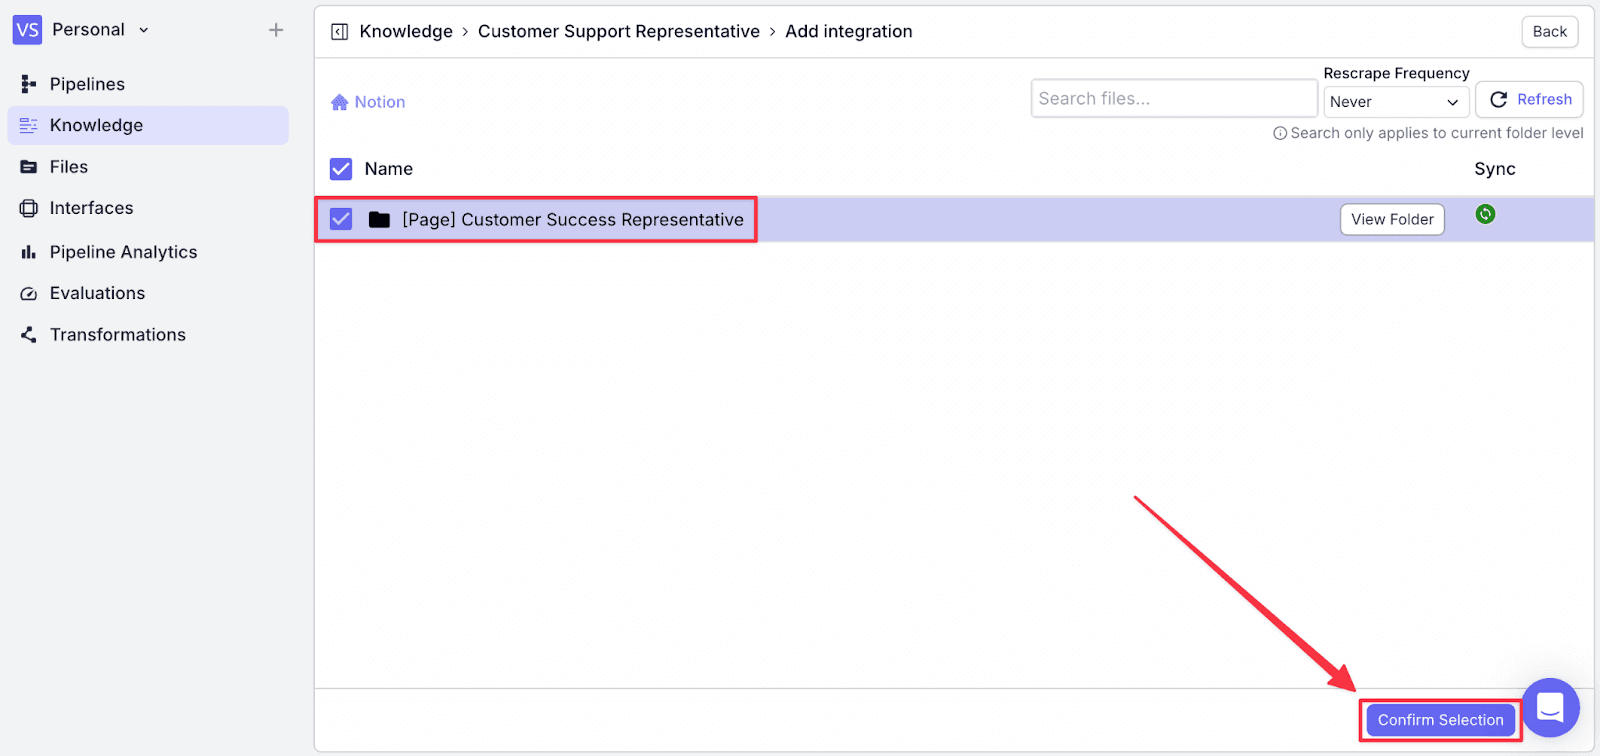
Step 6: Click the page, then click on “Confirm Selection” to finish the integration.
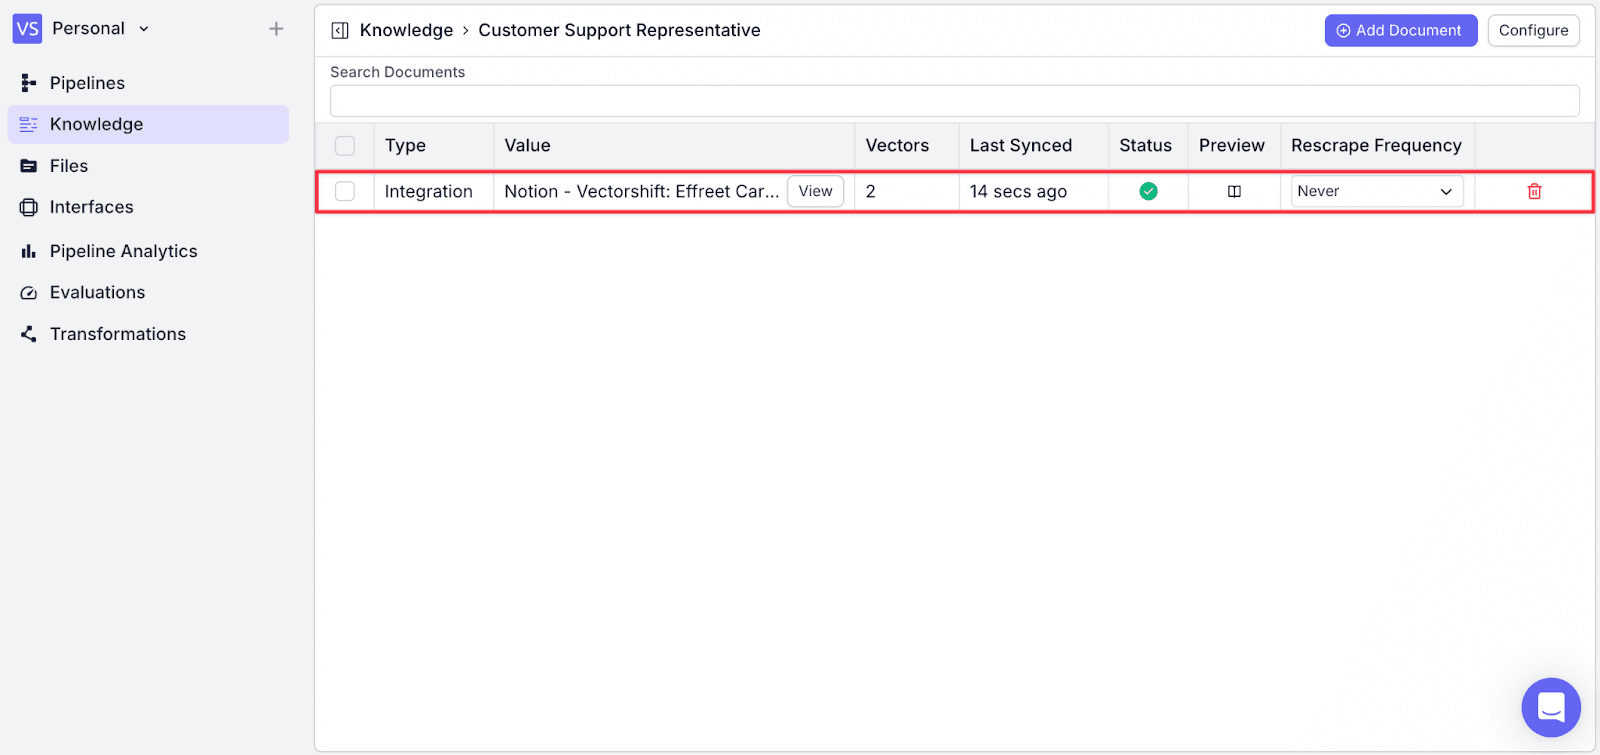
Step 7: You will see the document has been added to the “Customer Support Representative” knowledge base.
You should now have three knowledge bases on your “Knowledge” tab.

2. Designing the Workflow
Here are the detailed components of the pipeline:
Input Node: Input node allows the pipeline to receive questions from staff.
LLM Node (Router): This LLM classifies the question into one of three groups based on the three knowledge bases (questions related to “Administration Information”, “Company Information”, and “Customer Service Representative”).
Condition Node: This node recognizes the classification from the LLM router and does the actual “routing”.
Knowledge Nodes (3): The user query will query the knowledge base, finding relevant information from the data.
Merge Node: Given the condition node created different “paths”, we need to merge the paths together.
LLM Node (Generation): This LLM will generate answers to staff’s questions based on context from the knowledge base.
Output Node: The answer will be displayed through this node.
Working with Nodes in VectorShift
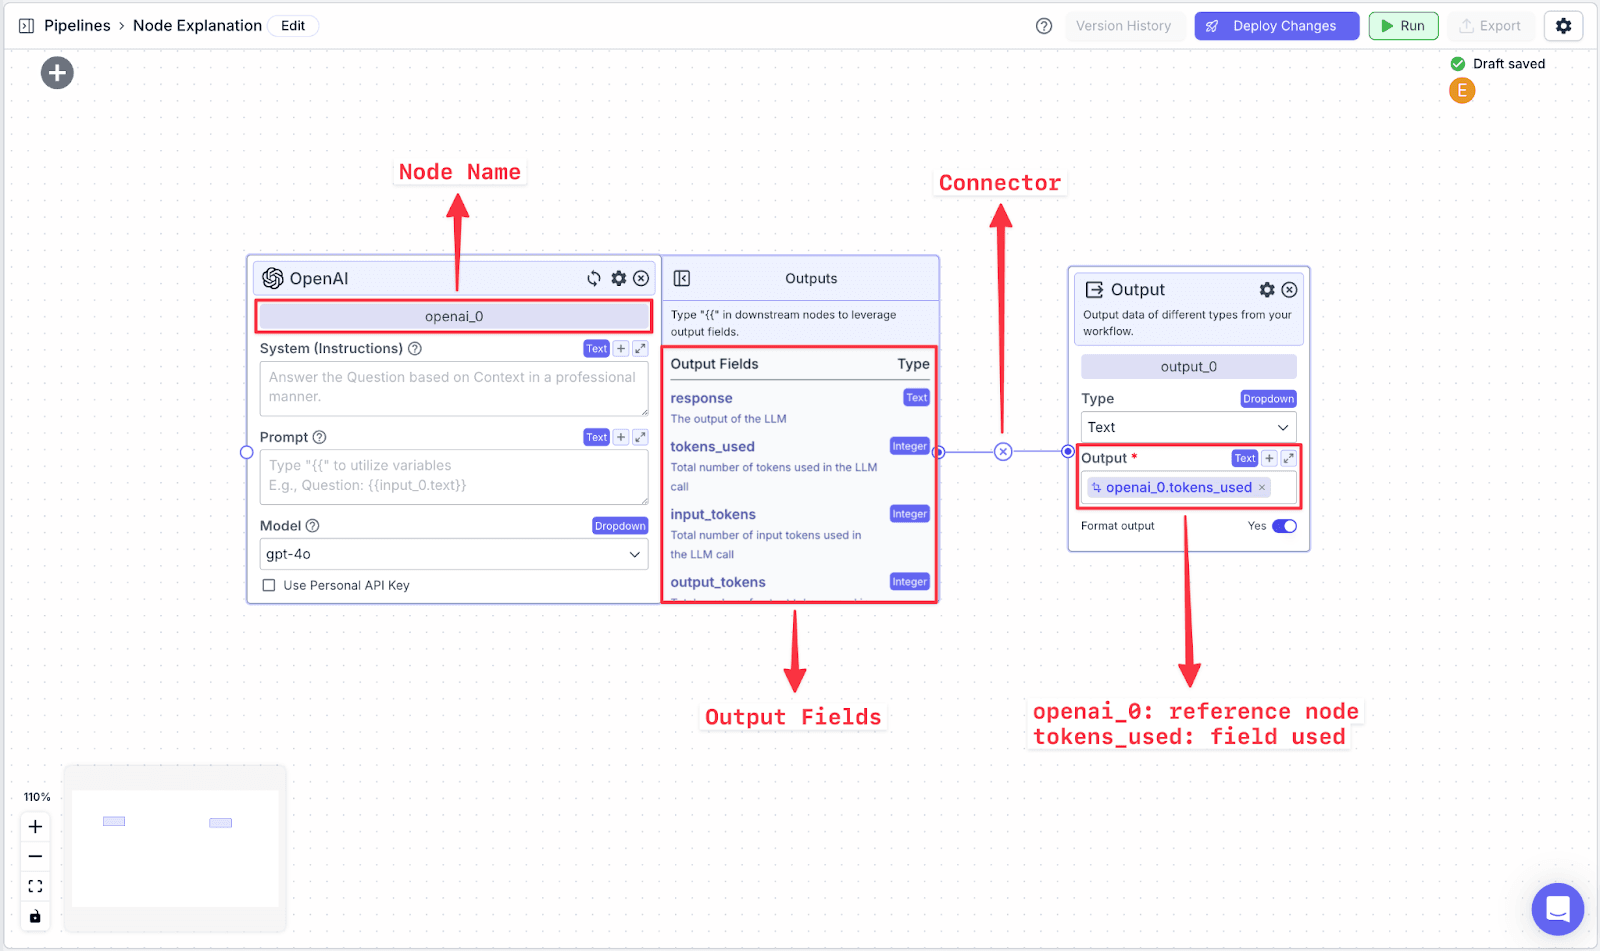
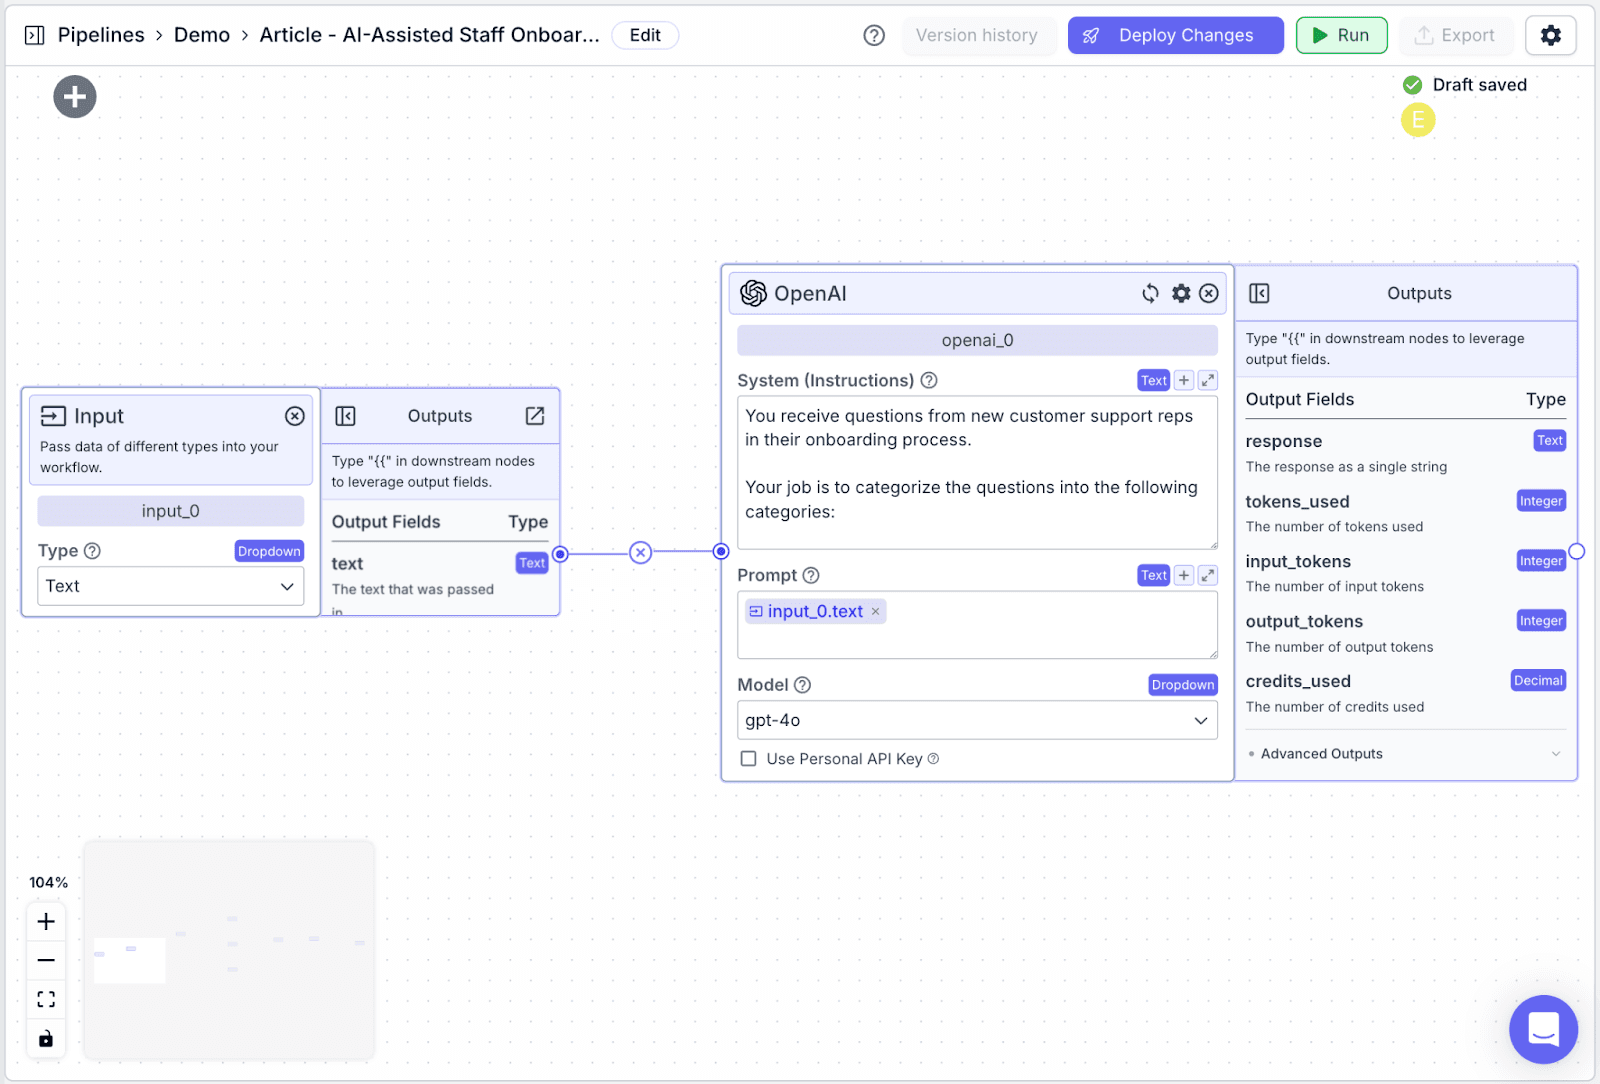
Each node in VectorShift has a name at the top of each node (e.g., openai_0) and output field(s), which are found in the right-hand pane of each node (e.g., the OpenAI LLM node has various output fields: response, tokens_used, input_tokens, output_tokens).
To reference specific data fields from other nodes, you have to do two things:
Connect the two nodes.
Reference the data from the previous field using a variable.
Variables in VectorShift all have the same structure:
You can also create variables by typing “{{“ in any text field, which opens the variable builder. To reference the text from the OpenAI node, you call the variable on the Output node:
To create a new pipeline, go to the “Pipeline” menu, and click “New” on the top-right.
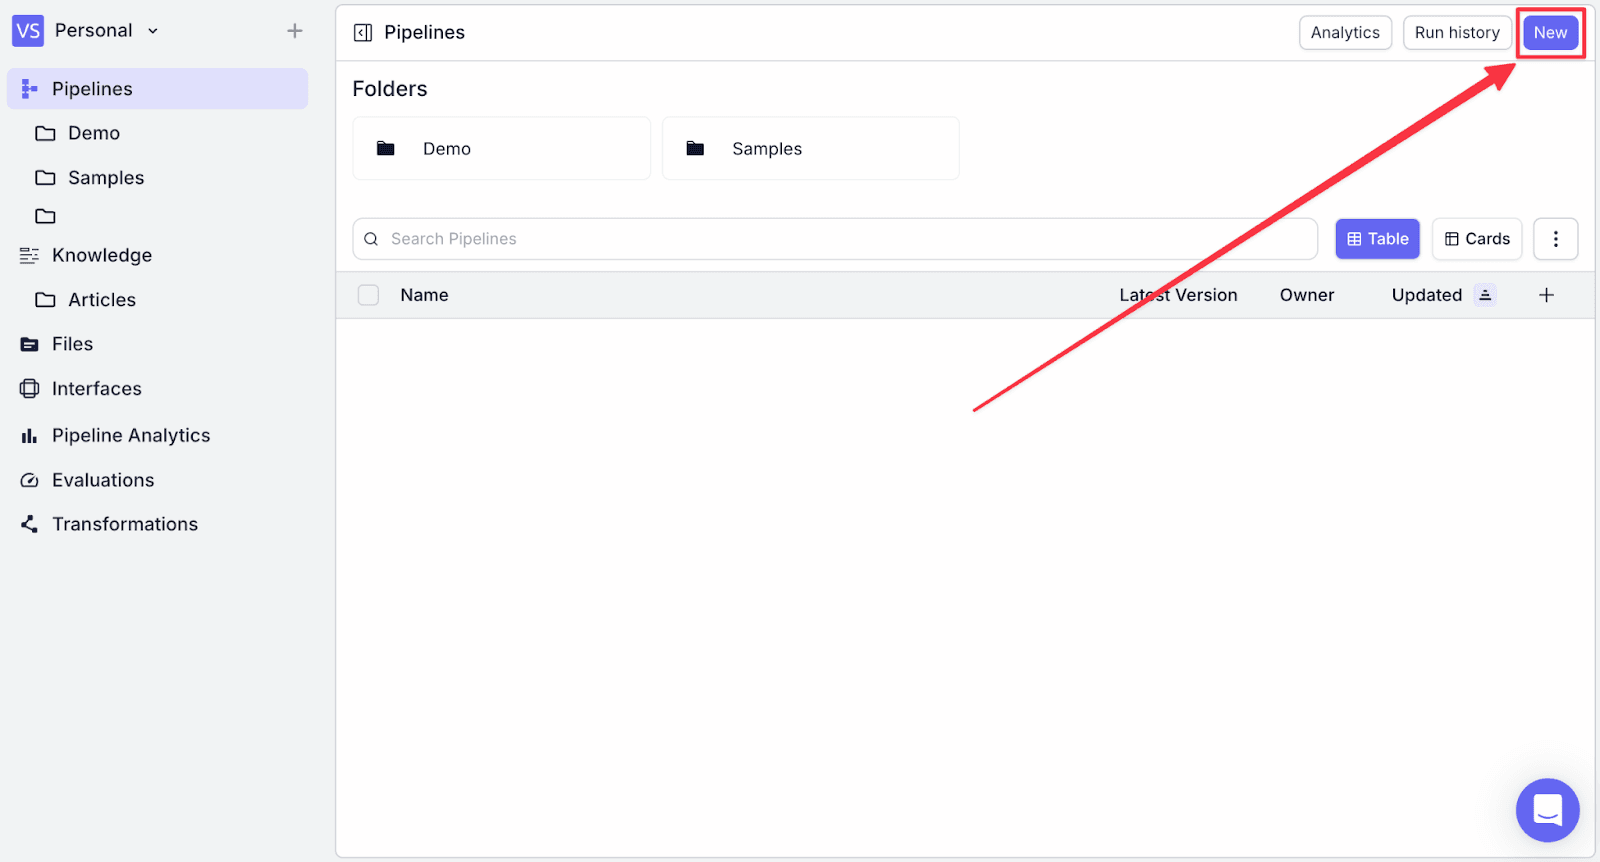
Click on the “Create Pipeline” tile. We will create a pipeline from scratch.

Input
In the pipeline editor, we will see some options. For the first step, click on the “Input Node”.

LLM (Router)
We will use an LLM to route the staff’s question based on the context of the question.
Step 1: Take an “LLM node” and connect the input node to it

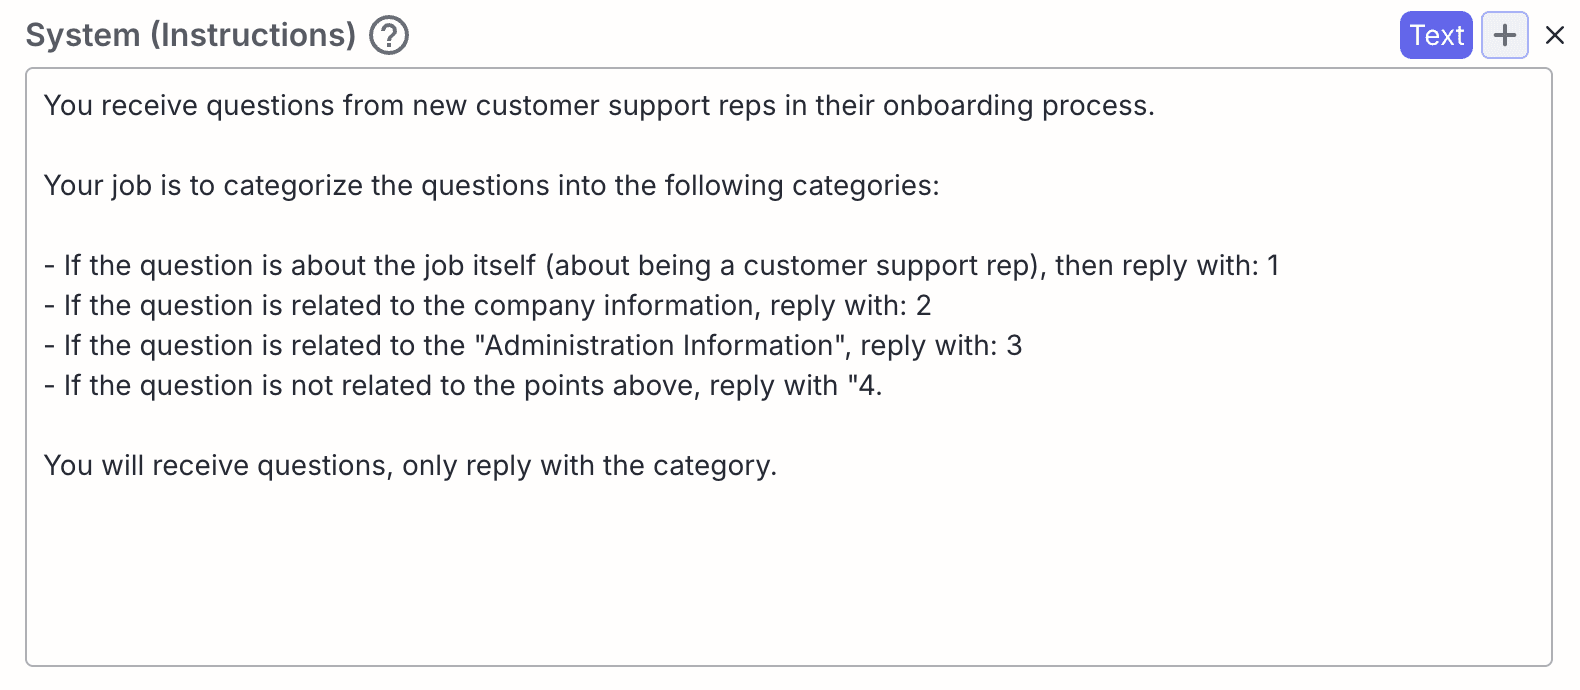
Step 2: “System (Instructions)” defines how our LLM should behave. You can use the template below:

Step 3: Within the “Prompt”, you can pass data from the Input node by typing “{{“. When you type “{{, you will be shown all the available nodes. Here, click “input_0”.

Step 4: Next, you need to choose which specific output field from the input node. We choose “text” here (the user question).

The pipeline so far:
Conditional Node
We'll now use a condition node to route the user question to different knowledge bases based on the classification from the router LLM.
Step 1: Drag a “Condition Node”, then connect it with LLM.
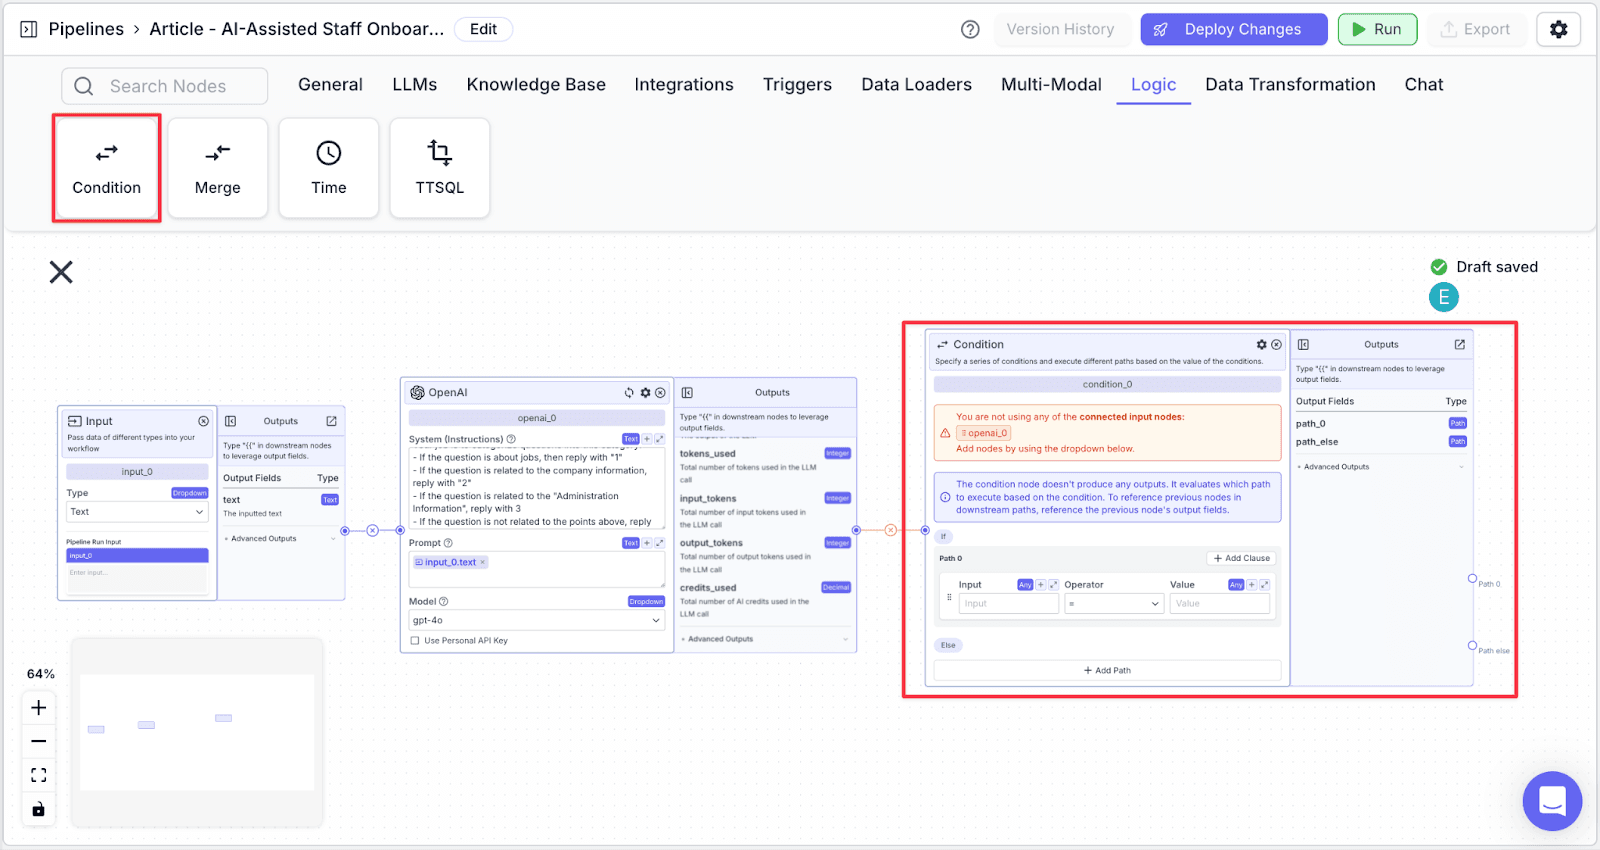
Step 2: In the “Input” part of “Path 0”, type {{openai_0.response}} with “Operator” equal to and “Value” of “1”. This means if the staff asks questions related to the customer service job, then it will be routed to “Path 0”.
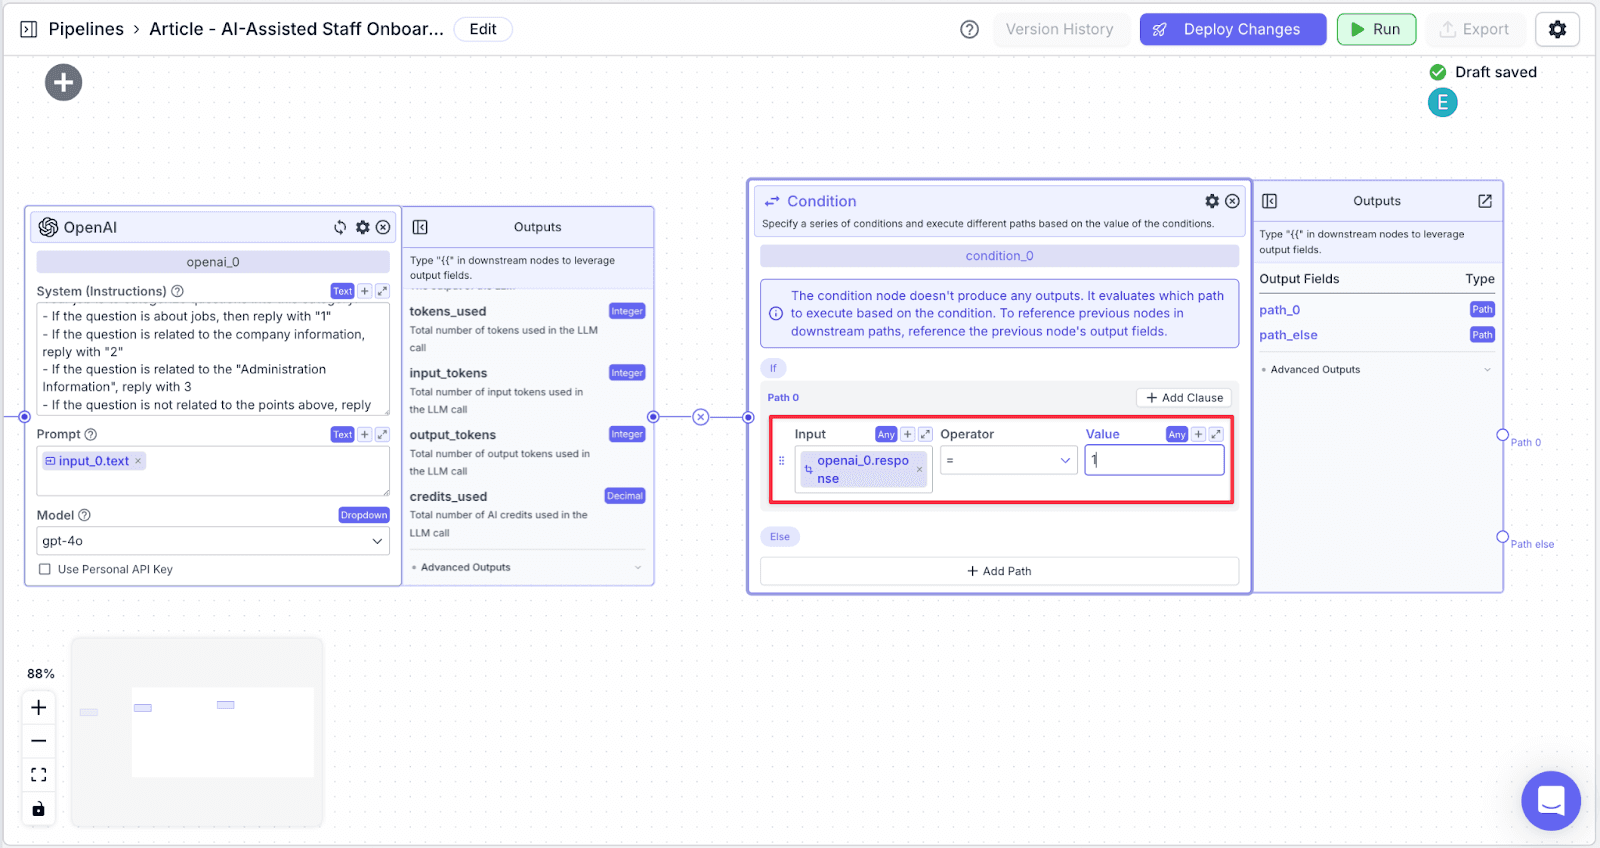
Step 3: Now click on “+ Add Path” to add another option to the “Condition” route. Repeat steps 1 and 2 to create a new route with values “2” and “3”.

The final result is you will have a condition node with a total of 4 paths (path 0, path 1, path 2, and path else). Path else is a “catch all” for all other situations.

Knowledge Base
Now, we need to connect the respective knowledge bases to the different paths generated by the condition node.
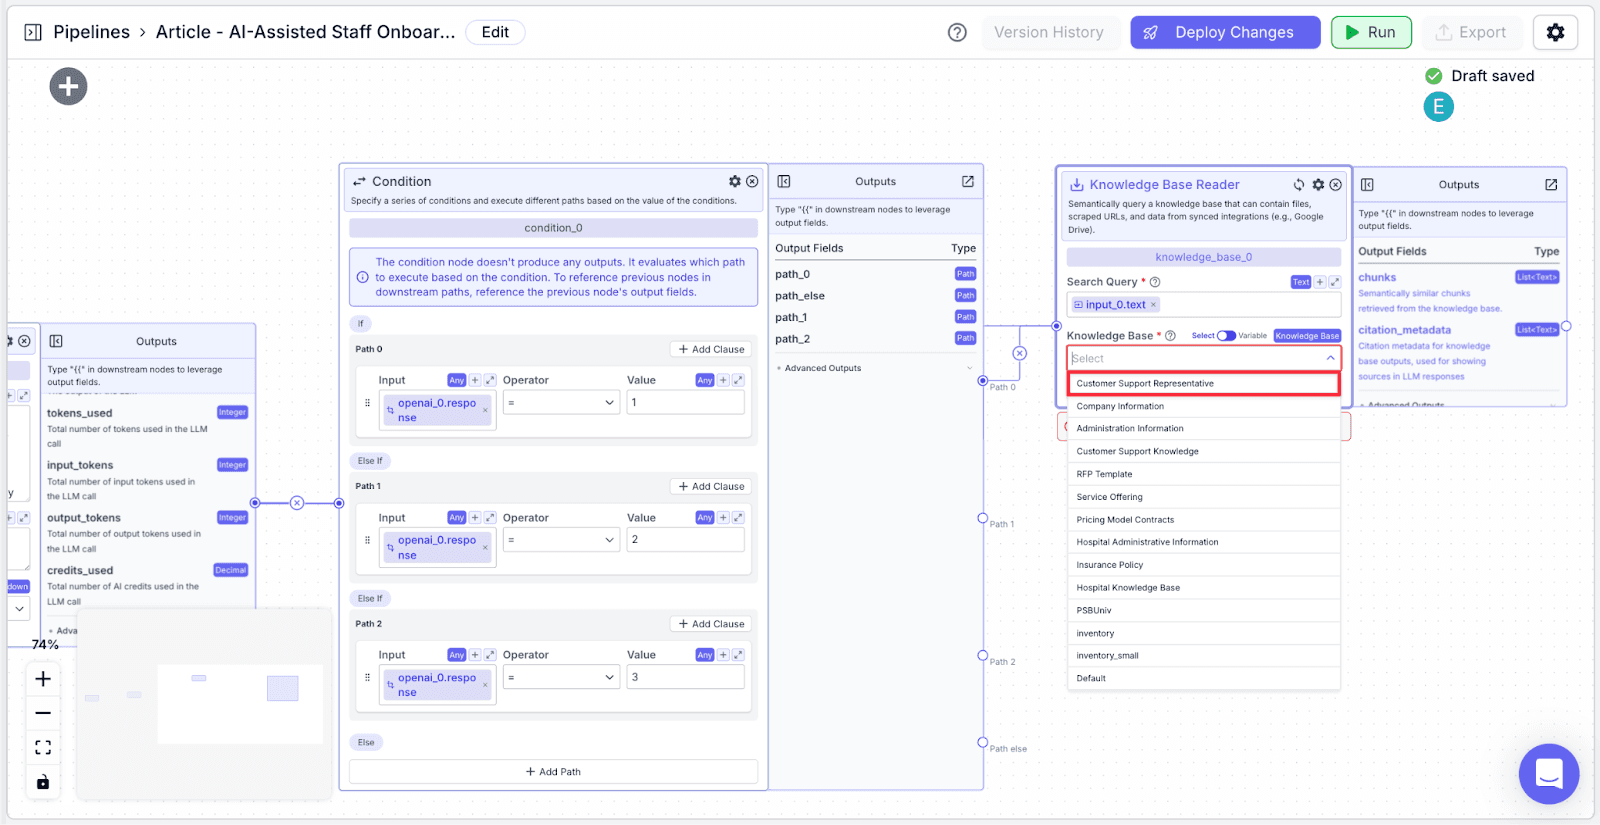
Step 1: Connect the “Path 0” output edge on the “Condition Node” to the first “Knowledge Base Reader” node.

Step 2: Go to “Search Query” field on the knowledge base node, then type “{{input_0.text}}”. This is because when the question is one related to the job (when it is classified as “1”), we want to use the user question to query the customer support representative knowledge base to find relevant information.

Step 3: Click the “Knowledge Base” dropdown and select “Customer Support Representative”.
Step 4: Add another knowledge base, but this time select “Company Information” as the knowledge base. Connect “Path 1” to this knowledge base. In the search query field, type “{{input_0.text}}”
This is because when the question is related to the company information (when it is classified as “2”), we want to use the user question to query the Company Information knowledge base to find relevant information.

Step 5:
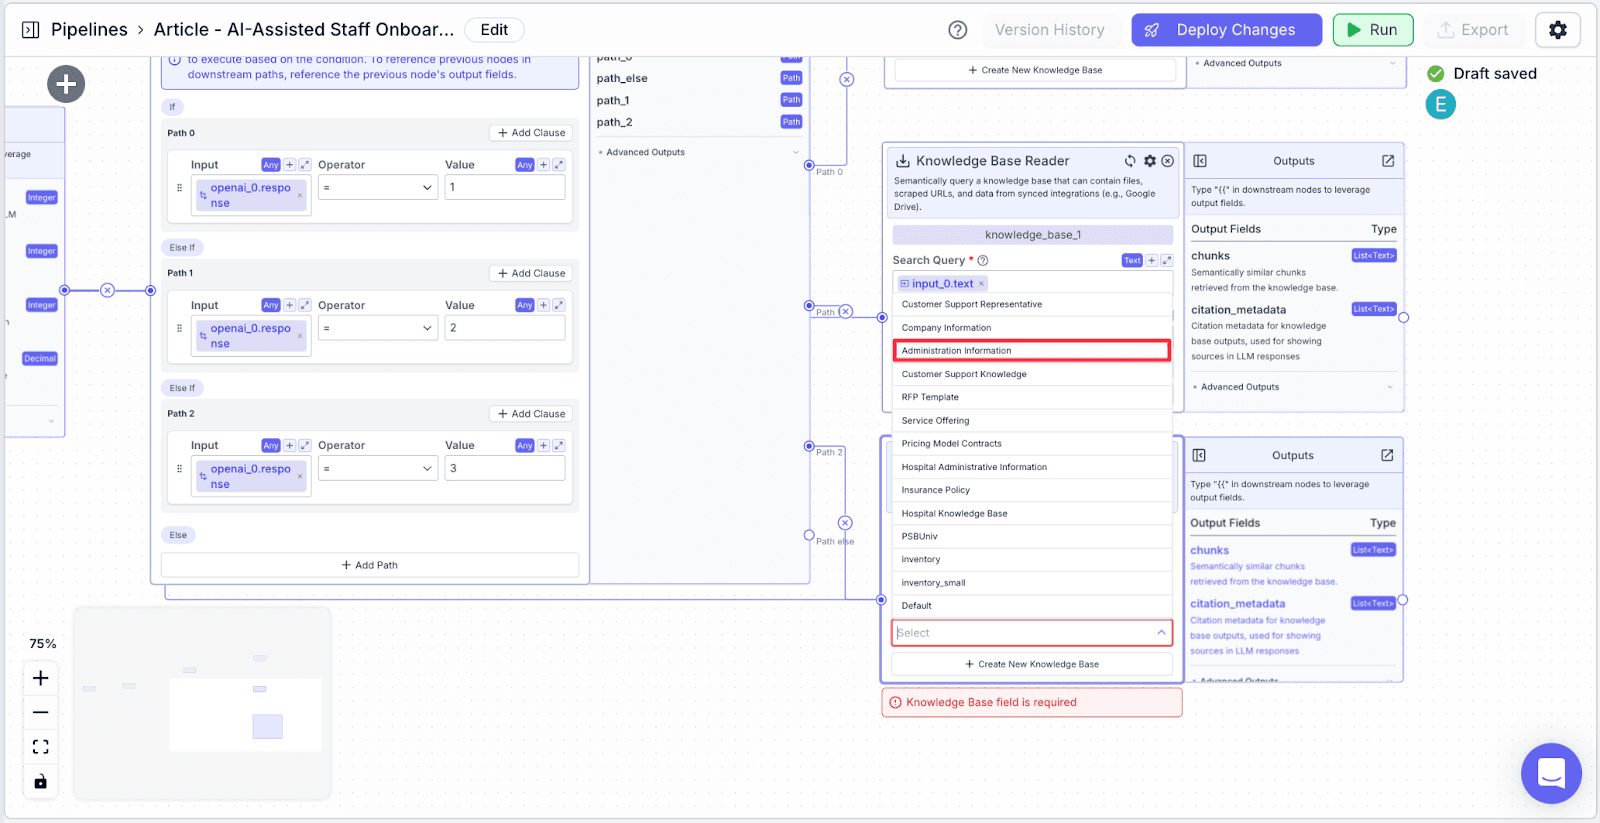
Add another knowledge base, but this time select “Administrative information” as the knowledge base. Connect “Path 2” to this knowledge base. In the search query field, type “{{input_0.text}}”
This is because when the question is related to the administrative information (when it is classified as “3”), we want to use the user question to query the Administrative information knowledge base to find relevant information.
You should have three knowledge bases in total right now.

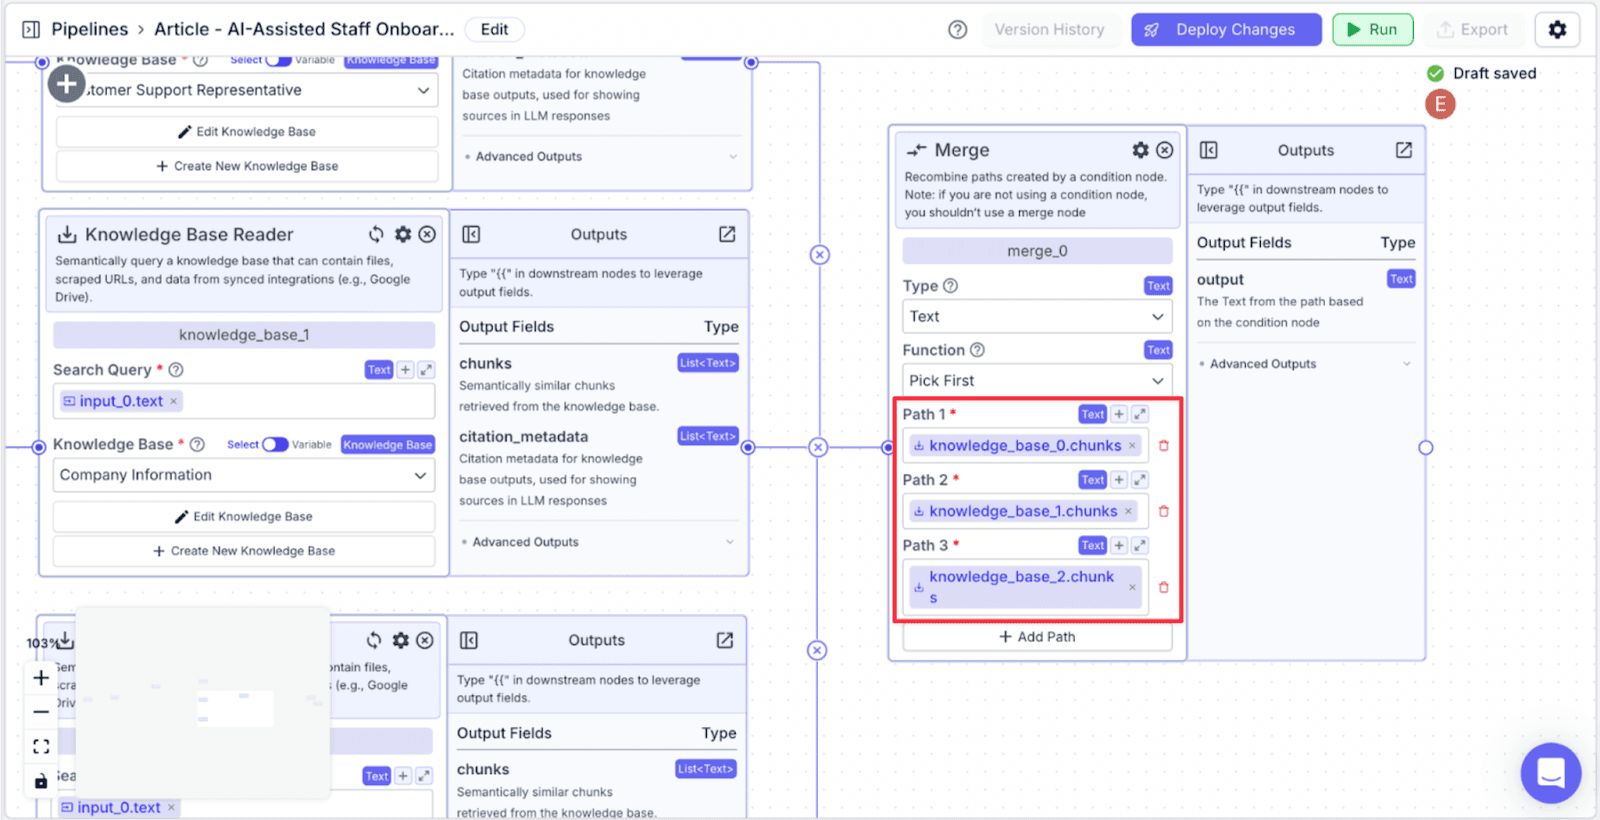
Merge Node
The “Merge node” is used to recombine the paths created by the condition node. “Merge node” is only used when you use the “Condition node”.
Step 1: Take the “Merge” node from the “Logic” menu.
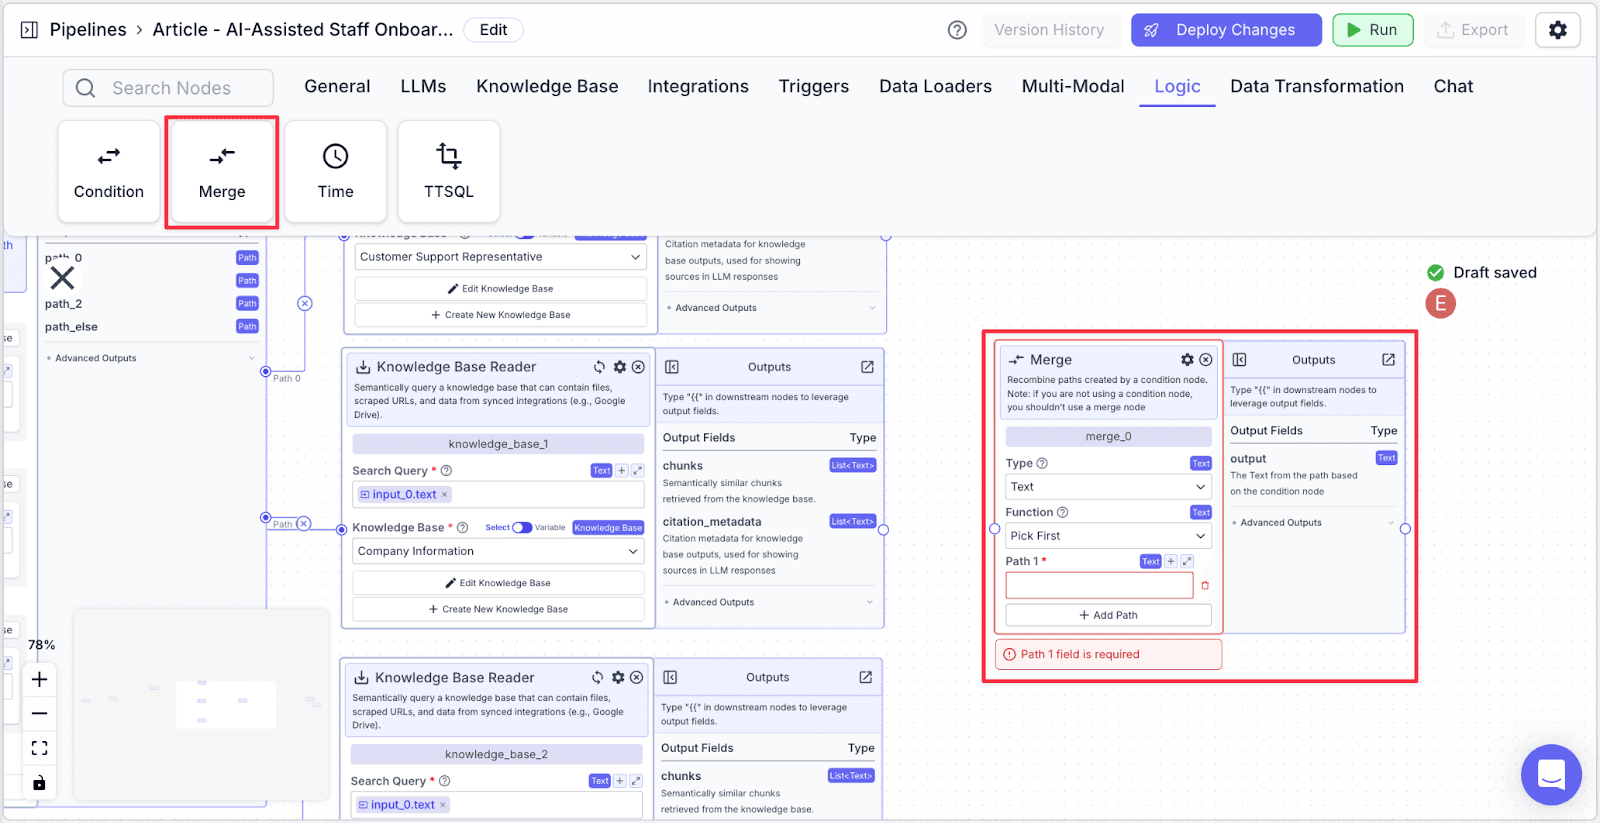
Step 2: Connect all of the knowledge bases to the “Merge” node. Click on “+ Add Path” to create additional paths.
No matter which path is taken, the paths will be “recombined”. For example, if “path 0”, “path 1”, and “path 2” are all connected to a merge node and “path 1” is chosen and the data in “path 1” is “xyz”, the output of the merge node will be “xyz” even though “path 0” and “path 2” are skipped.

Step 3: For each path, refer to a different knowledge base.
Path 1
Path 2
Path 3
This is how the pipeline should look so far:

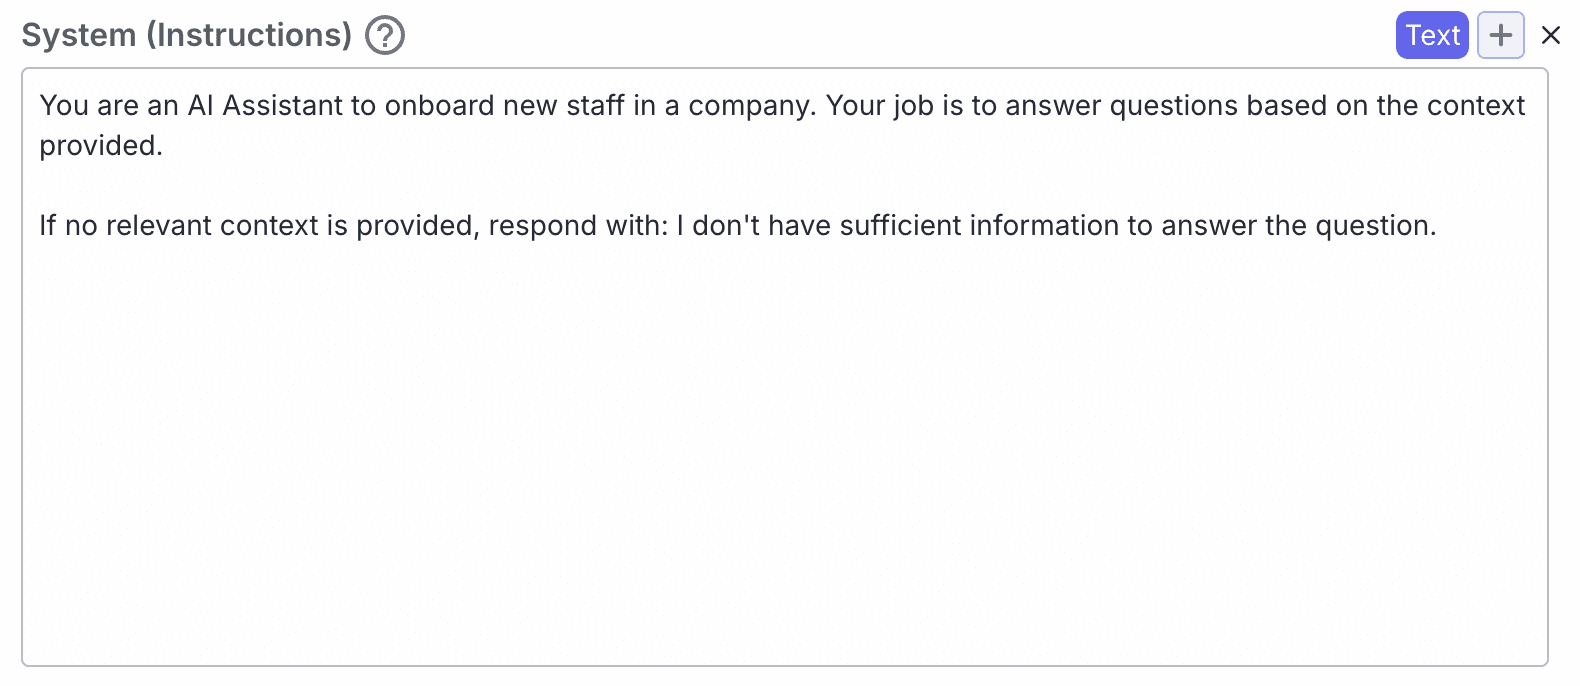
LLM (Response Generation)
Now we need to add another LLM node to generate the response based on the knowledge base context. This LLM will take the staff's questions and the relevant information from the knowledge bases to generate a comprehensive and helpful response.
Drag an LLM node and connect it to the “Merge Node” and “Input Node”

Use the prompt below for “System (Instructions)”:

Use the prompt below for “Prompt”:


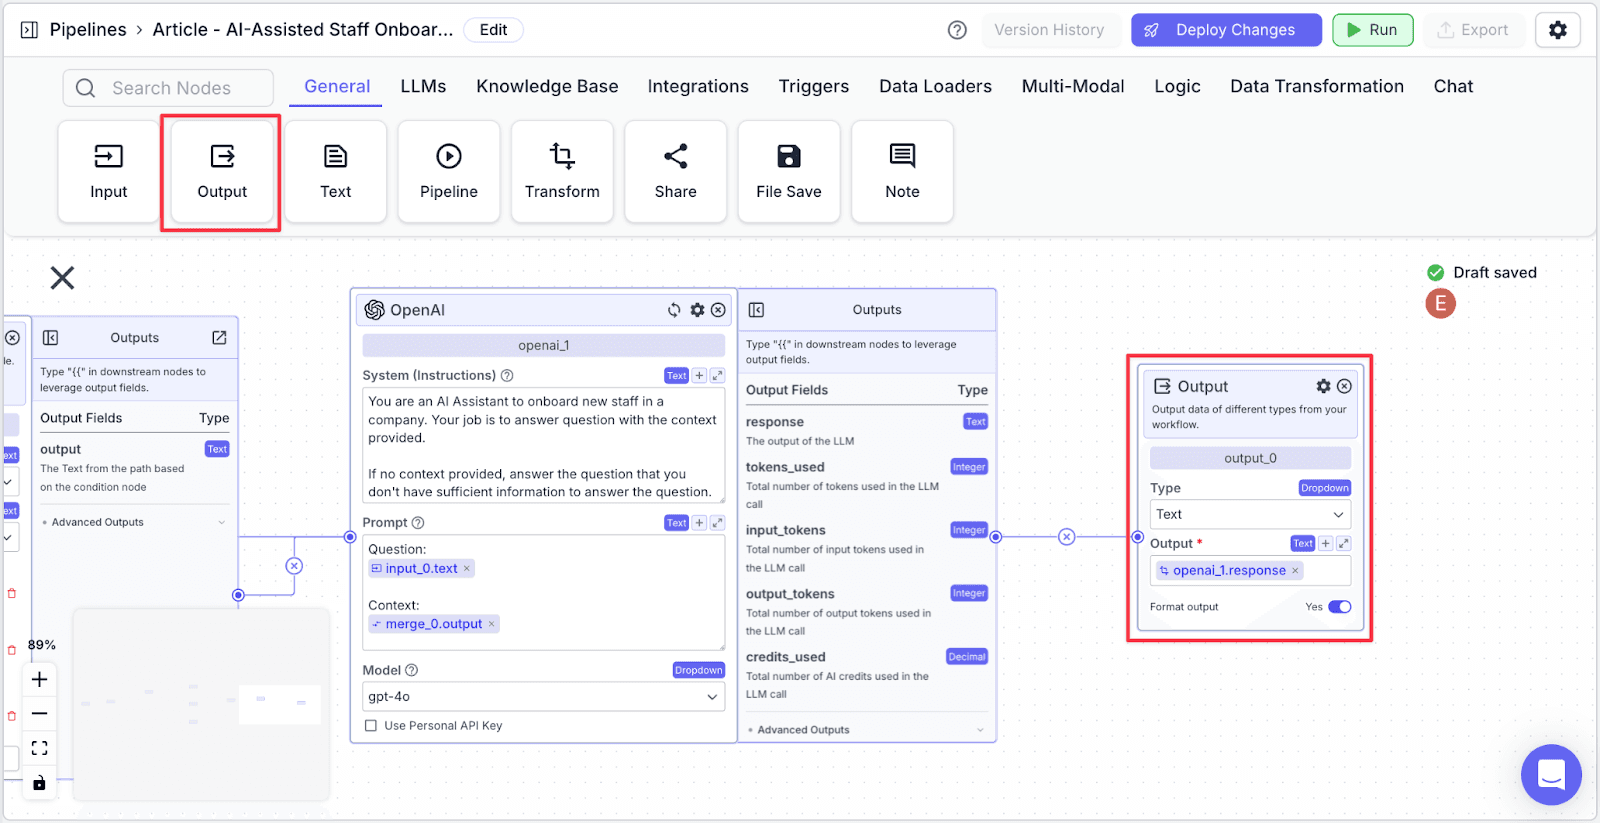
Output Node
Lastly, we need to connect the LLM to the “Output Node”. Take the “Output Node” and connect it with the “LLM Node”.
Running the Pipeline
Click “Run” on the top-right of the window. You will be shown the “Run Pipeline” pane on the right part of the screen.
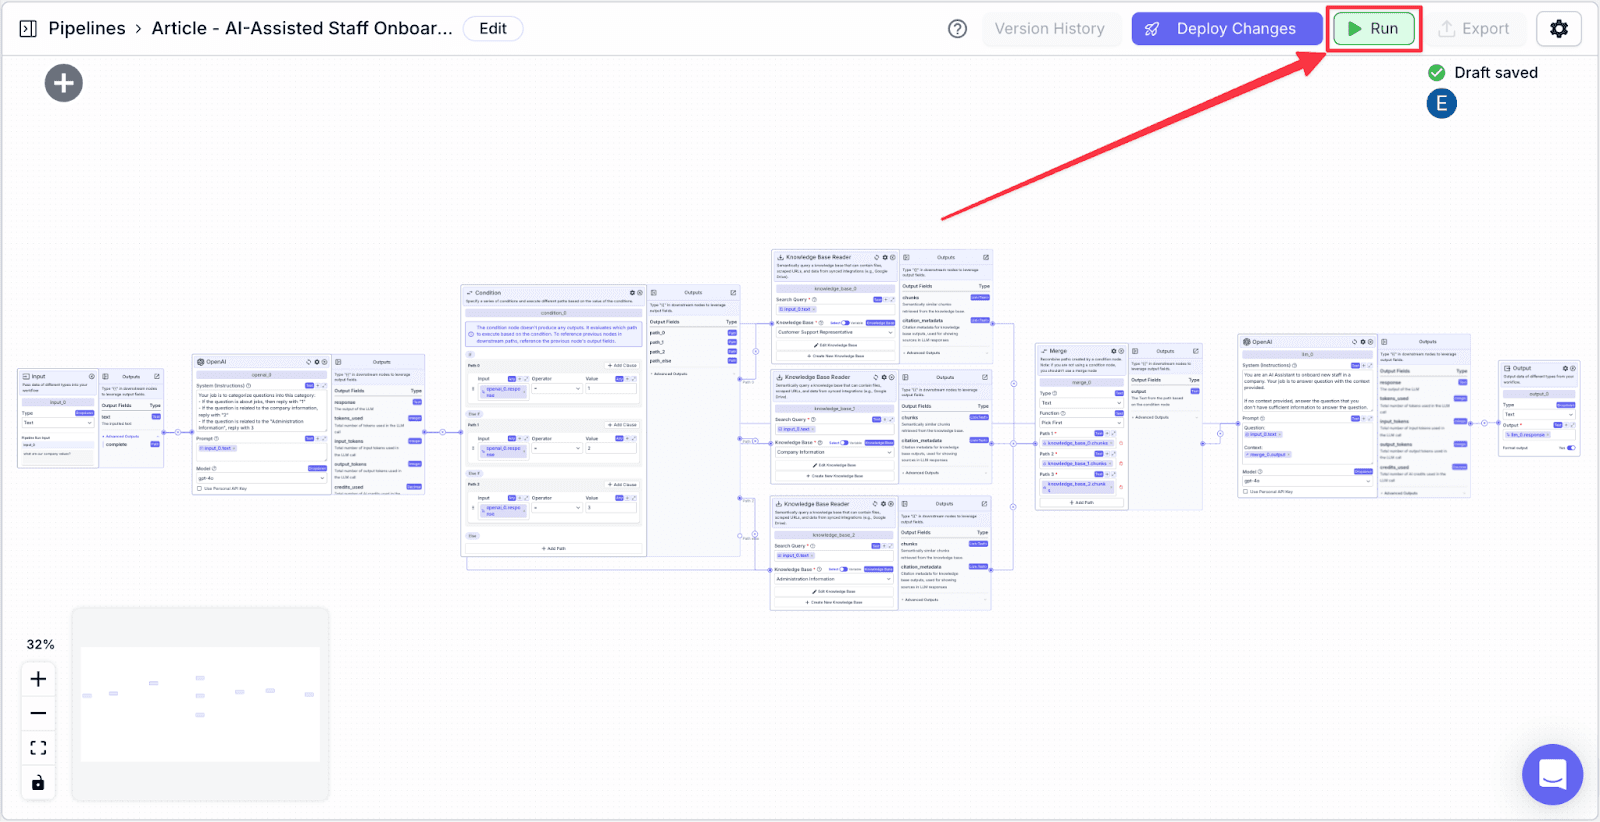
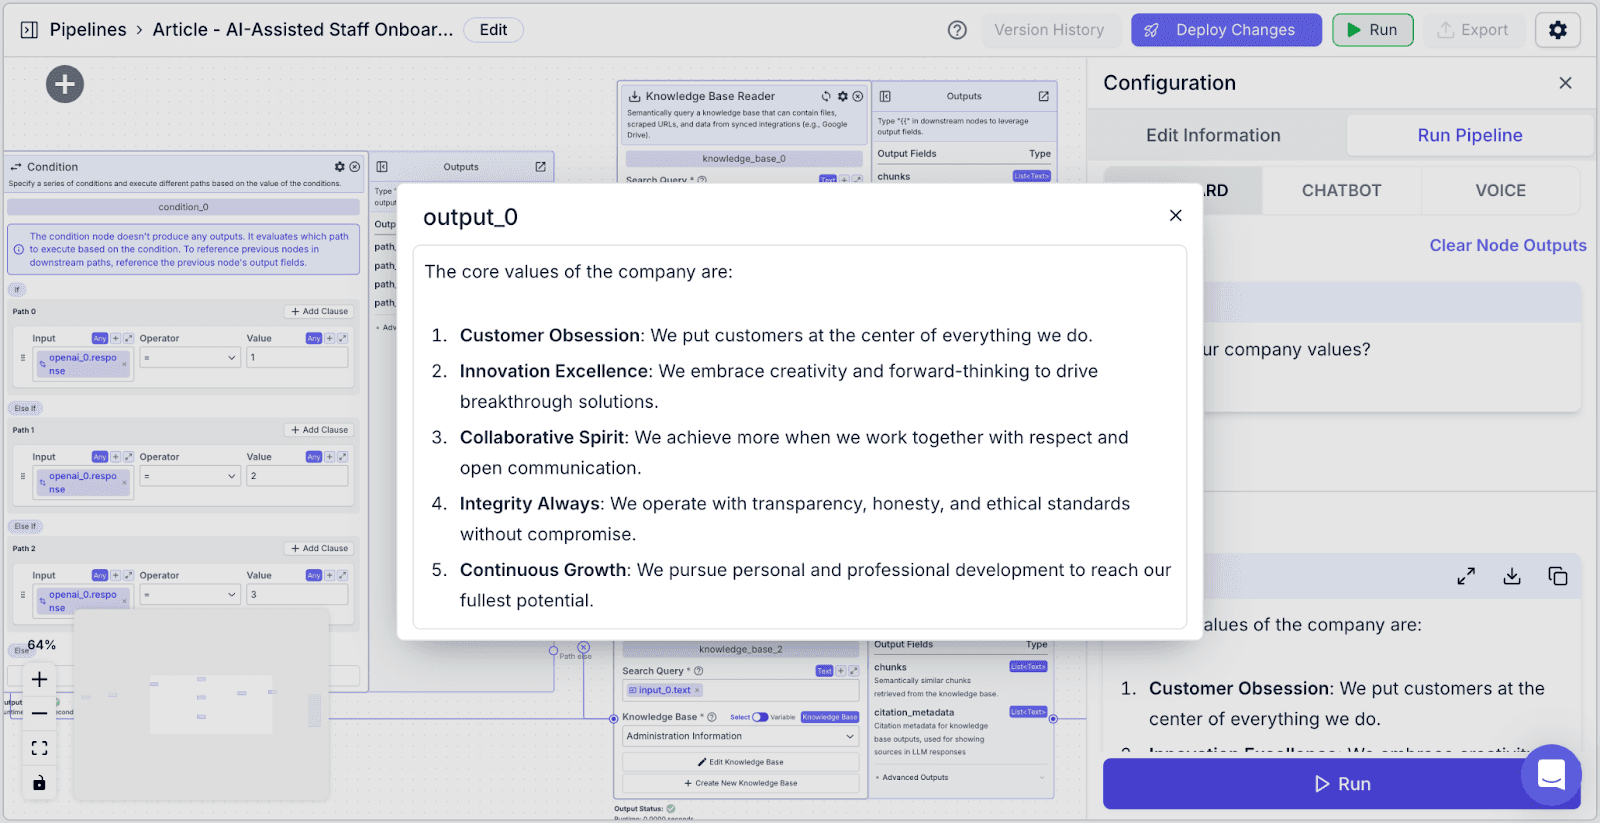
Ask a question in the “input_0” box, then click the “Run” button at the bottom.

You can see the detailed answer in the “Outputs” section.
Deploying Pipeline
The last thing you need to do is to deploy the pipeline. This allows you to track your pipeline versioning in case you want to revert to the previous version. Click “Deploy Changes” to continue.
Click on the “Deploy” button to apply the changes.

3. Exporting the Pipeline
We need to deploy our pipeline in Slack to be able to chat through Slack’s interface.
Export Pipeline
Step 1: Click on the “Export” on the top right.

Step 2: You will see some options to export your pipeline. For this article, click on “Chatbot”.

Step 3: Give a name to the chatbot then click “Create Chatbot”.

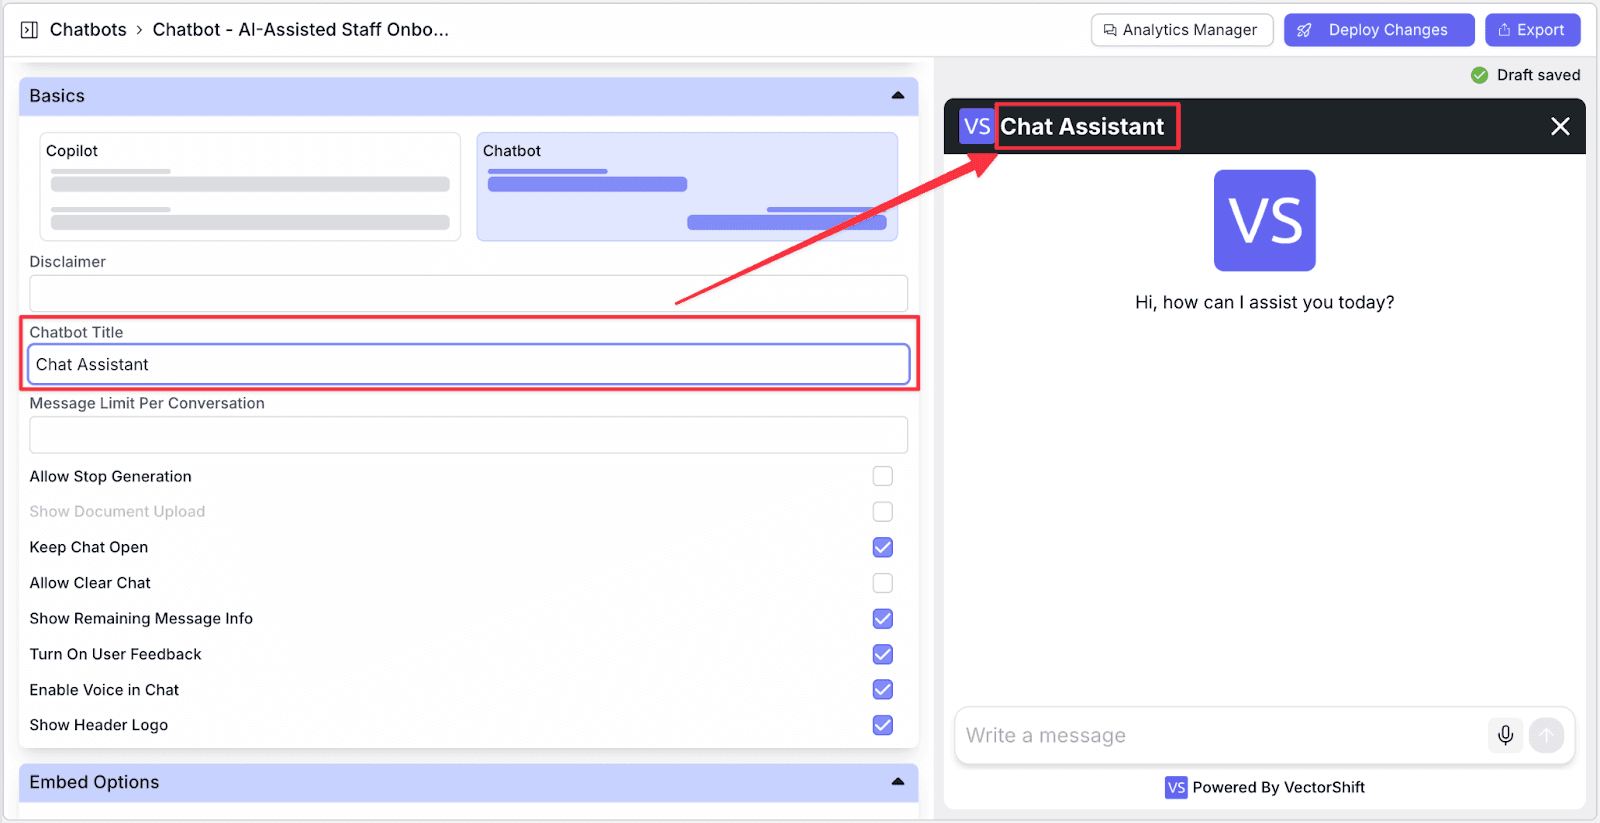
Step 4: Make any necessary configurations in the left pane. For example, if you want to change the Title, type whatever title you want in the “Chatbot Title” field. You will see the changes immediately.
Step 5: After finishing making changes, click on “Deploy Changes” to deploy the latest update. After that, click “Deploy”.

Integrate with Slack
After deploying the changes, click “Export” to continue to the next step.

Go to “Connect to Slack”, then click on “Connect Account”.

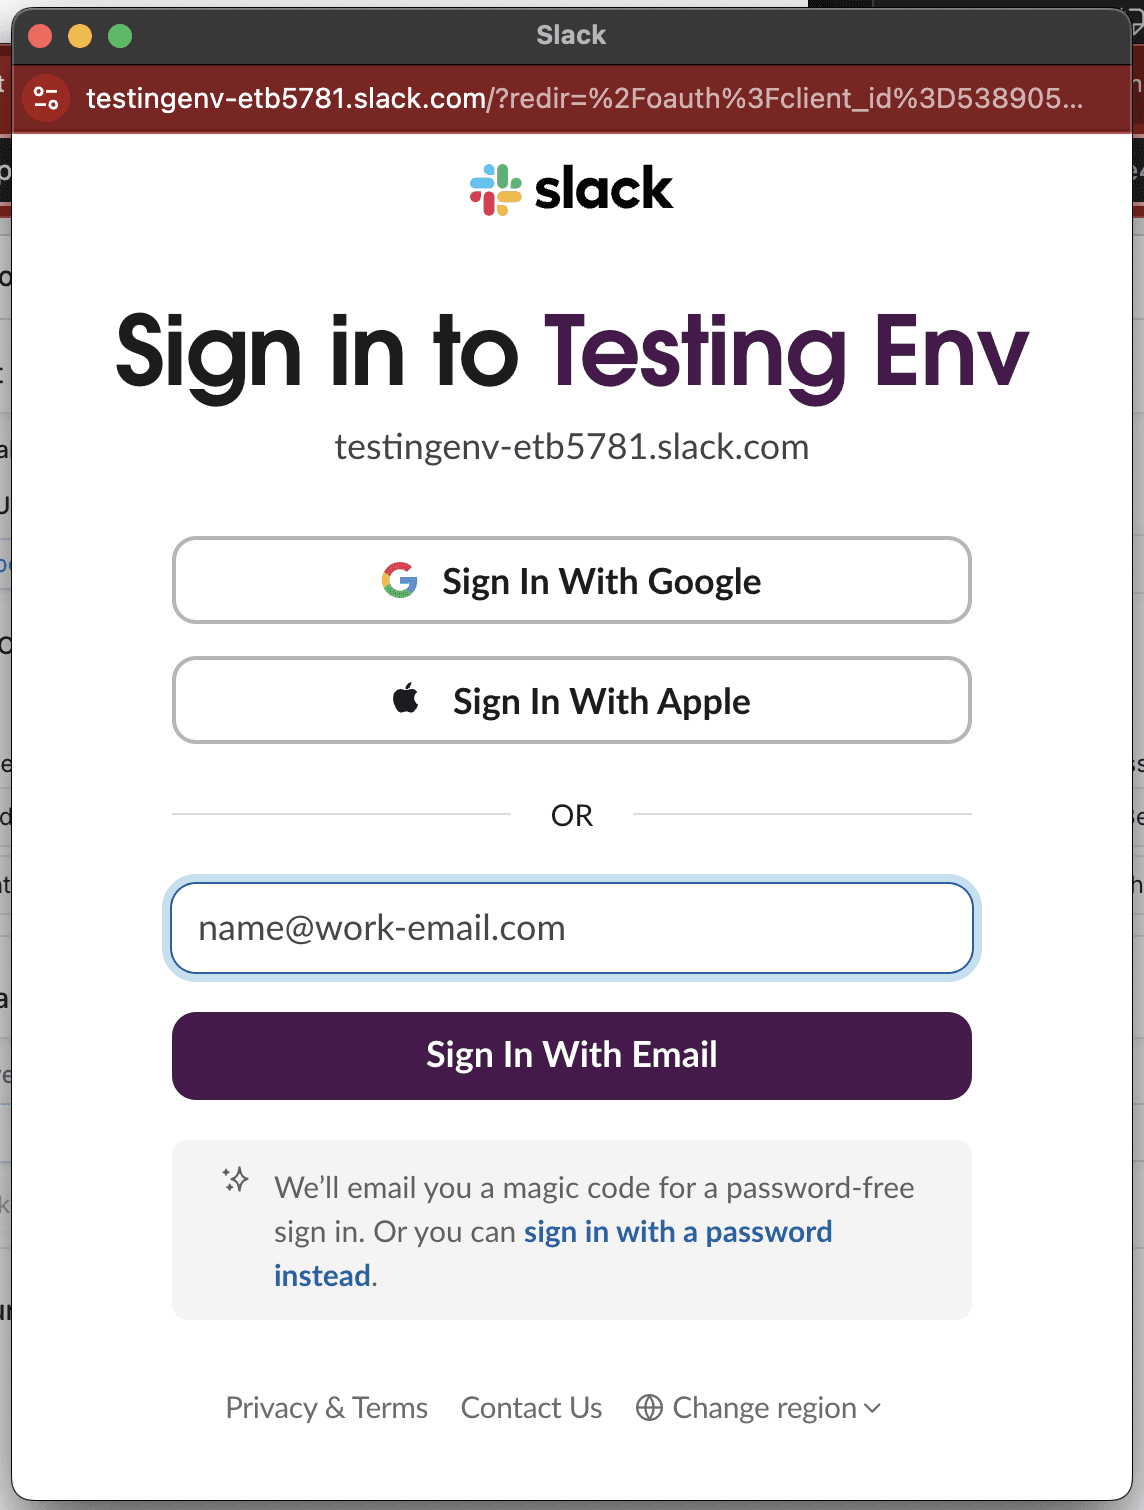
Sign in to your workspace and account, then when Slack asks for permission, click “Allow”.


Next, click on the “Deploy to Slack” button to deploy the chatbot.

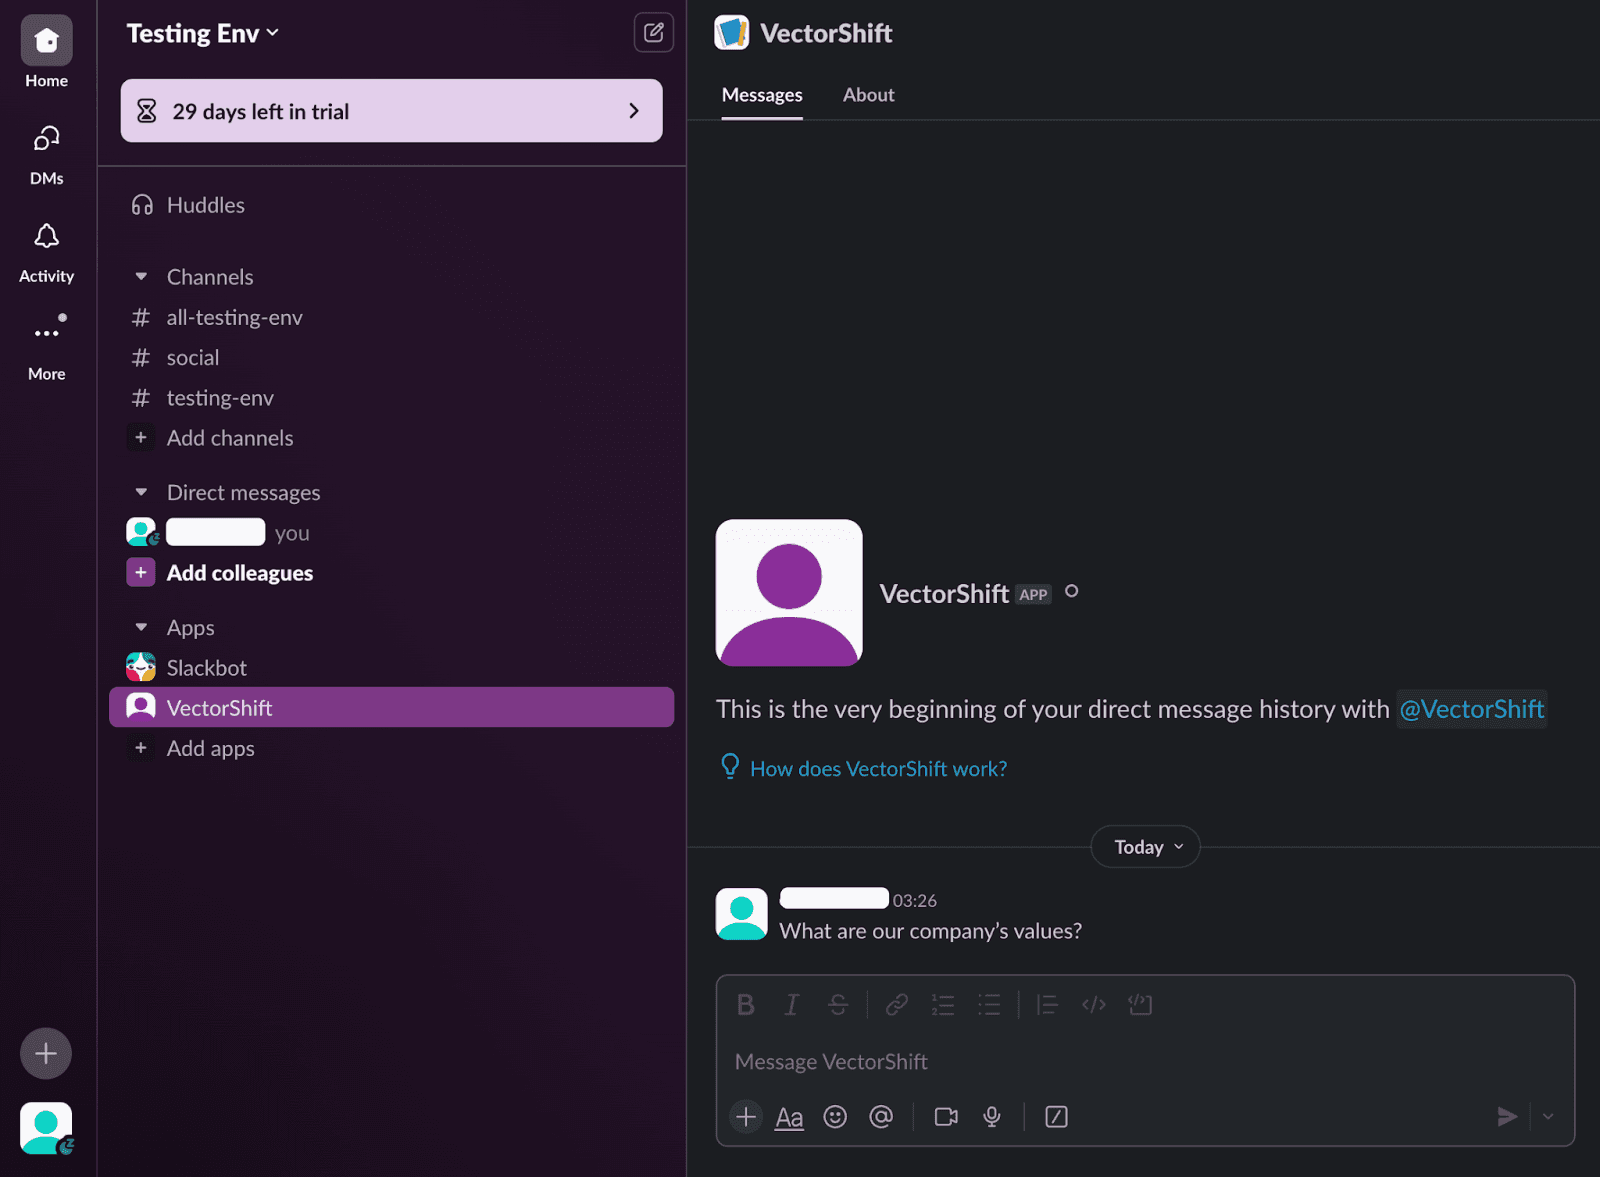
You will see the “VectorShift” app has been added to your Slack Server.
Conclusion: A new way to upskill your staff
Now you have integrated a company specific AI assistant into Slack.
For further development, you can enhance your AI assistant by integrating additional data sources, such as Google Search, or internal documentation. You can also integrate the chatbot further with WhatsApp, Websites and more.
There’s a lot more you can automate business processes with VectorShift. Create your free account here or speak with an AI expert to start scaling your business!

Albert Mao
Co-Founder
Albert Mao is a co-founder of VectorShift, a no-code AI automation platform and holds a BA in Statistics from Harvard. Previously, he worked at McKinsey & Company, helping Fortune 500 firms with digital transformation and go-to-market strategies.