
Guides
Mar 13, 2025

Albert Mao
Co-Founder
Transform your organization with AI
Discover how VectorShift can automate workflows with our Secure AI plarform.
Today companies face significant challenges in delivering high-quality customer support consistently. This is compounded by challenges around staffing customer support centers, predicting spikes in demand, and routing queries to the right level of support. With AI, operations leaders have an opportunity to reinvent how support is delivered to improve customer satisfaction while reducing costs.
For an insurance company, VectorShift reduced the number of tickets by ~75% (majority of L1 support and some L2 cases).
In this guide, we will walk through how to build a customer support workflow automation using VectorShift and how to integrate it into your product/website.
Designing the Workflow
To enable an AI agent to respond relevantly, we need to ground the responses in relevant data. Examples of relevant data for customer support use cases include: 1) previous answers, 2) relevant product documentation, and 3) FAQs.
At a high level, we need to:
Compile and centralize all the data in a knowledge base
Build a workflow to orchestrate AI responses
Deploy an interface (the chat interface) on the workflow and embed it into the website.
1. Building Knowledge Bases
The foundation of your AI support assistant is a well-organized knowledge base. VectorShift allows you to import data from various sources, including your existing support documentation, FAQs, and product manuals.
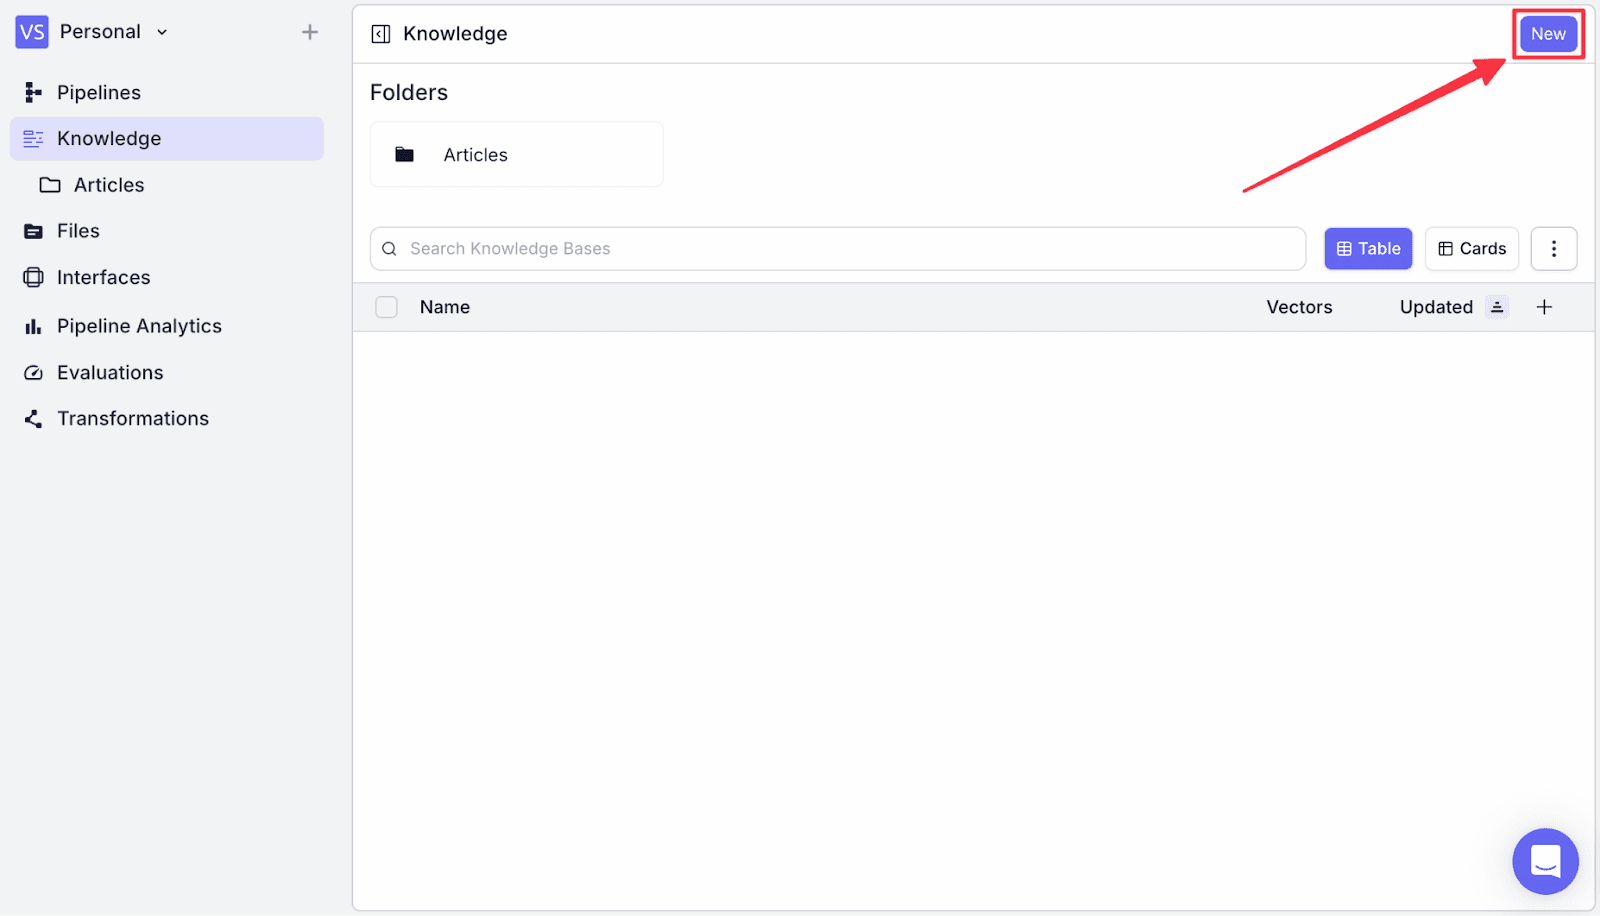
Step 1: Go to the “Knowledge” menu on the left, and click “New” on the top right.
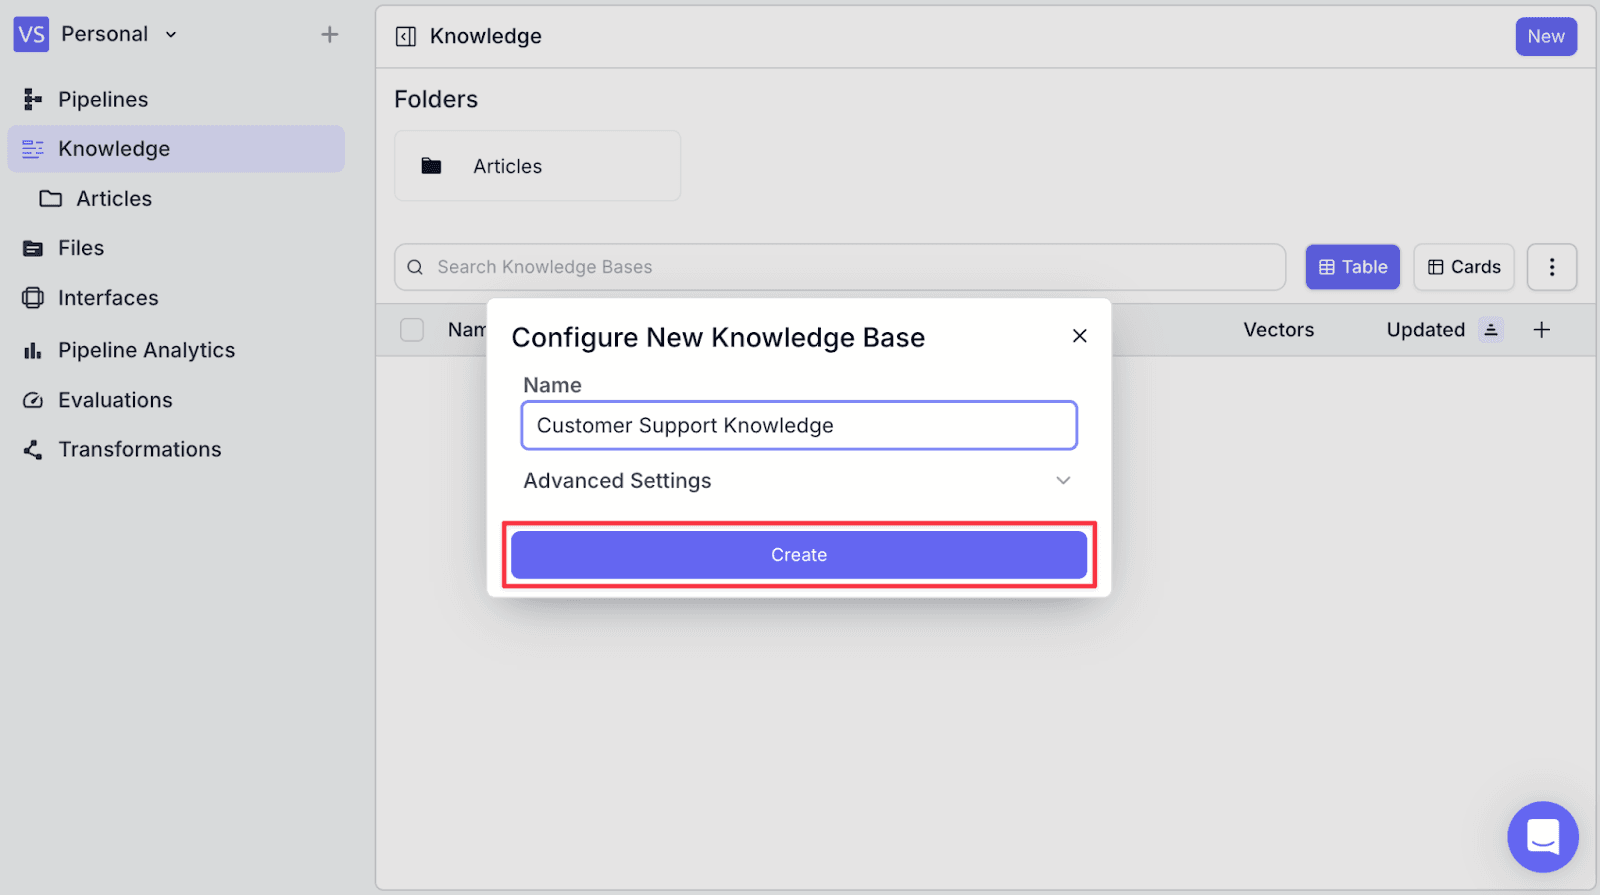
Step 2: Give the knowledge base a name then click “Create”.
Step 3: You can add relevant documents in multiple ways:
Import documents directly from your computer
Connect to cloud storage services like Google Drive or Dropbox
Scrape from existing URL
As you import your data, VectorShift will automatically categorize and index the information, making it easily retrievable.
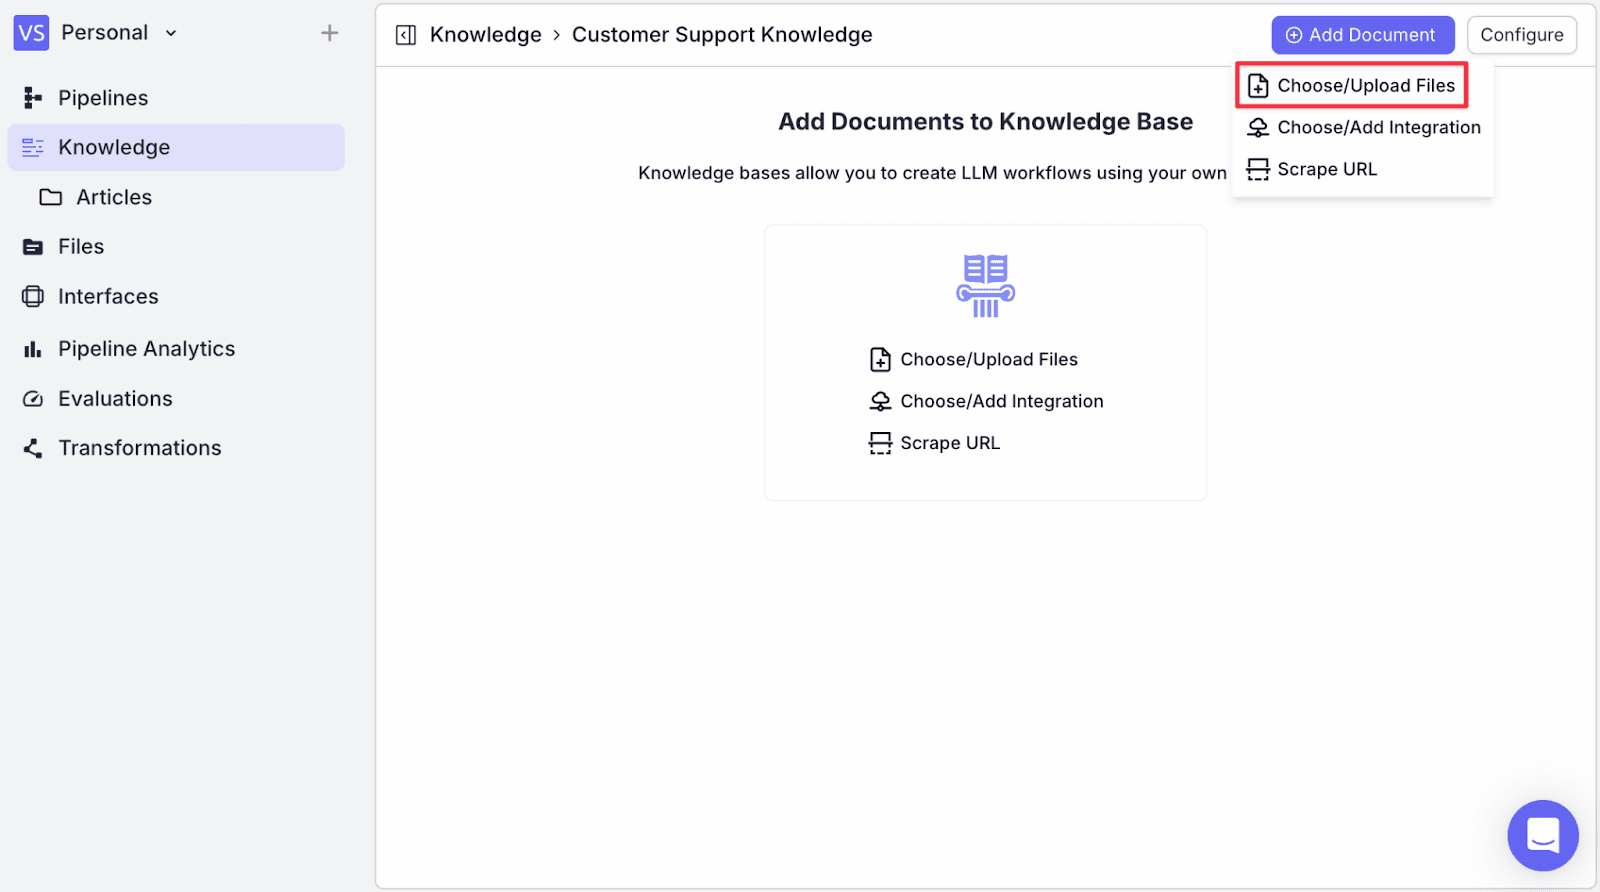
Now click on “Add Document” on the top right, then click “Choose/Upload Files”.
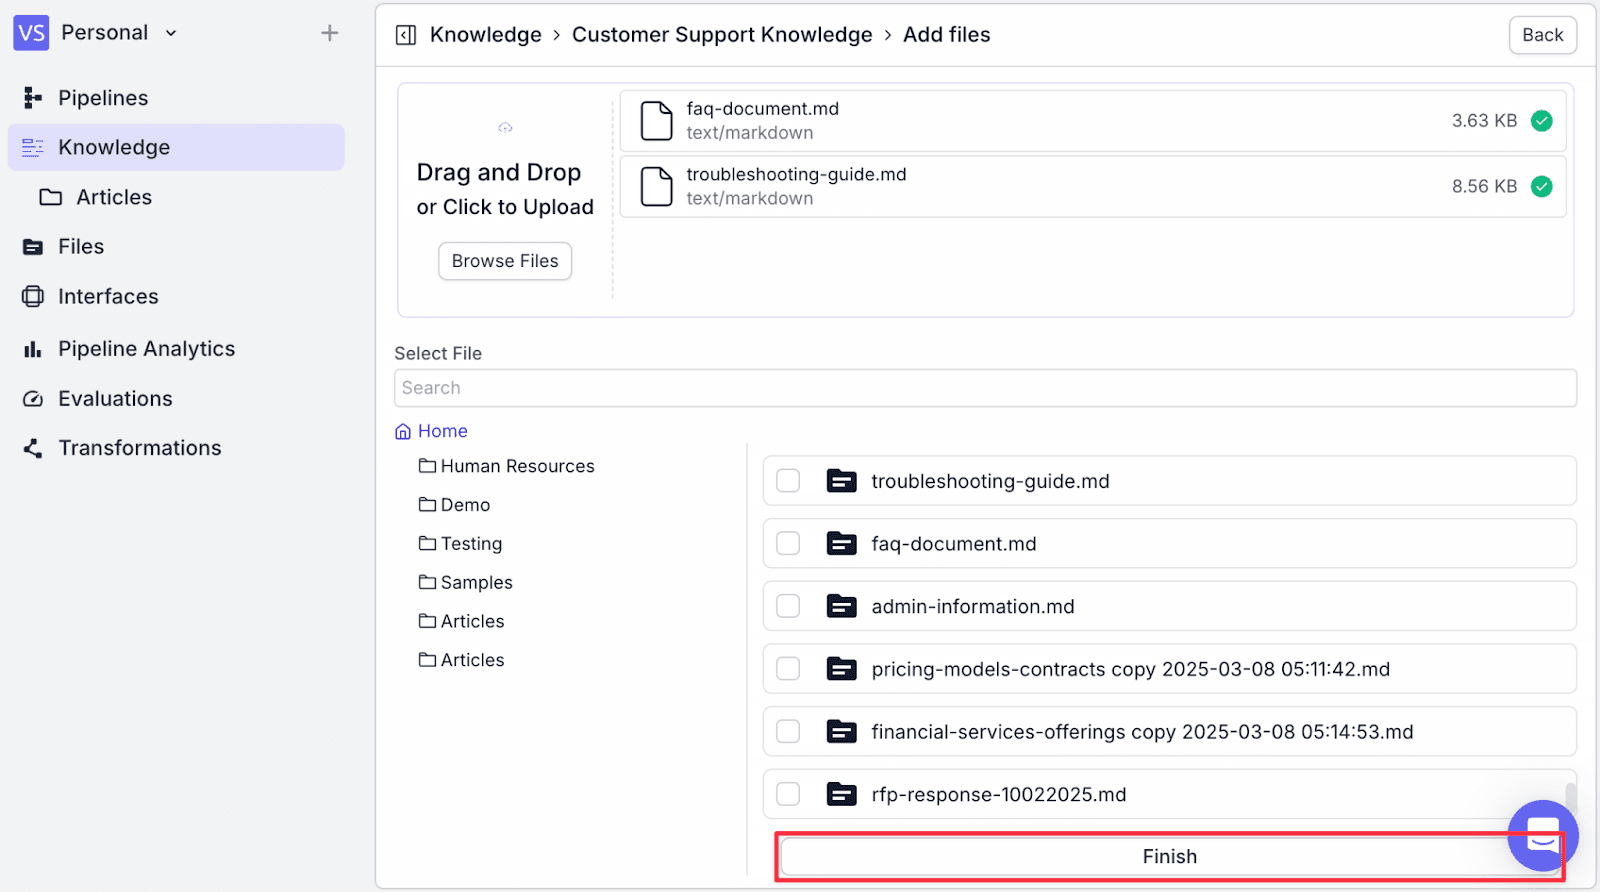
Step 4: Click on “Browse Files”, then choose the relevant document. Here, we upload a FAQ Document and Troubleshooting Guide as an example.

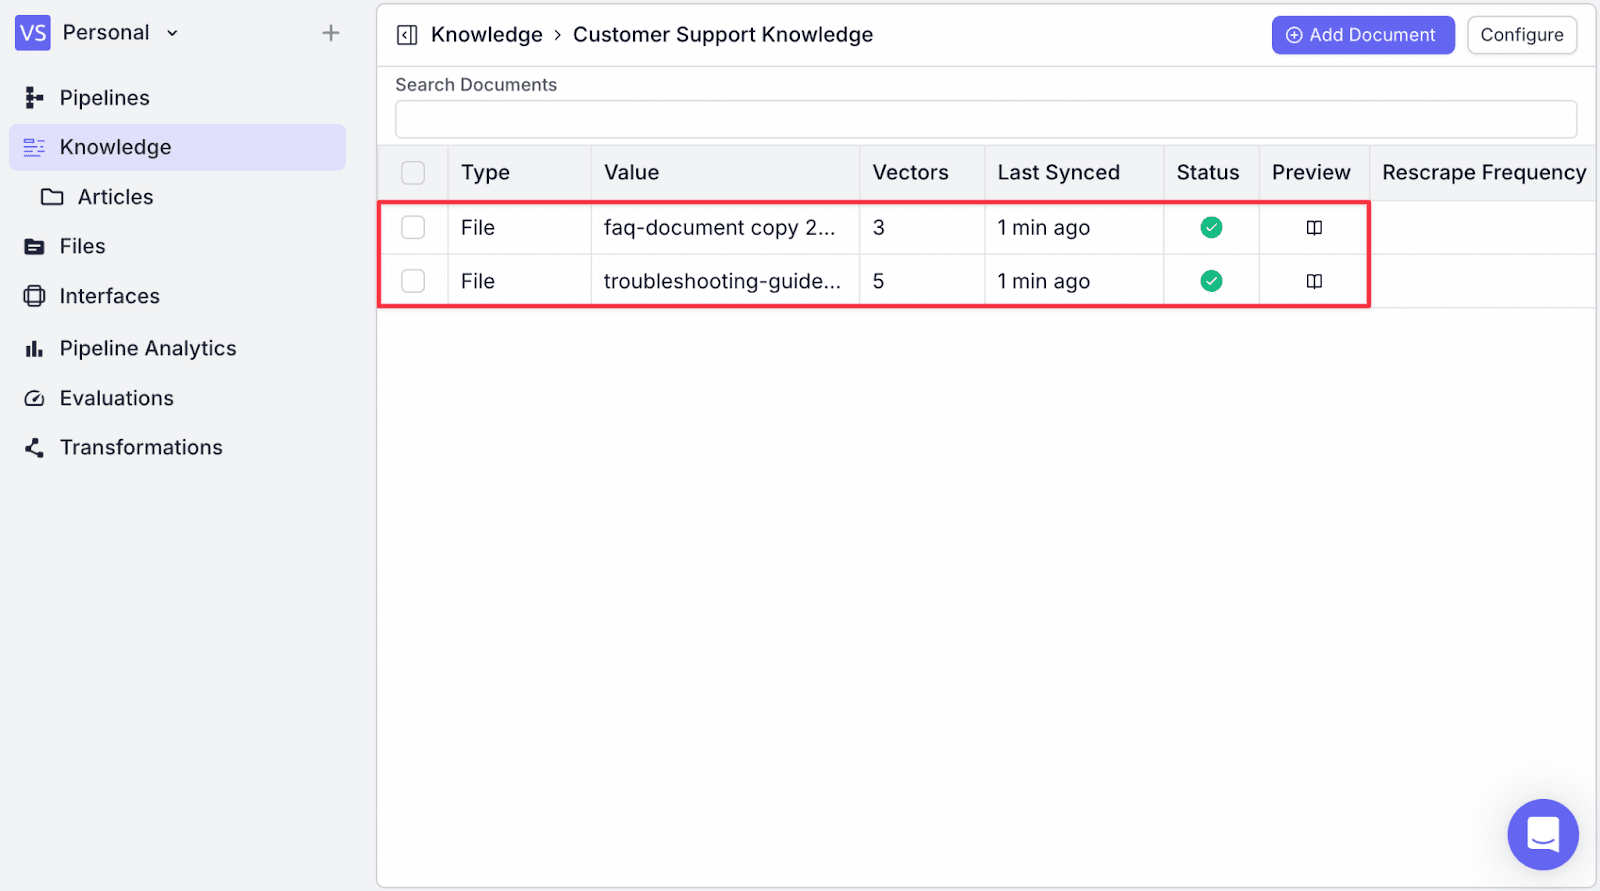
Step 5: After selecting the documents, click on “Finish”. You will then see a confirmation screen of the documents that have been successfully added.
You will see the document has been added to the knowledge base along with the number of vectors, last sync, and status.
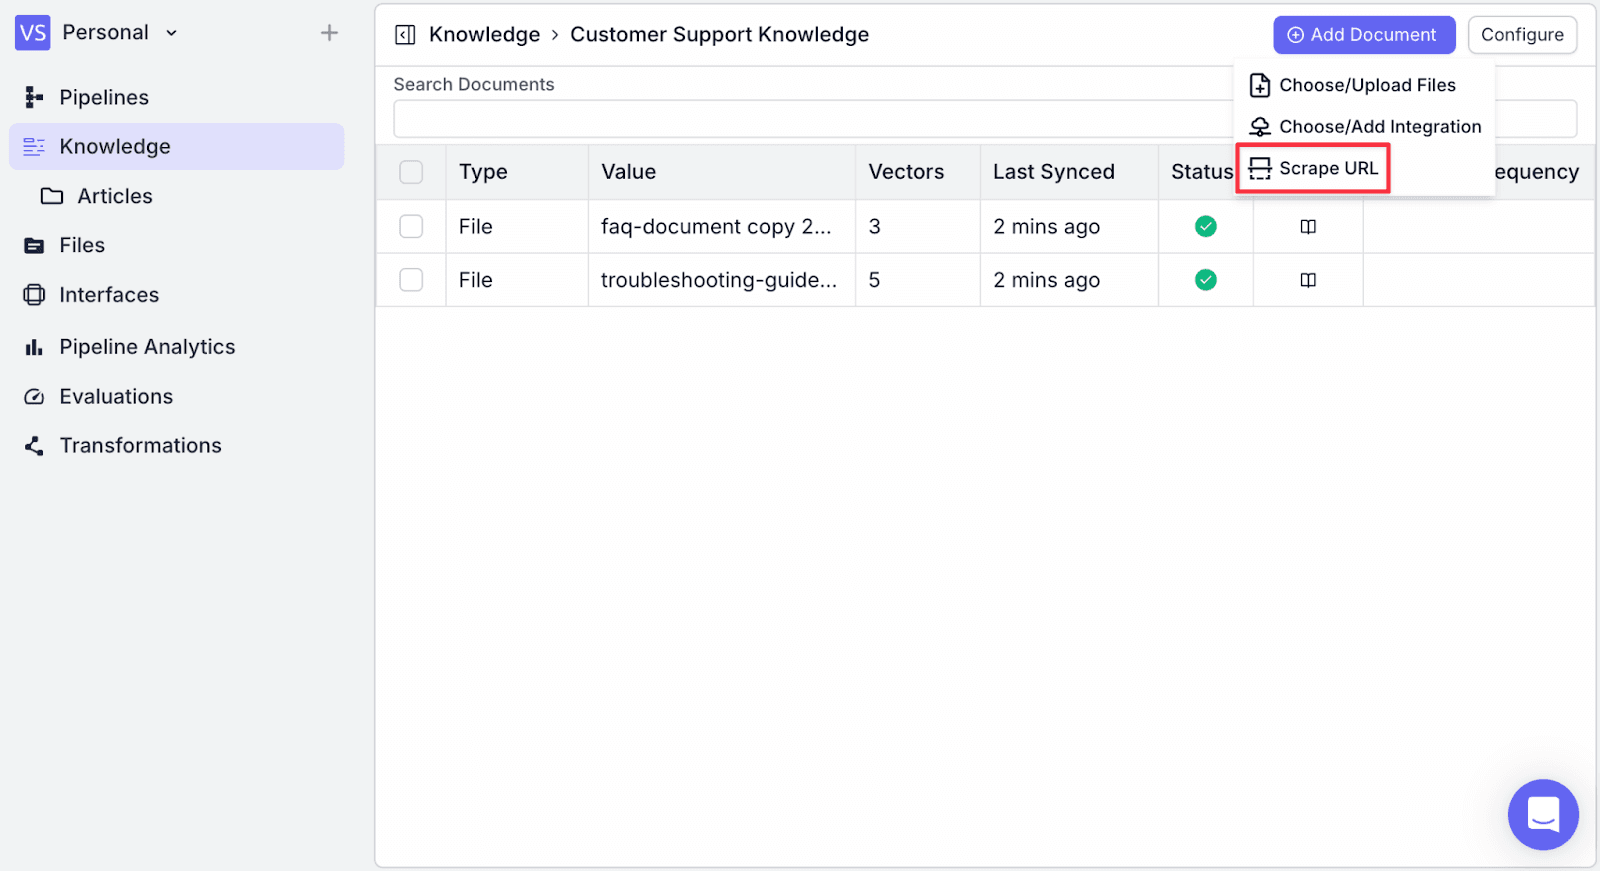
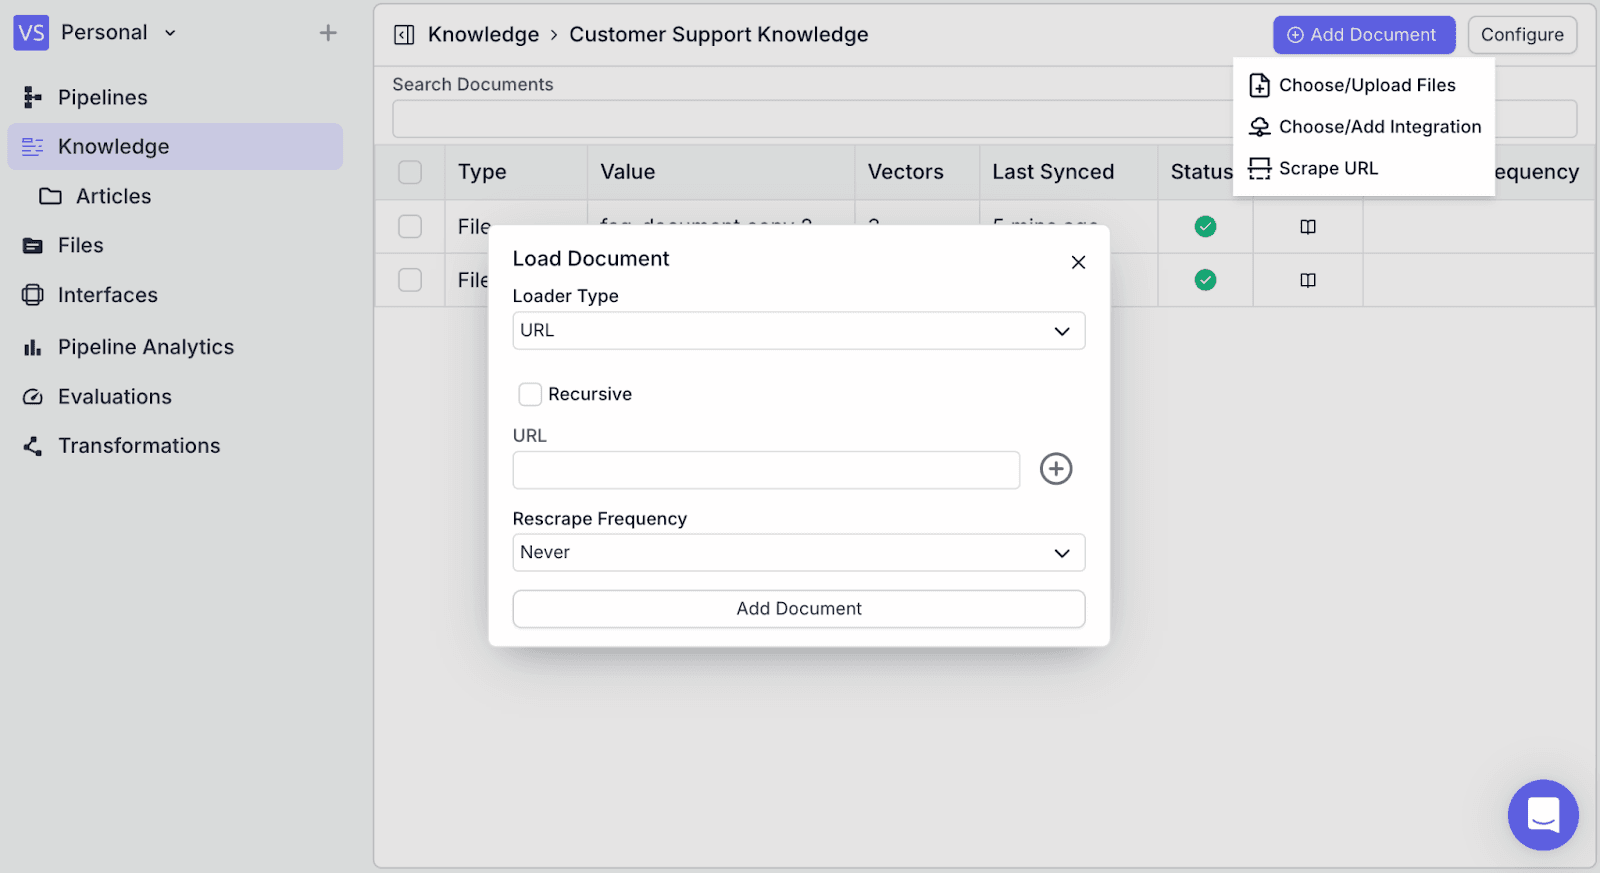
Step 6: Next, we will add a website. Within “Add Document” this time, click “Scrape URL”. This allows us to scrape information from the URL, which is useful if you have any existing documentation available online.
You will see the “Load Document” view:
Loader Type: Options to load from a general URL or a specific platform such as YouTube, Arxiv, Wikipedia, and Repository.
Recursive: Option to crawl sub-pages
URL: The URL to be scrapped.
Rescrape Frequency: How often the re-scrape process will be triggered. This is useful if you expect your site to have updates.
Step 7: Copy your documentation URL into “URL”, then make the necessary changes in “Recursive” and “Rescrape Frequency”. Then click the “Add Document” button on the bottom.
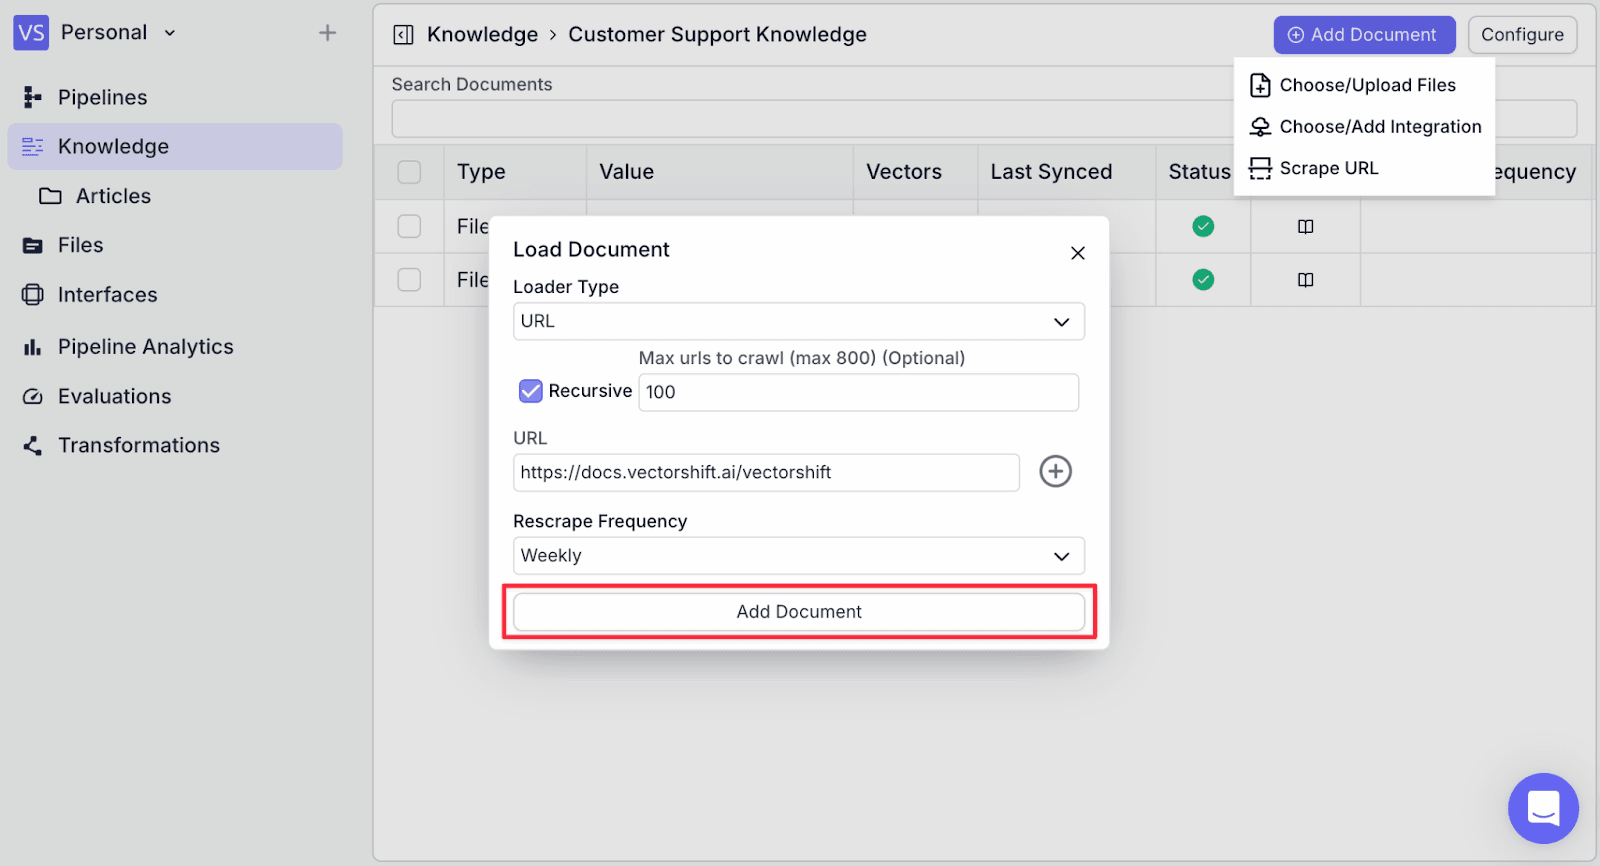
You will see the knowledge from the URL has been added. This may take some time depending on the websites.

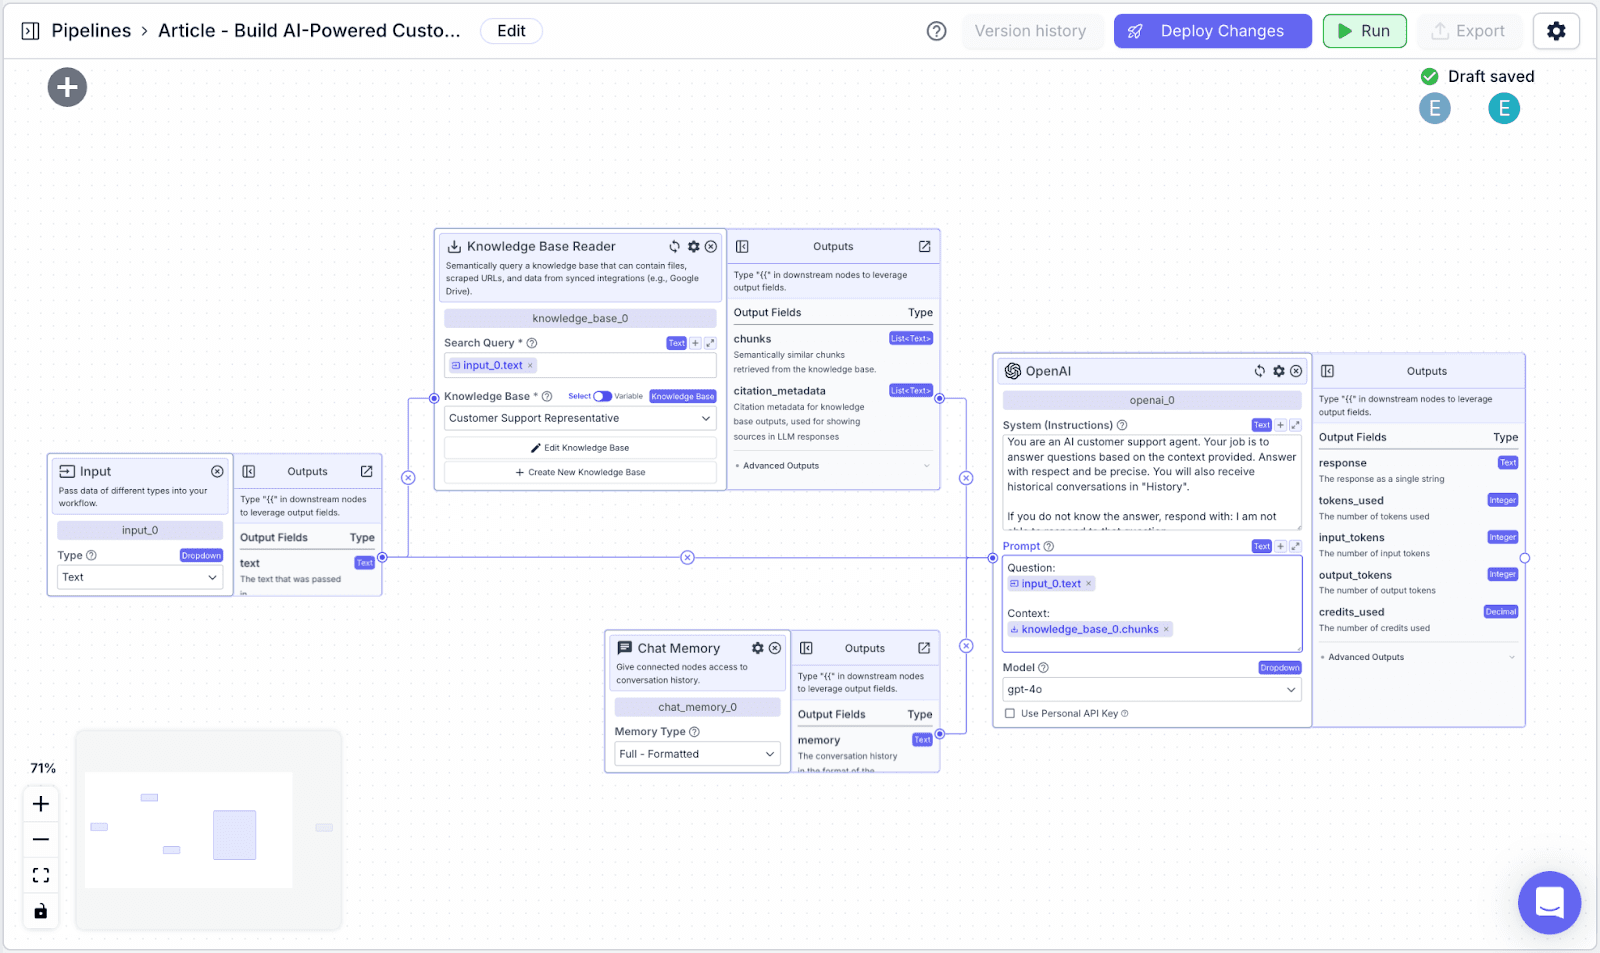
2. Designing the Pipeline
The pipeline has 5 nodes: an input node, a knowledge base node, an LLM node, a chat memory node, and an output node.
Input Nodes: Node to take customer’s inquiry as an input to the workflow.
Knowledge Base: Provide relevant context to help a LLM formulate the answer.
LLM Node: Generate answers from the question and context given.
Chat memory Node: LLMs do not automatically “remember” conversation history. To ensure that answers are relevant to the conversation, the conversation history needs to be “passed” to the LLM with each generation.
Output Node: Shows the answer to the customer.

Working with Nodes in VectorShift
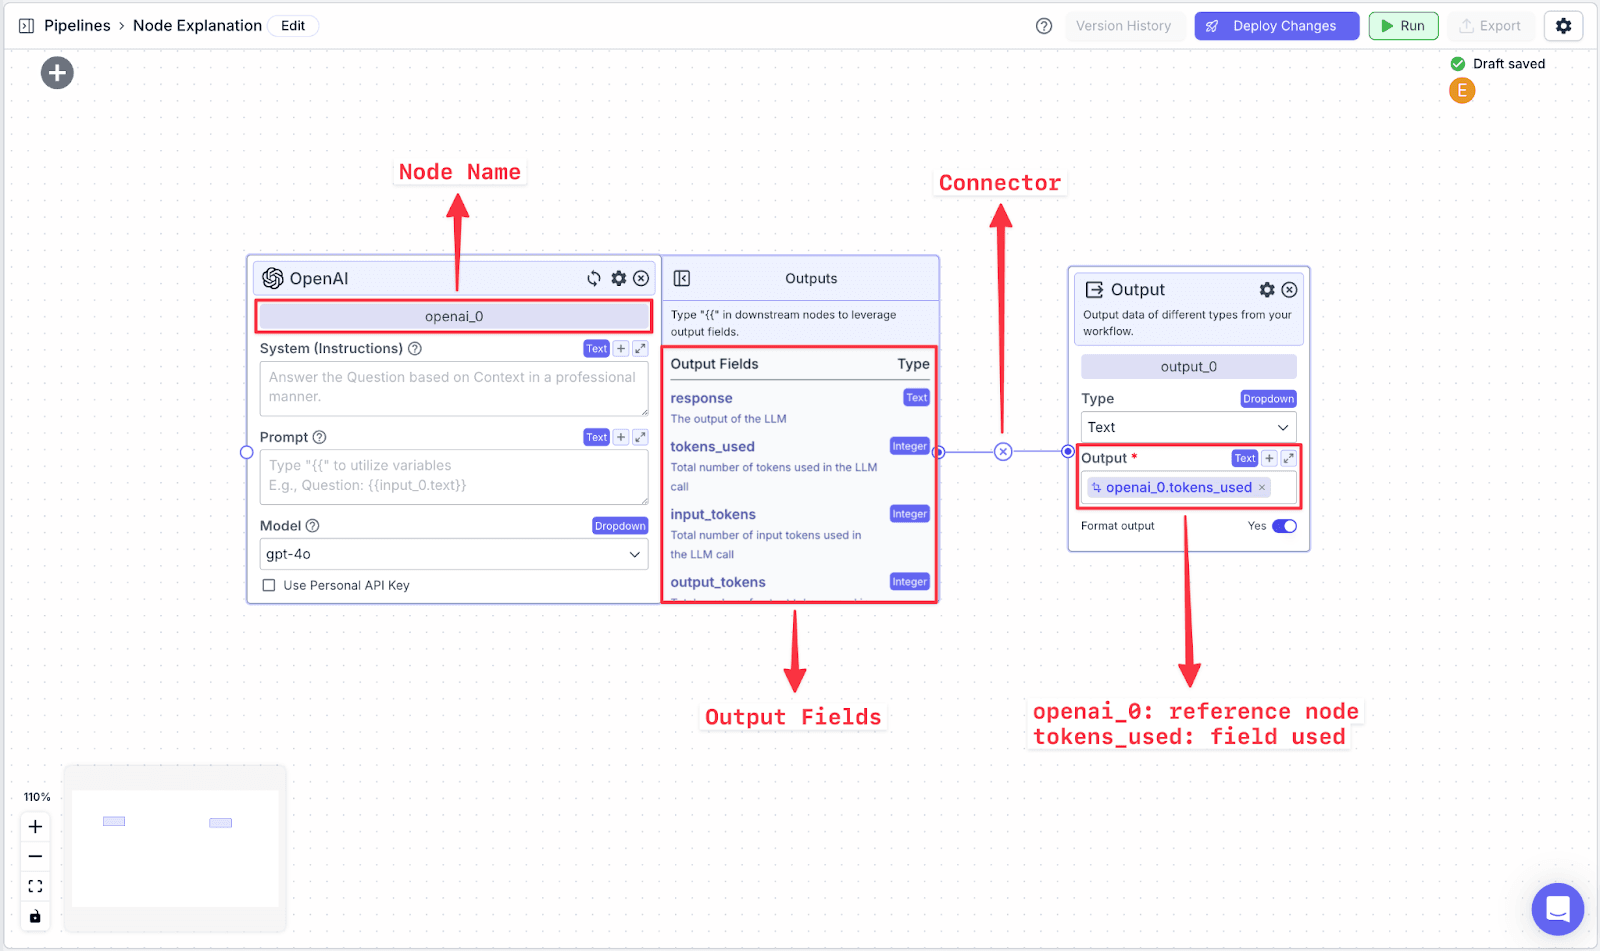
Each node in VectorShift has a name at the top of each node (e.g., openai_0) and output field(s), which are found in the right-hand pane of each node (e.g., the OpenAI LLM node has various output fields: response, tokens.used, input_tokens, output_tokens).
To reference specific data fields from other nodes, you have to do two things:
Connect the two nodes.
Reference the data from the previous field using a variable.
Variables in VectorShift all have the same structure:
You can also create variables by typing “{{“ in any text field, which opens the variable builder. To reference the text from the OpenAI node, you call the variable:
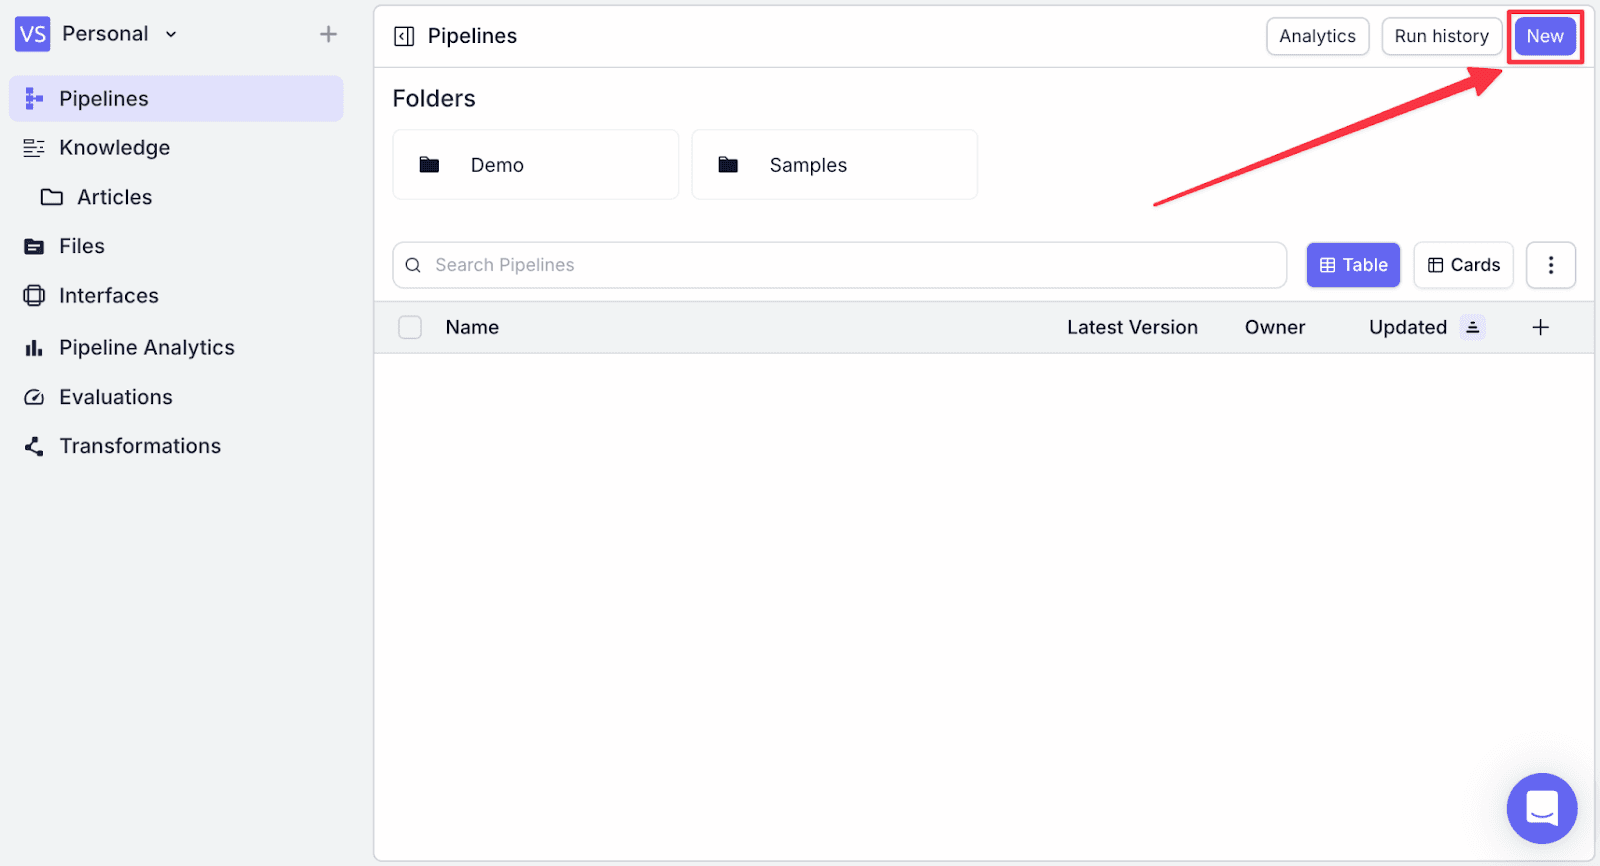
To start creating a new pipeline, go to the “Pipeline” menu, and click “New” on the top-right
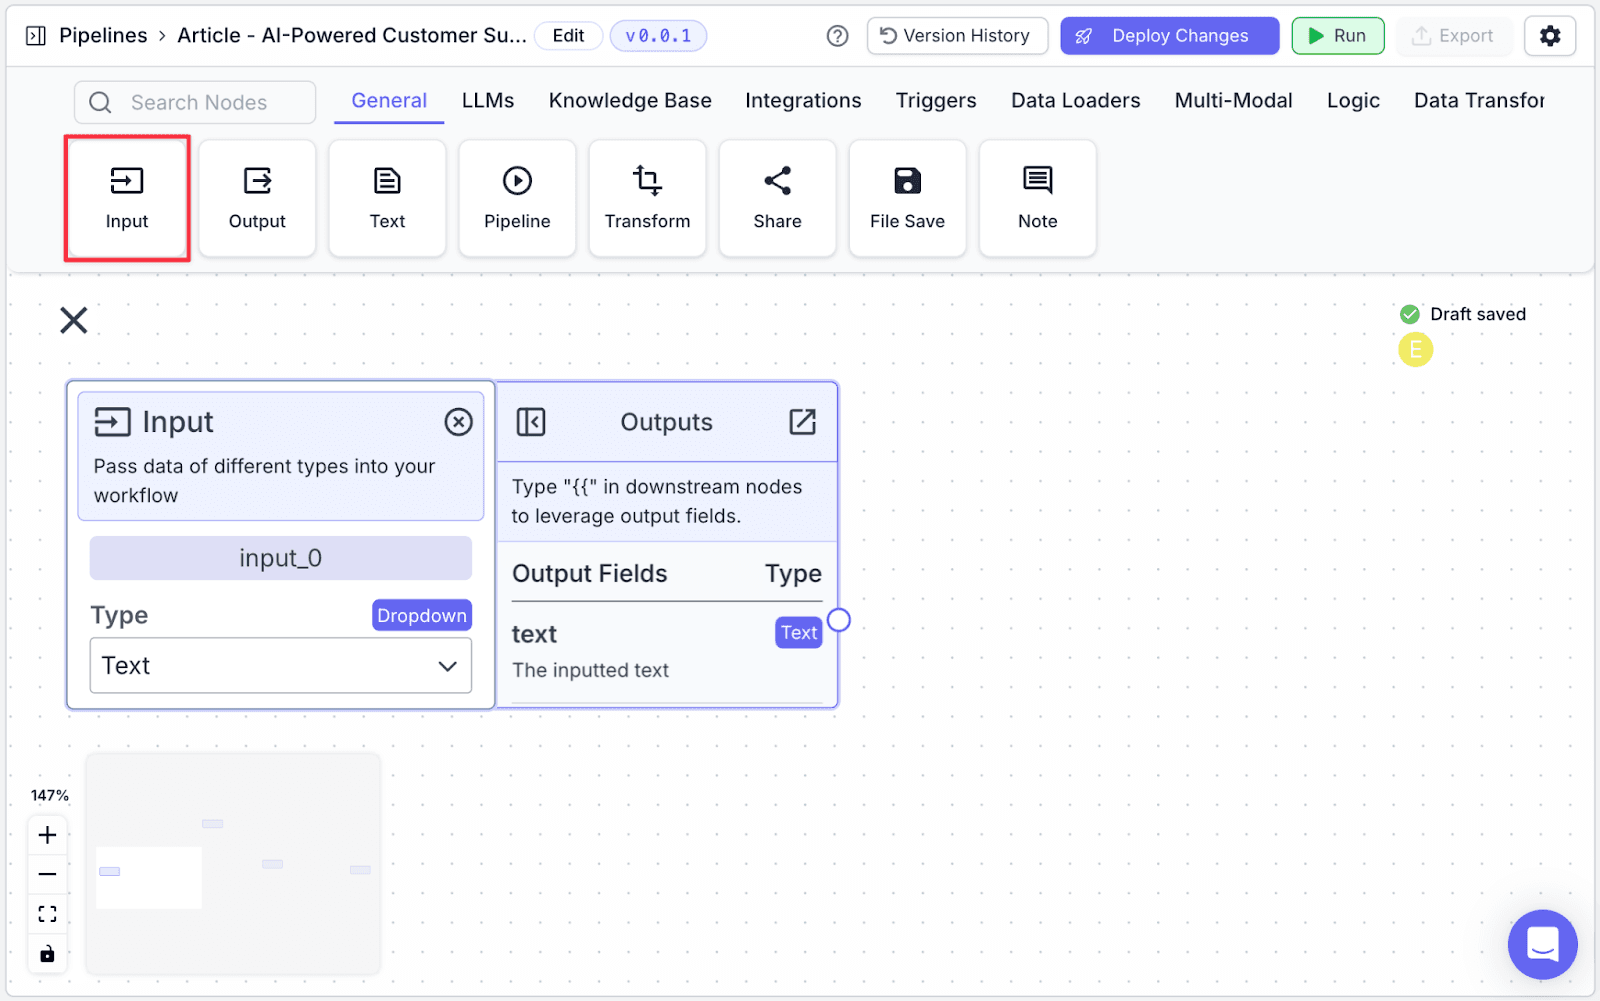
Input
In the pipeline editor, we will see some options. For the first step, drag out an Input node.
Knowledge Base
To ensure that an LLM is answering in a relevant way based on your knowledge base, we use a knowledge base reader node.
The knowledge base reader node will be used to find relevant pieces of information based on a user query, which will then be passed to an LLM node for reference.
Step 1: Connect the “Input” node to the “Knowledge Base” node.
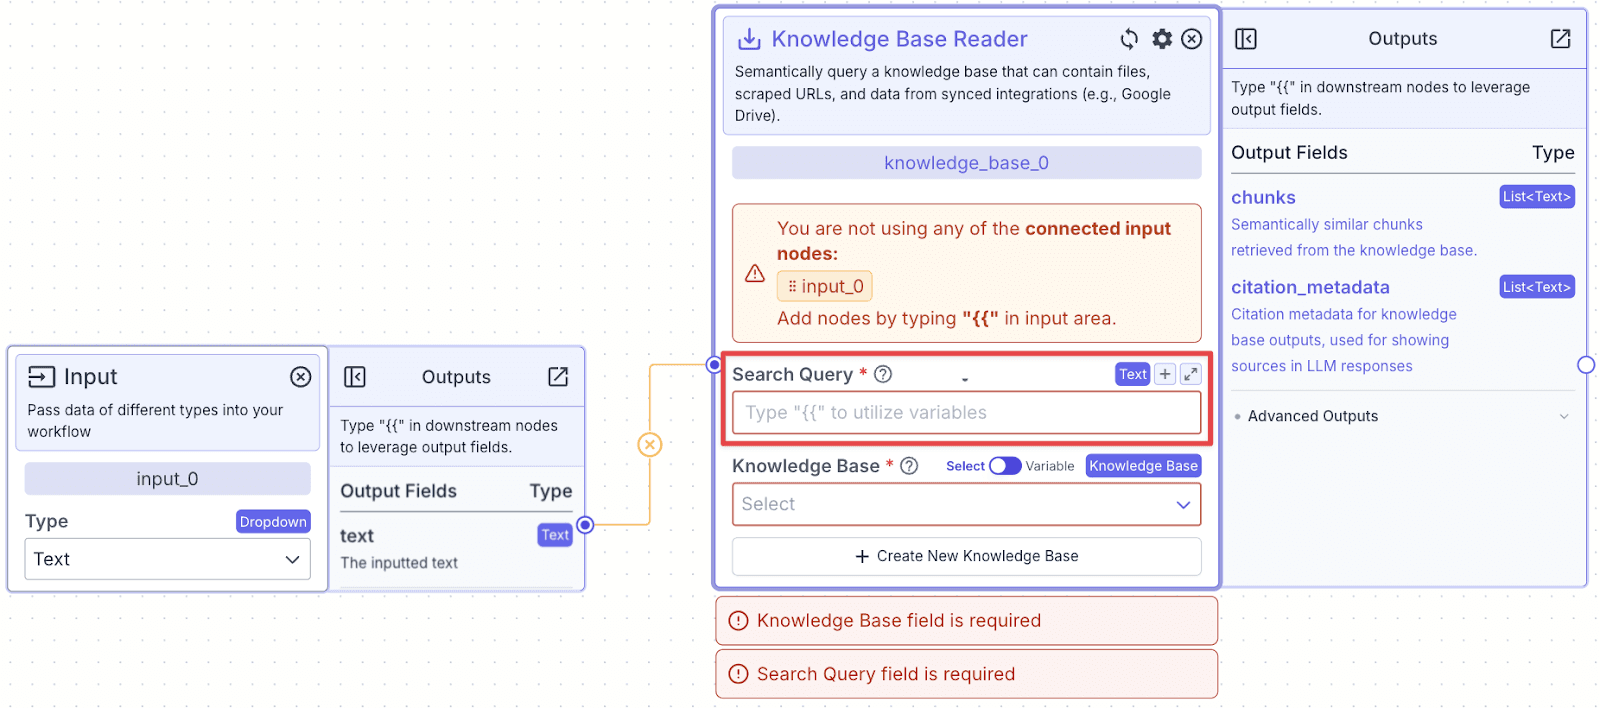
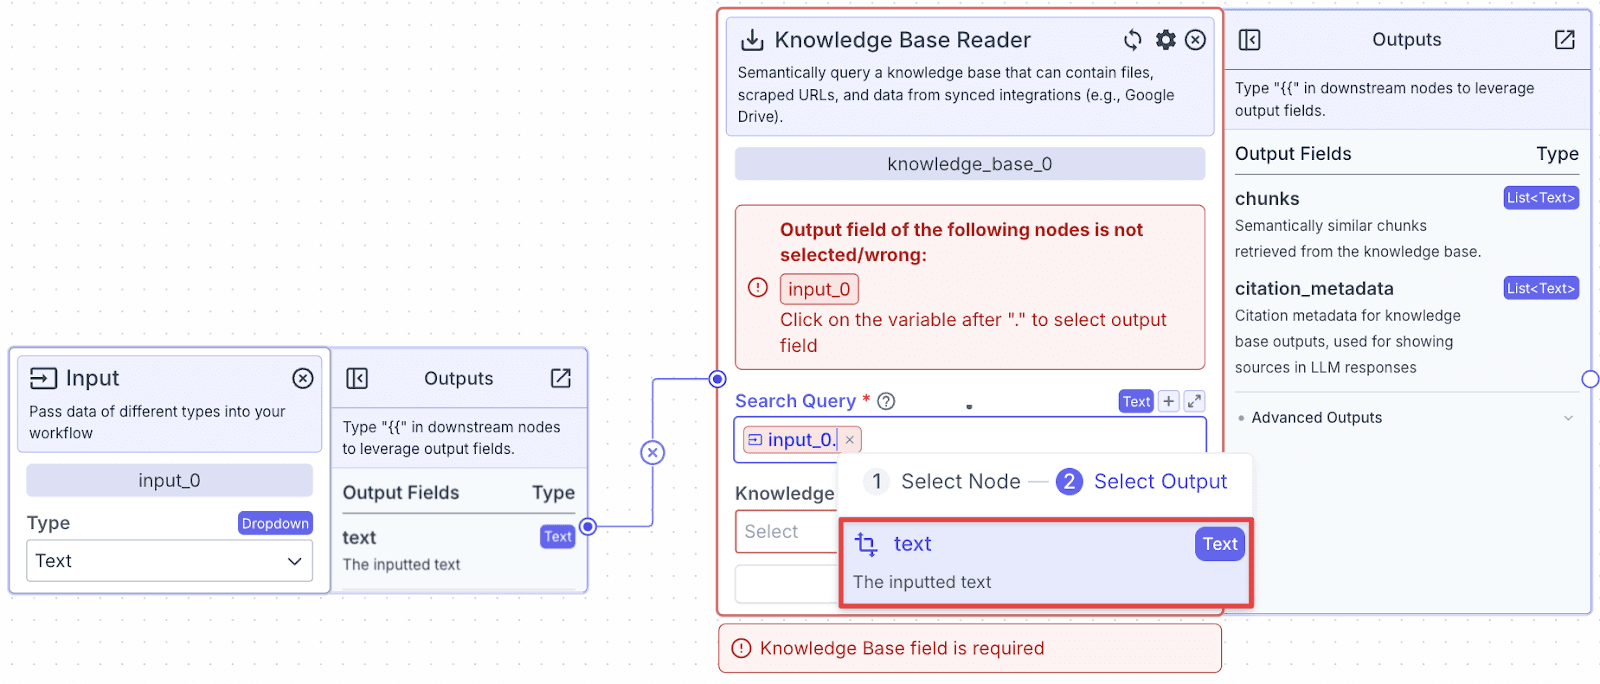
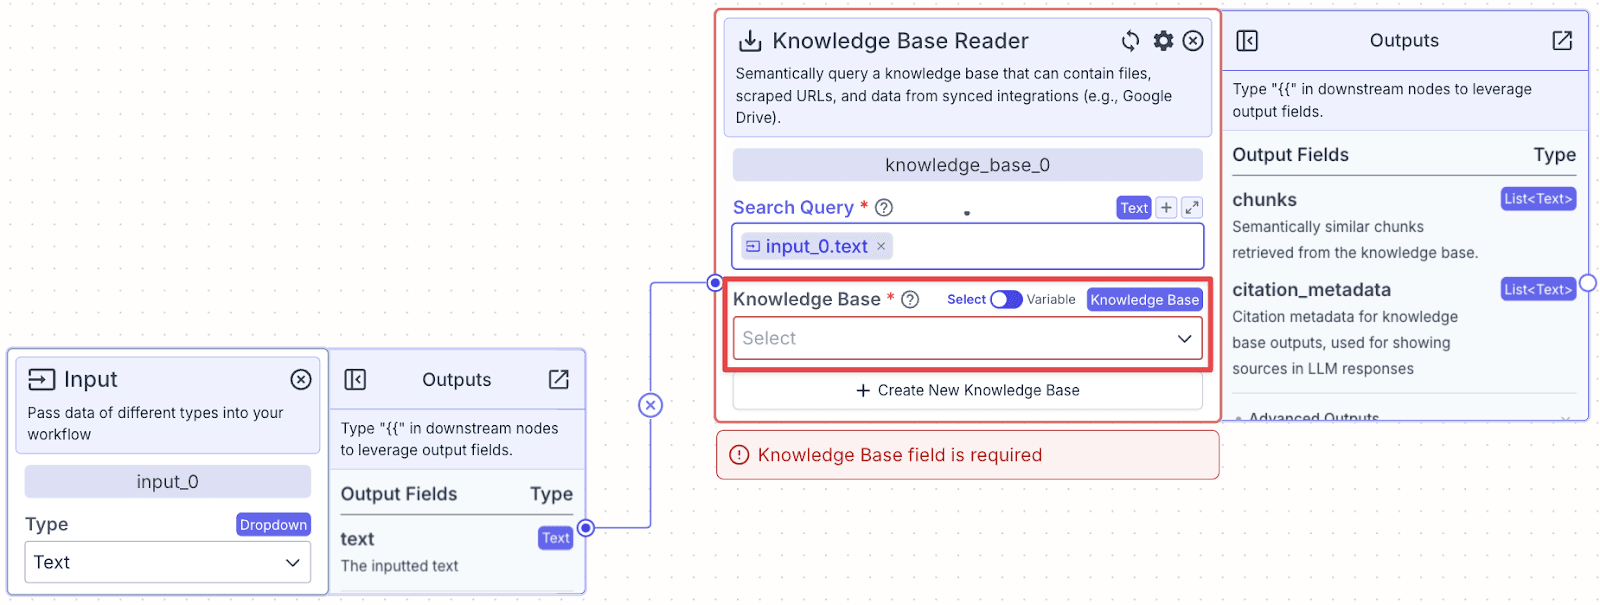
Step 2: On the knowledge base reader node, in the “Search Query” field, type “{{” opening the variable builder. The first step of the variable builder is to select the node you want to reference. Here we select the input node, “input_0”.
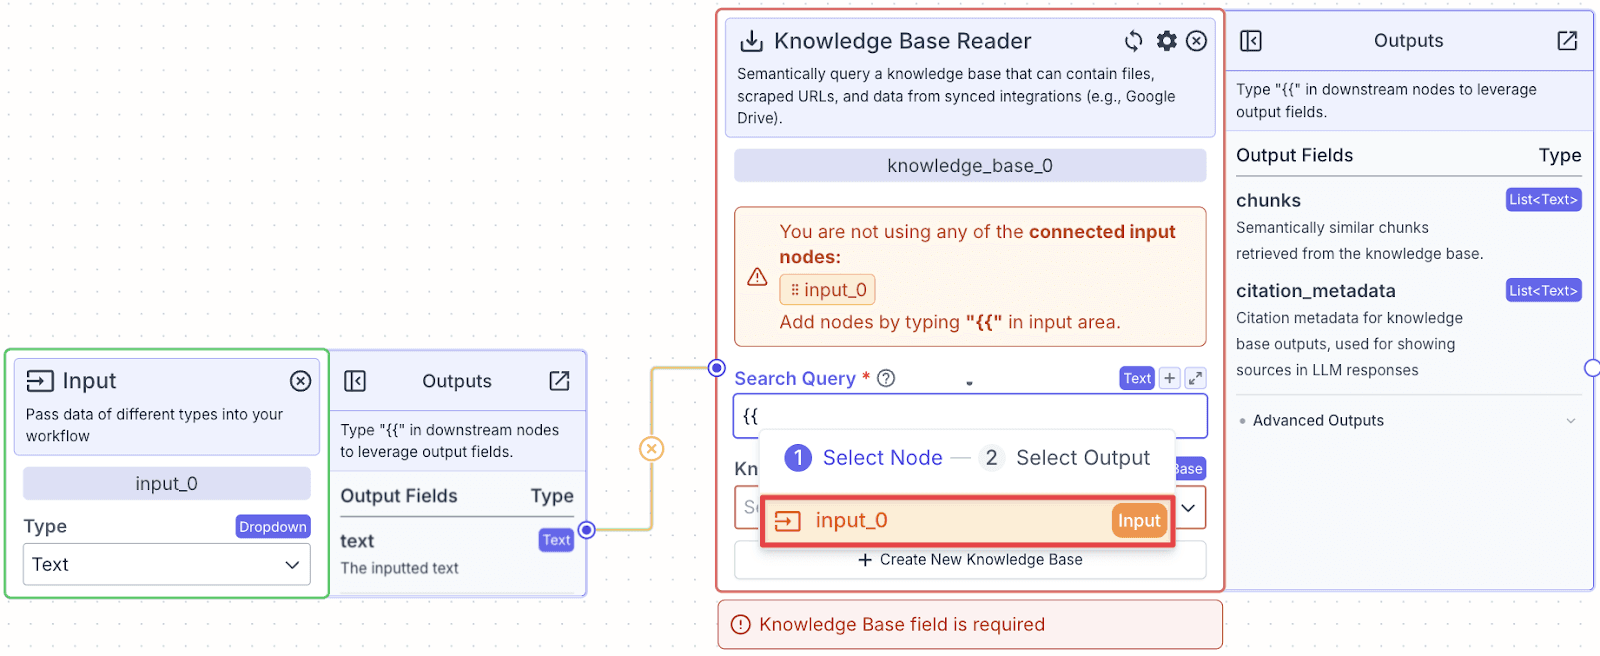
Step 3: After selecting the “input_0” node, we want to select which field to reference within the Input node. Here, we choose the “text” field (the user question).
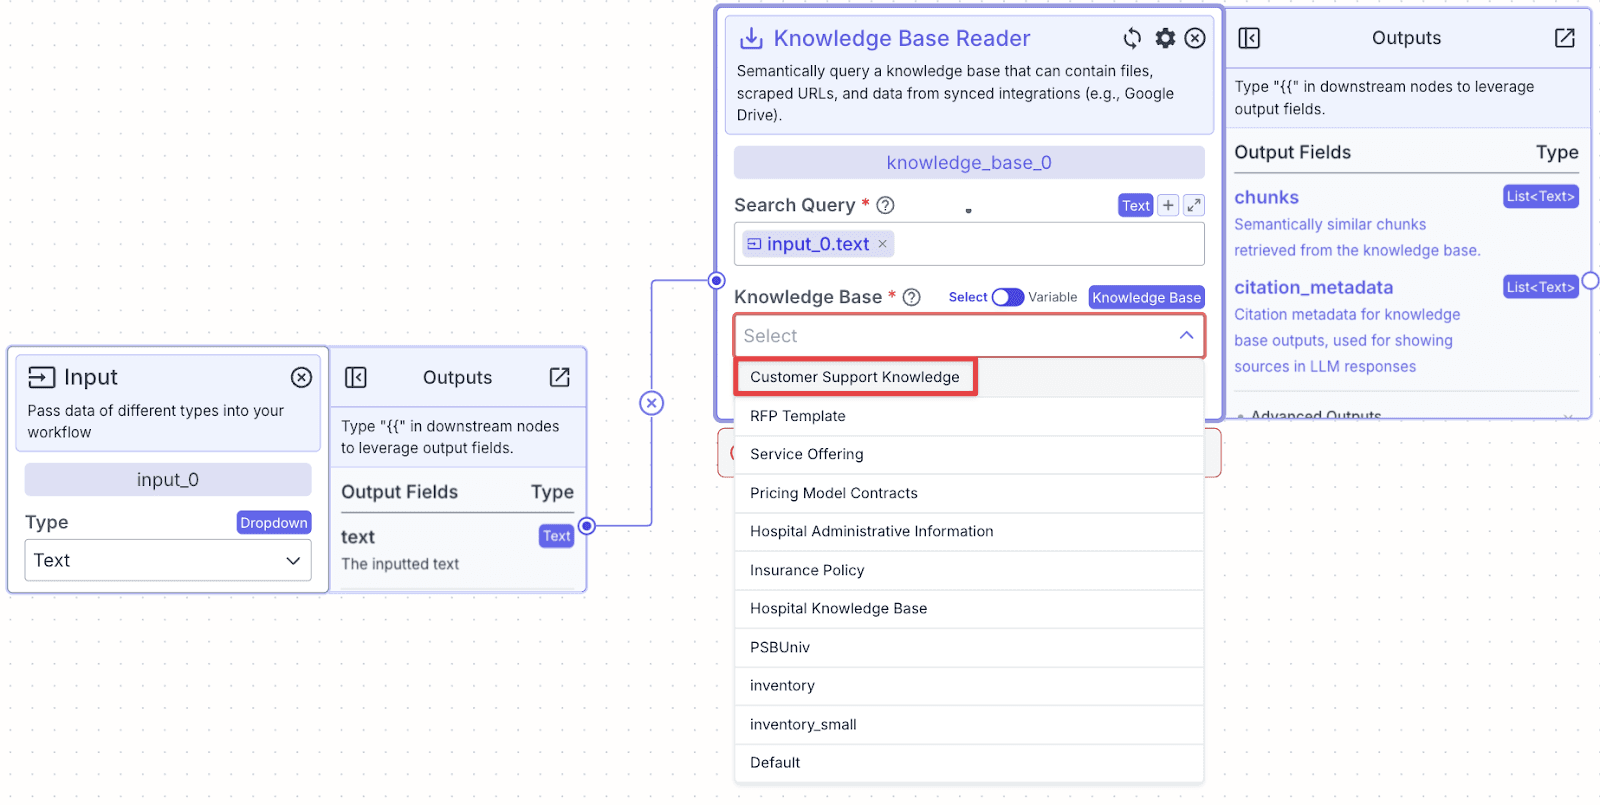
Step 4: Next we need to choose the knowledge base in the “Knowledge Base” dropdown. Click on it and you will be given a list of available knowledge bases.
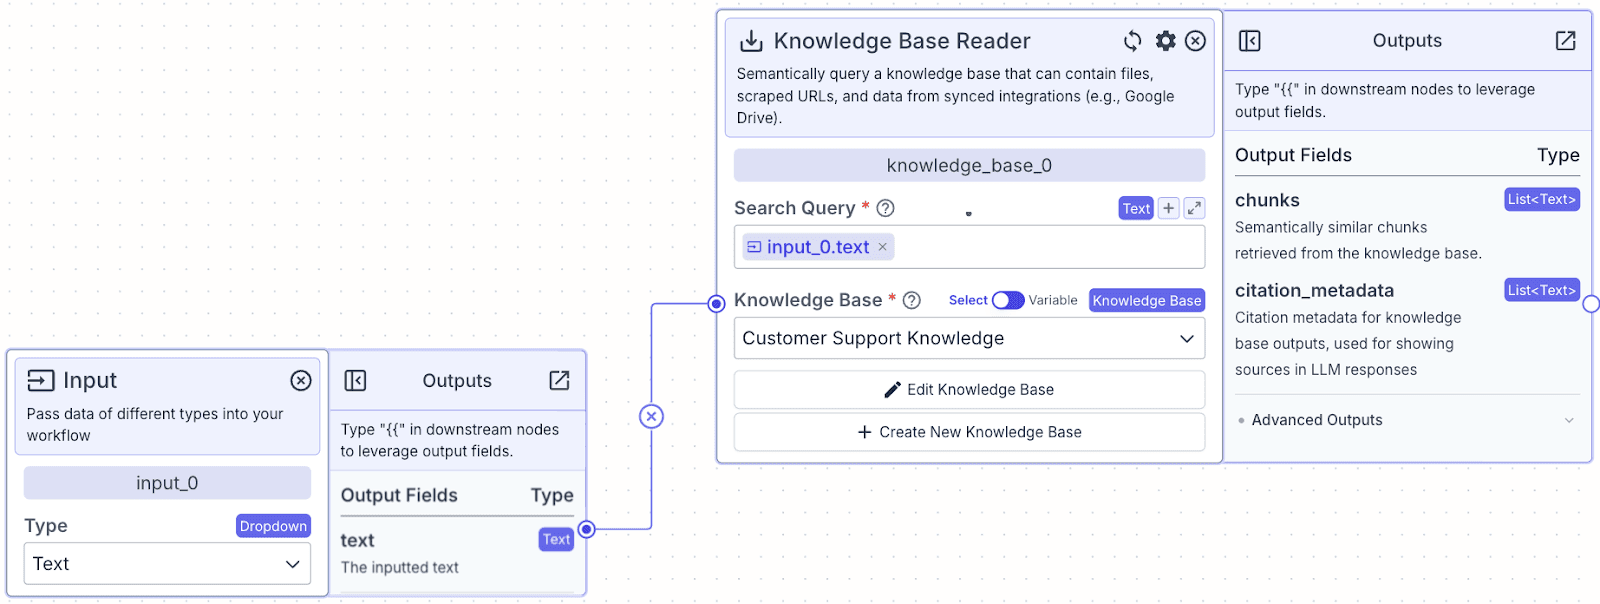
Step 5: Click on the knowledge base we just created. In this case, we will choose “Customer Support Knowledge”.
Now, the connection between the input node and the knowledge base node has been completed. It’s time to connect both into an LLM Node.
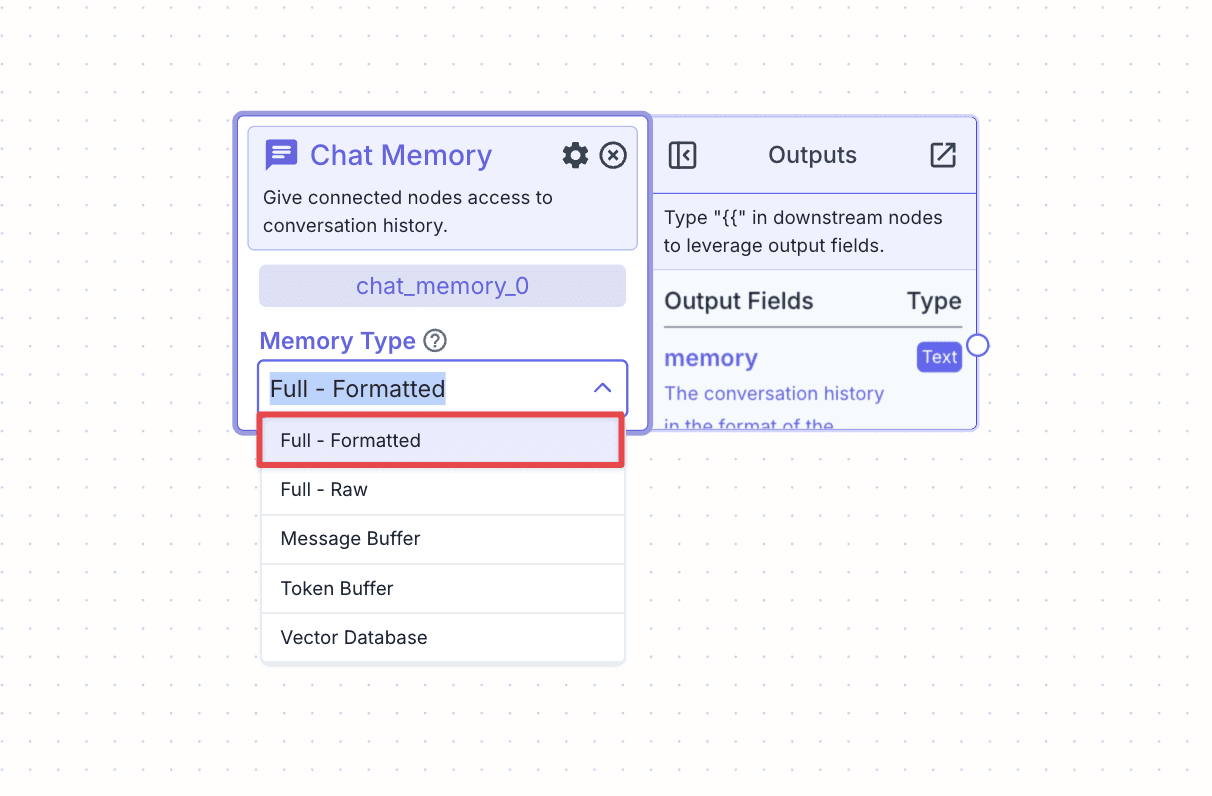
Chat Memory
Chat memory allows the pipeline to remember previous chats, giving the chatbot a richer context to answer questions.
Now from the tab “Chat”, click on the “Chat Memory” node.
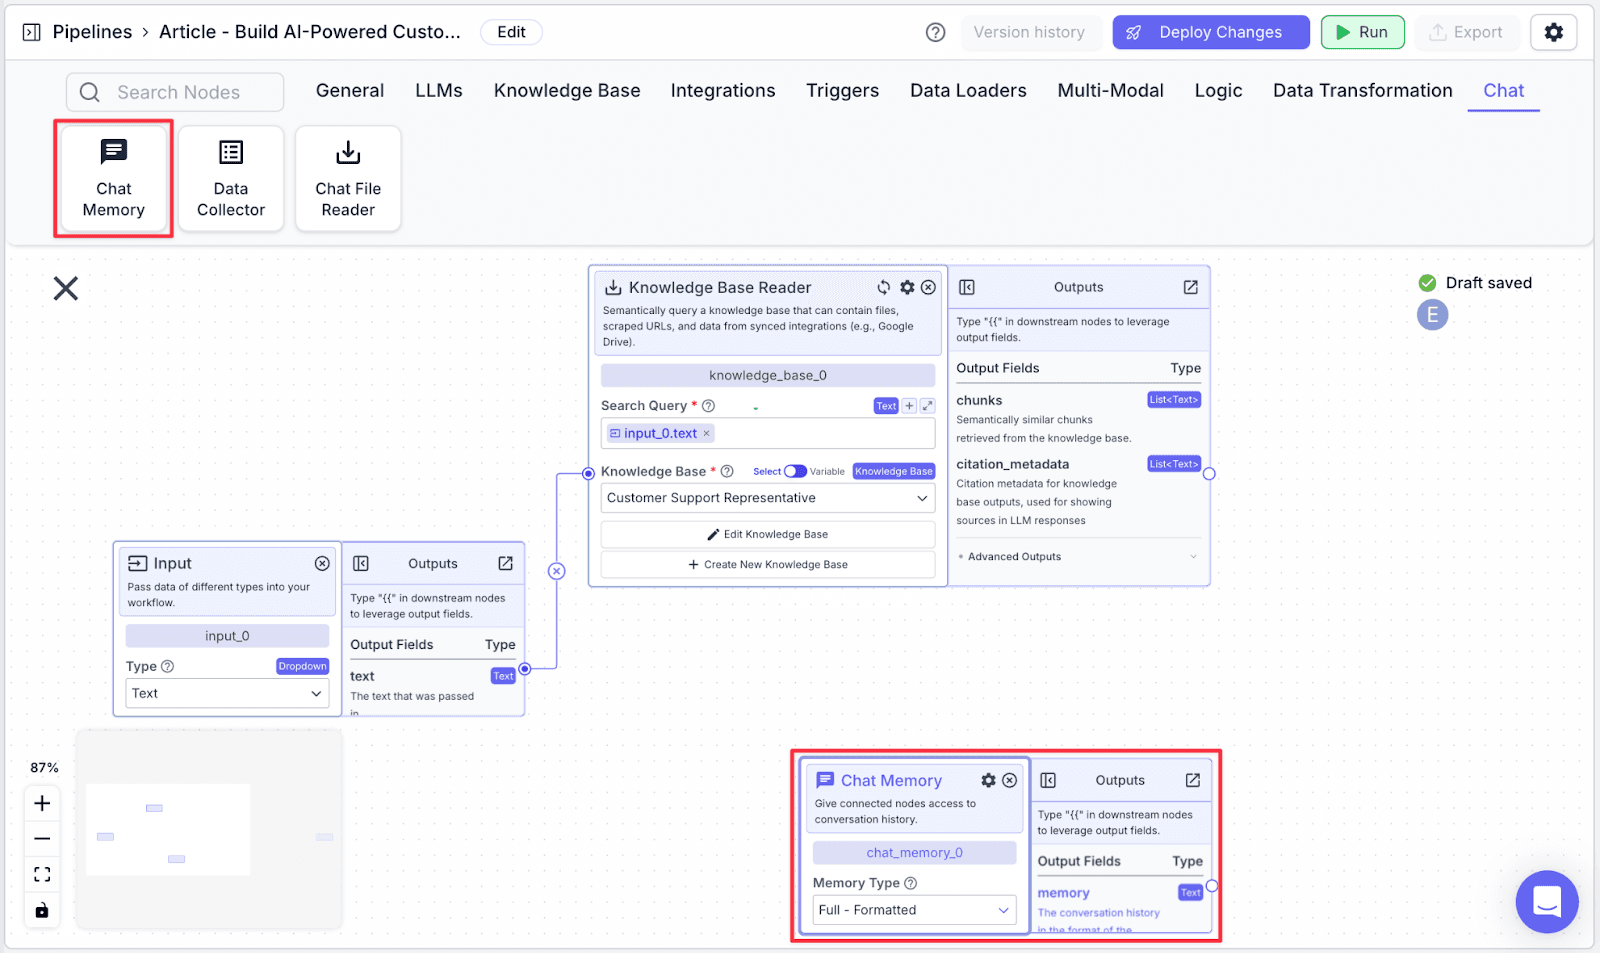
Change the “Memory Type” to “Full-Formatted” for now. This allows our pipeline to get full conversation history as additional context.
LLM
We will use the LLM Node to generate answers with the help of context from the knowledge base.
Connect the “Knowledge Base”, “Input”, and “Chat Memory” nodes to the LLM node. In this article, we are using OpenAI GPT-4o, however, you can pick any LLM node you want, even your own LLM because VectorShift is LLM agnostic!
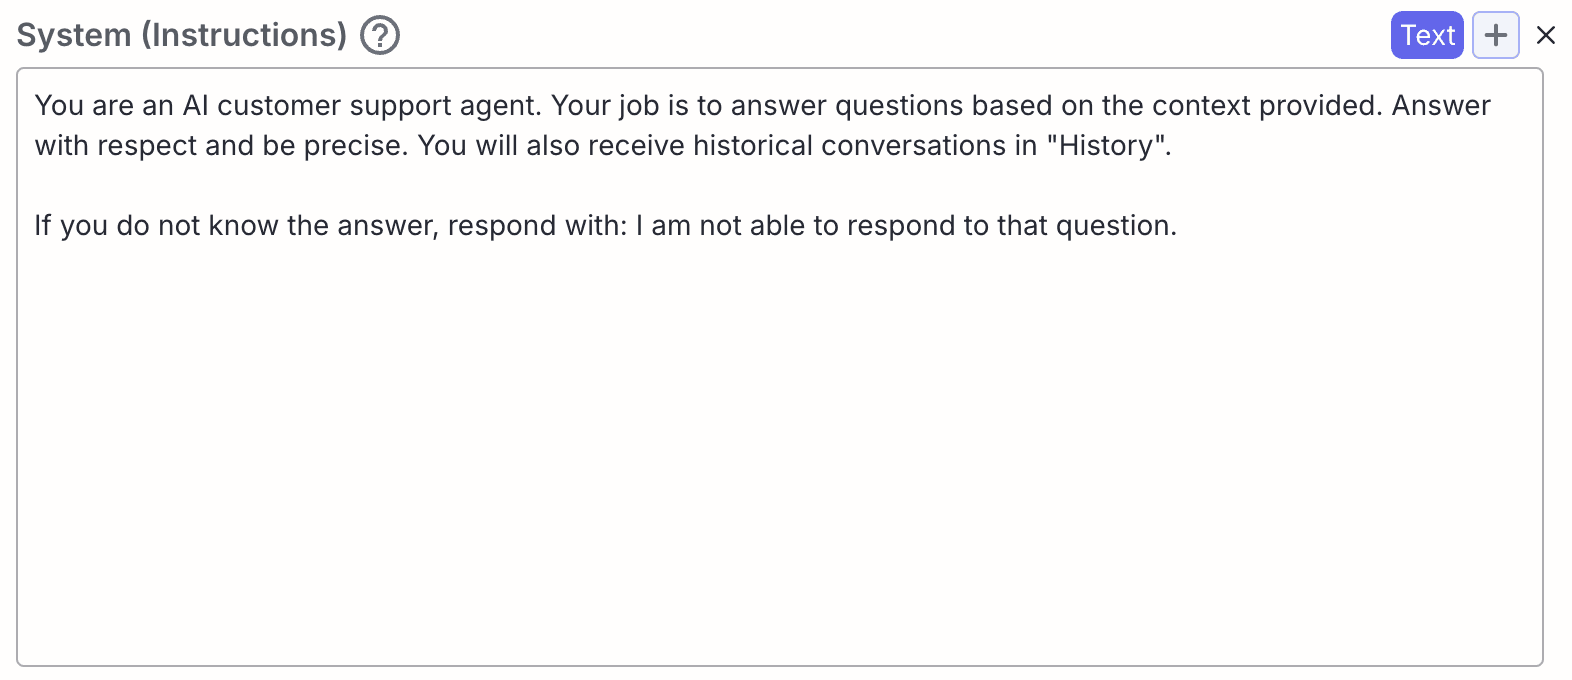
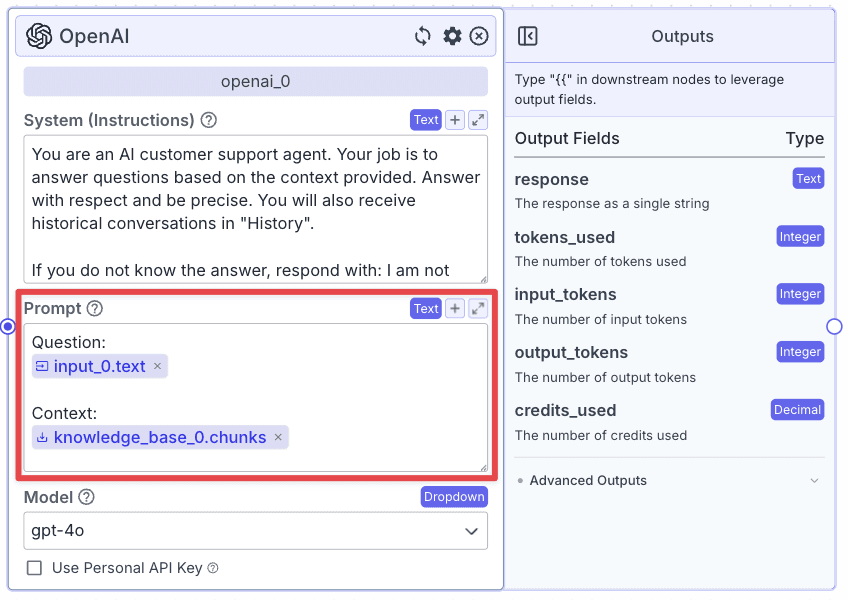
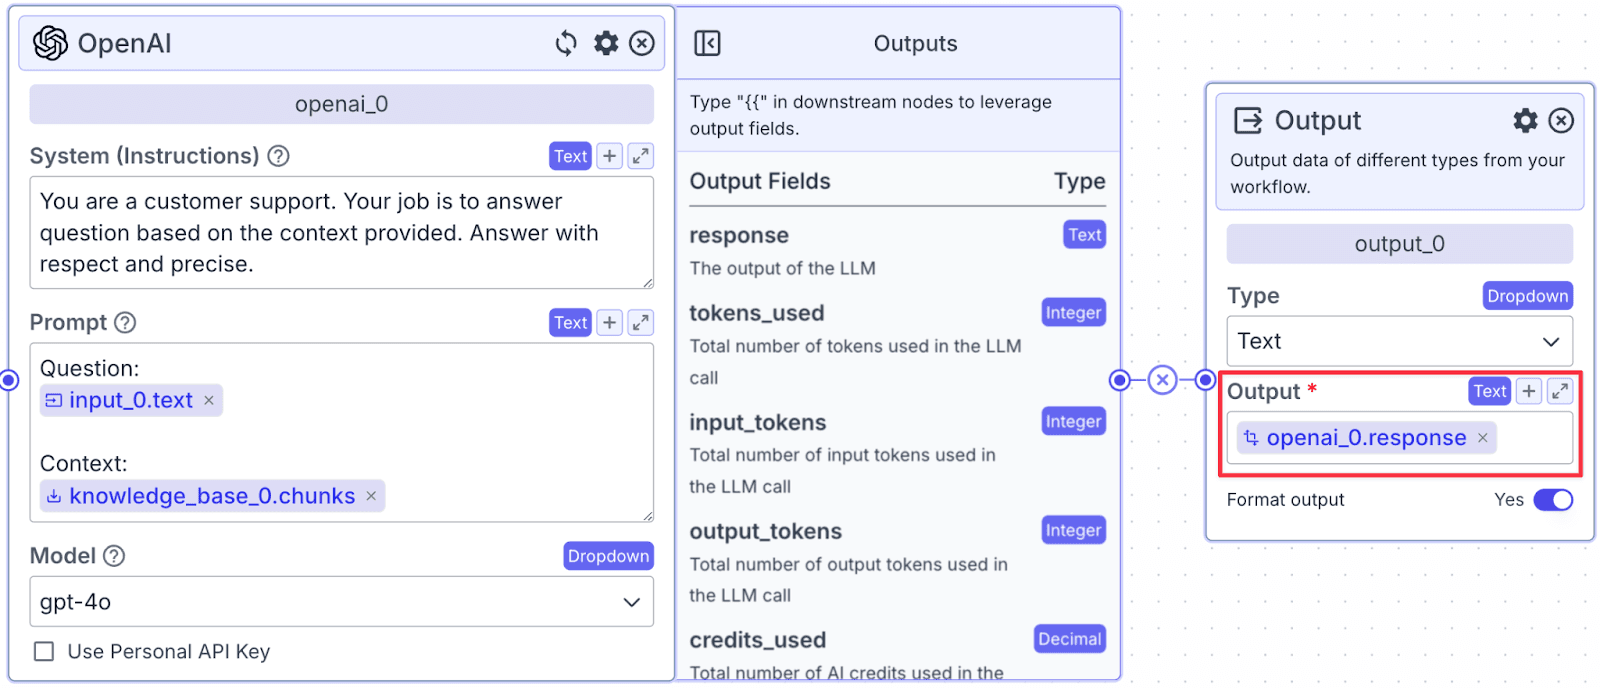
The LLM node has two fields: “System (Instructions)” and “Prompt”.
“System (Instructions)” defines how you want the LLM to behave. You can use the template below:
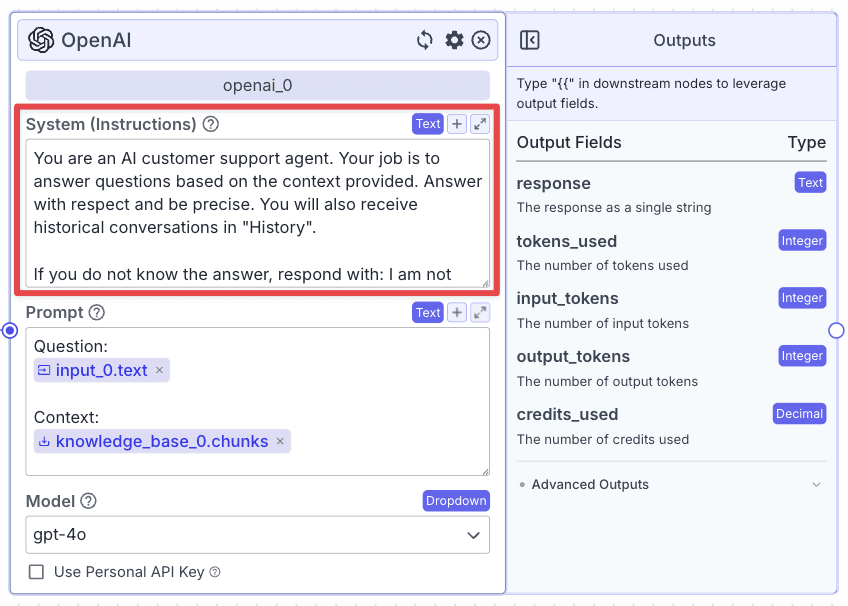
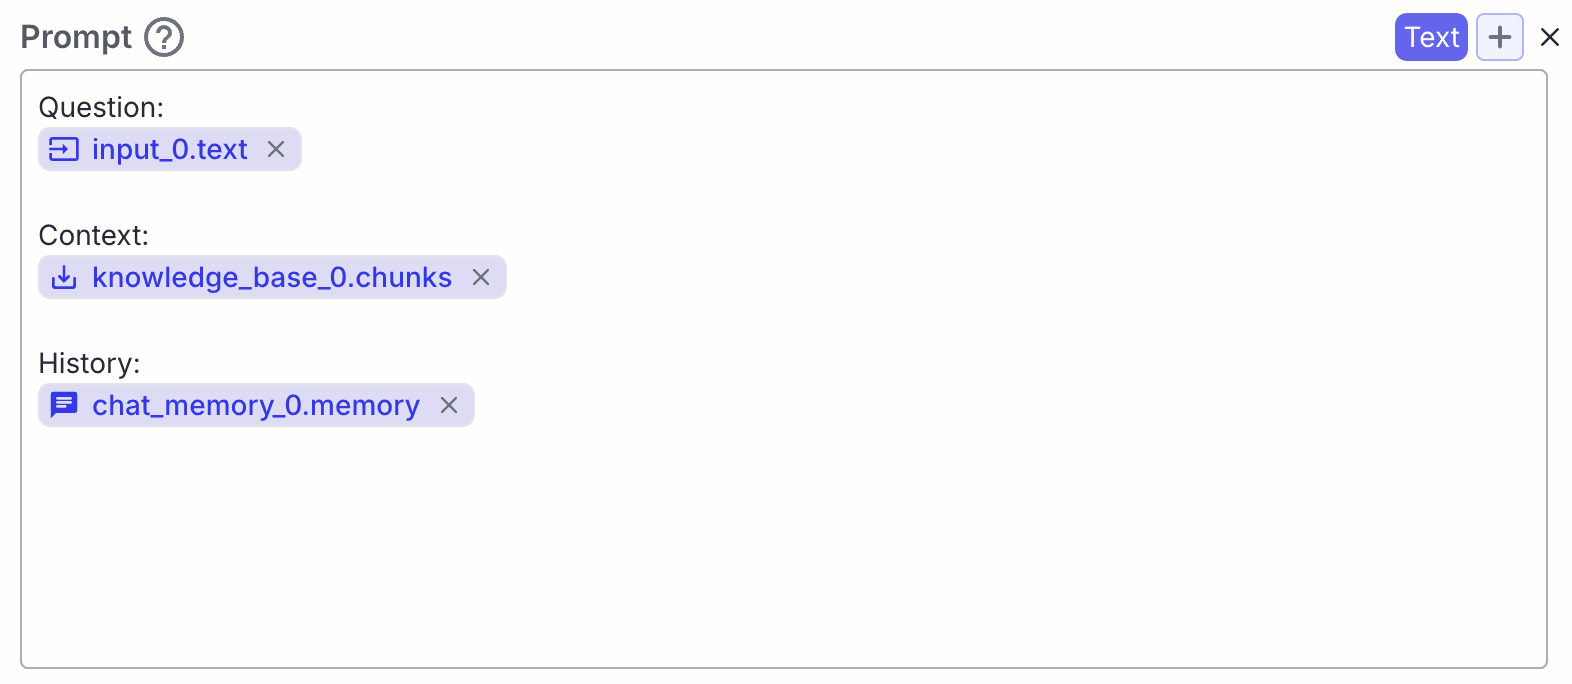
Within the “Prompt”, you can pass data from other nodes:
Output
We need to connect the LLM node to the Output node and type {{openai_0.response}} to refer to the LLM node Output.
Running the Pipeline
Click “Run” on the top-right of the window. You will show the “Run Pipeline” pane on the right part of the screen.
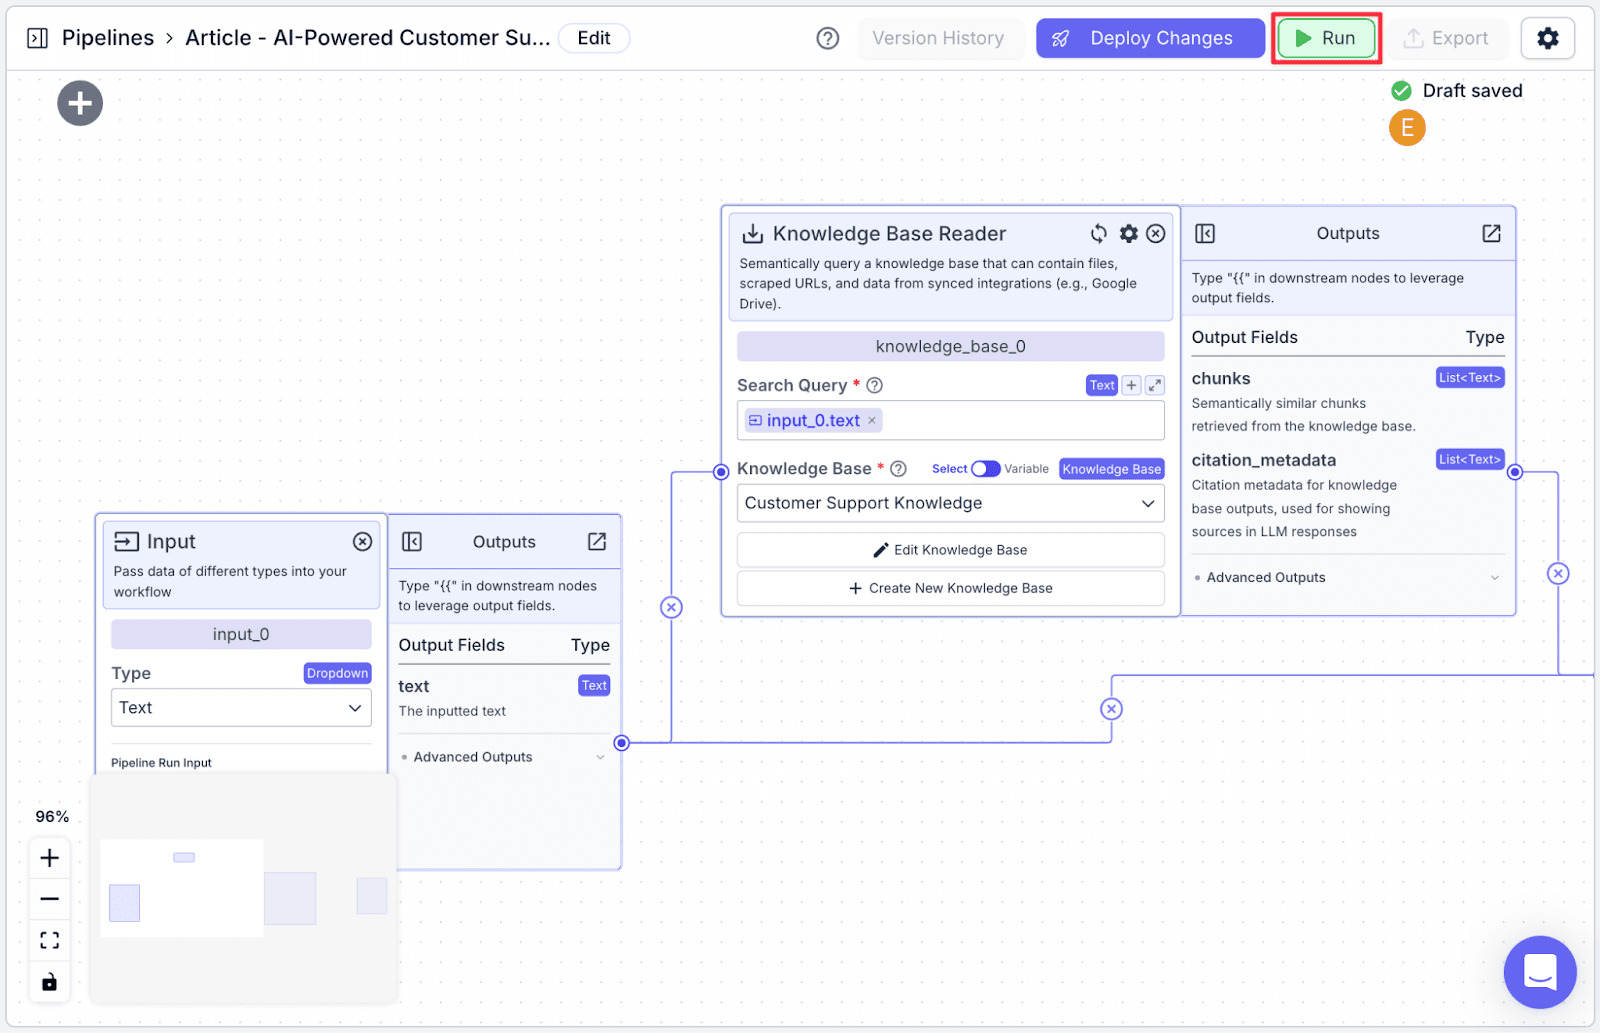
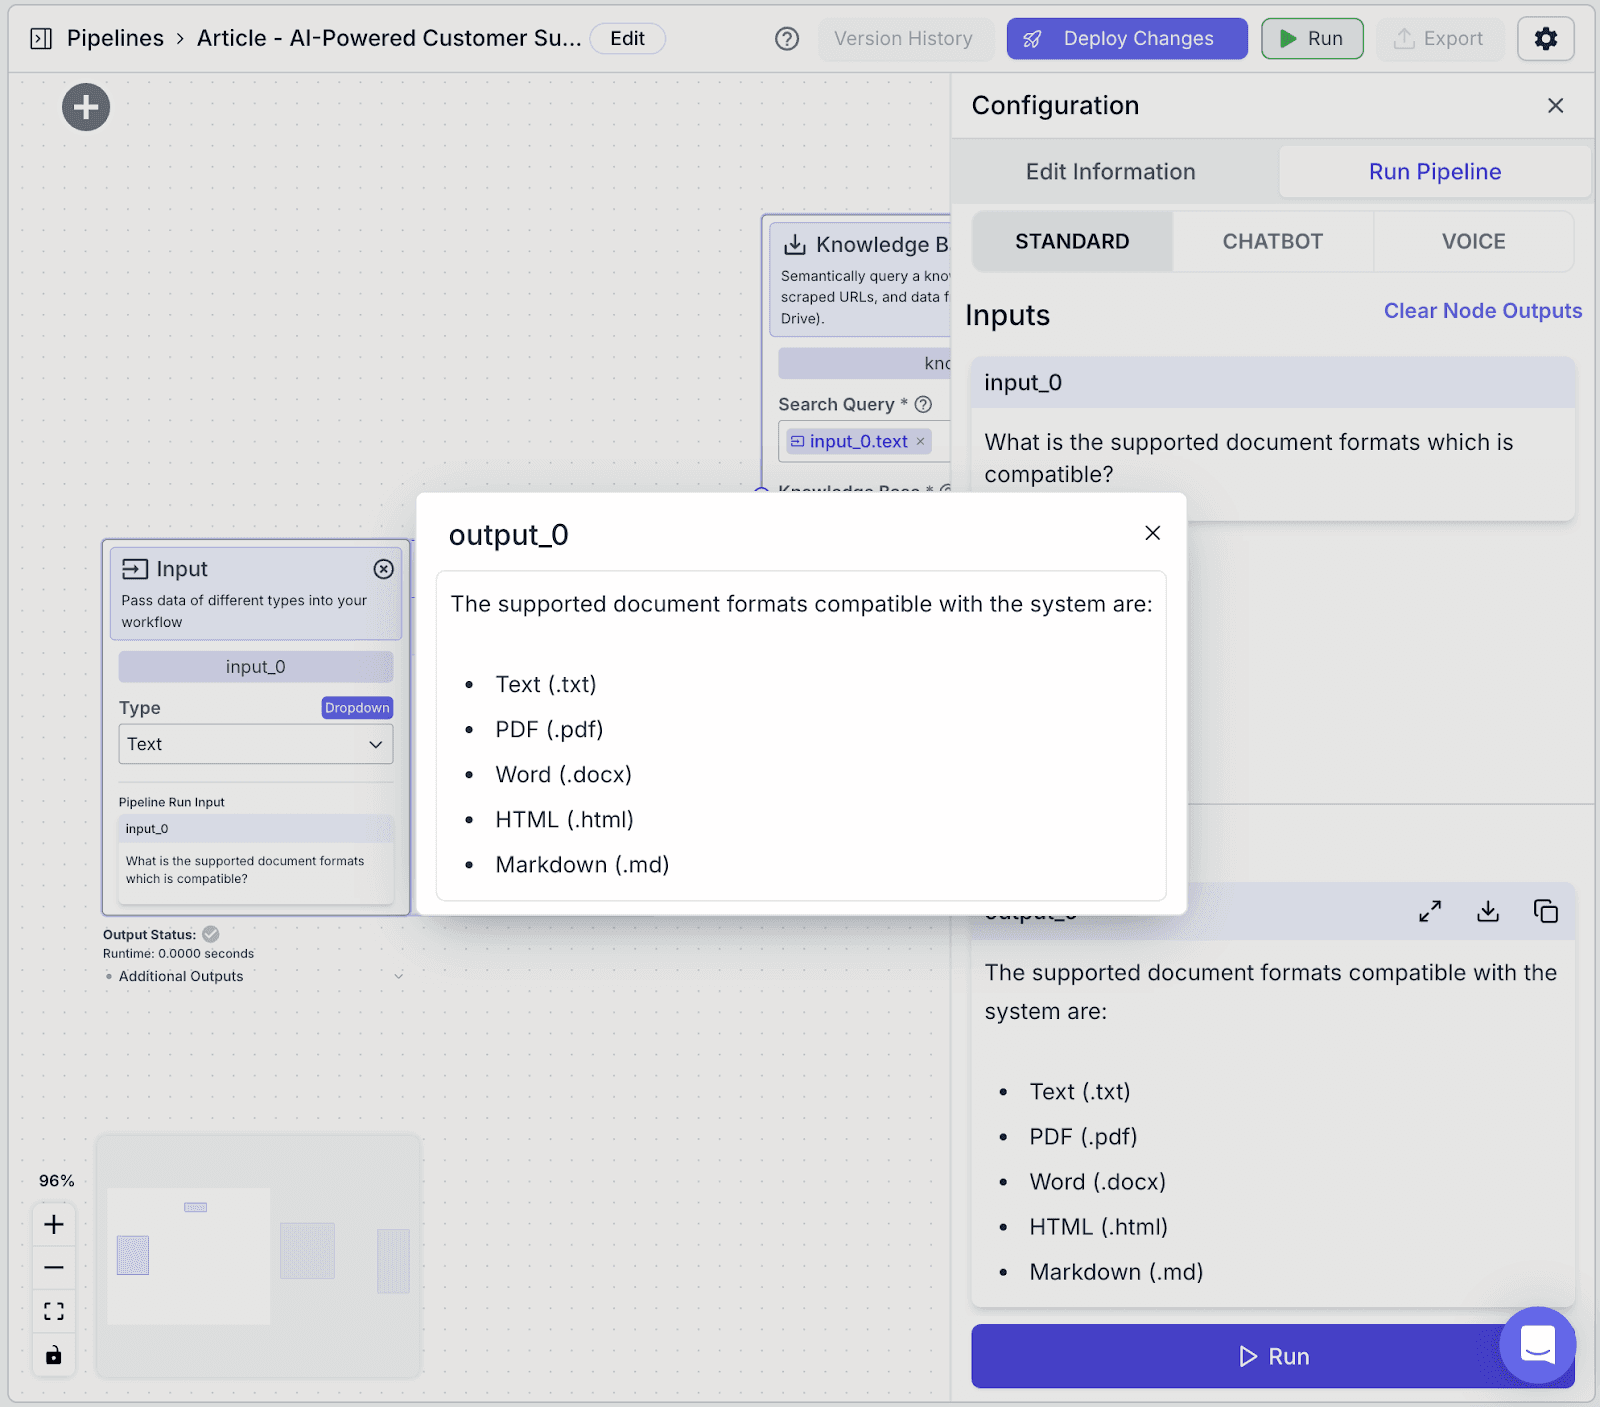
Ask any question in input_0, then click on the “Run” button on the bottom right.
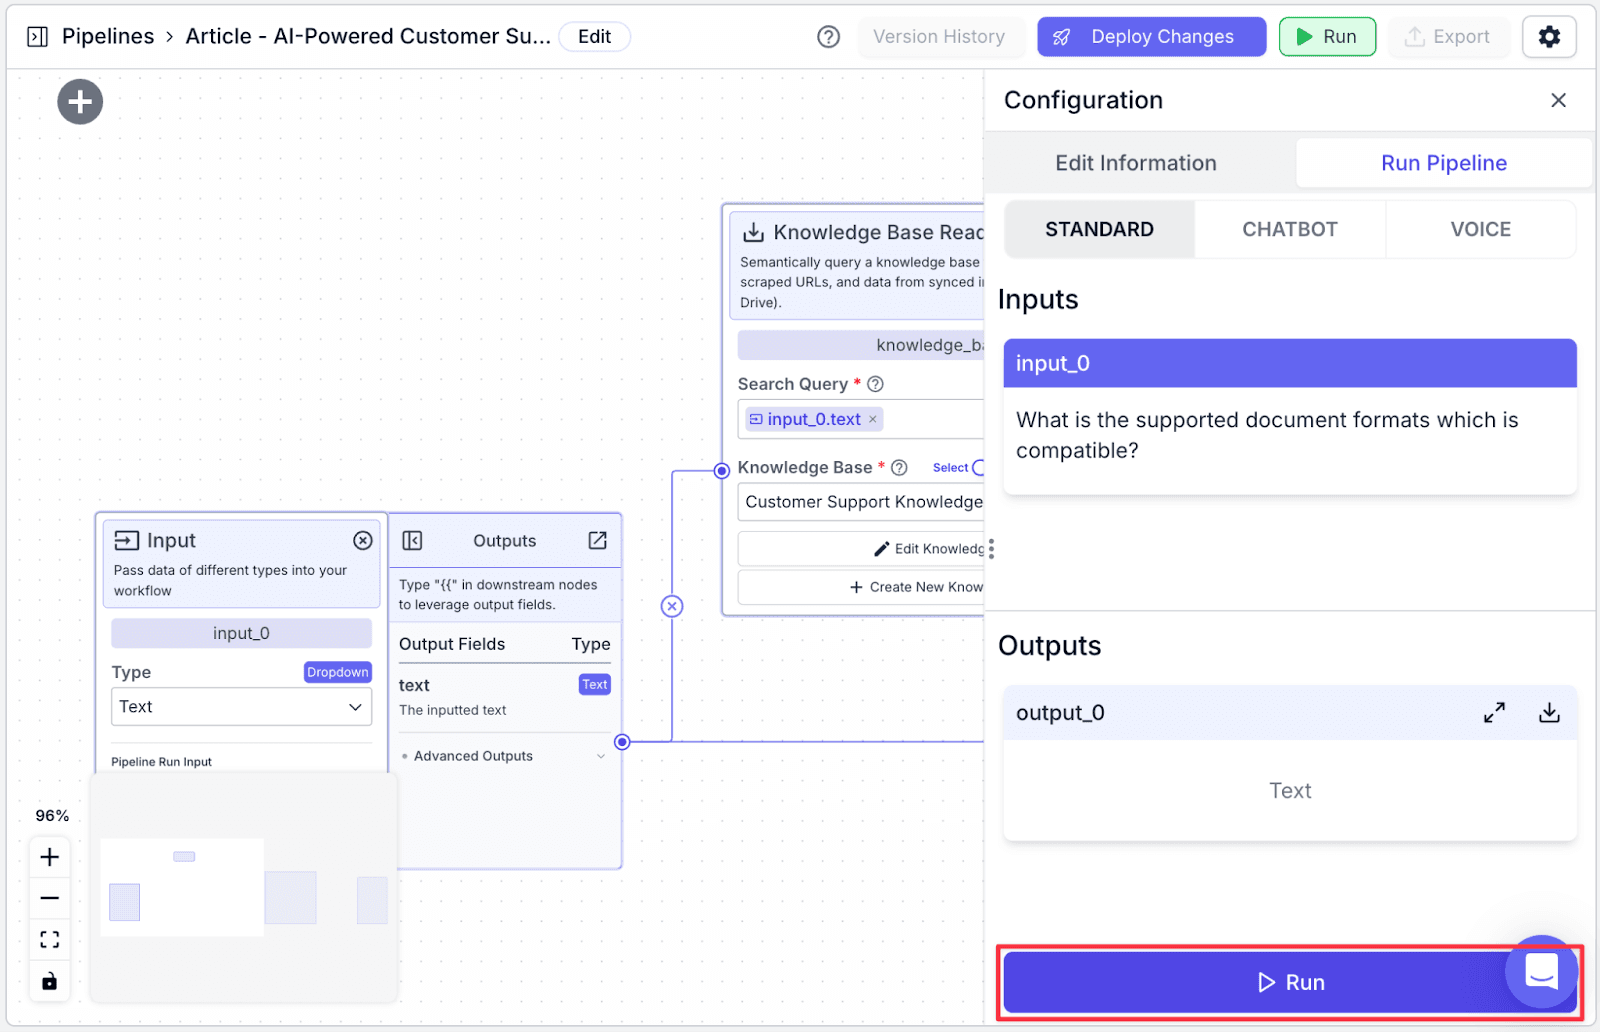
You can see the result in the output_0 section.
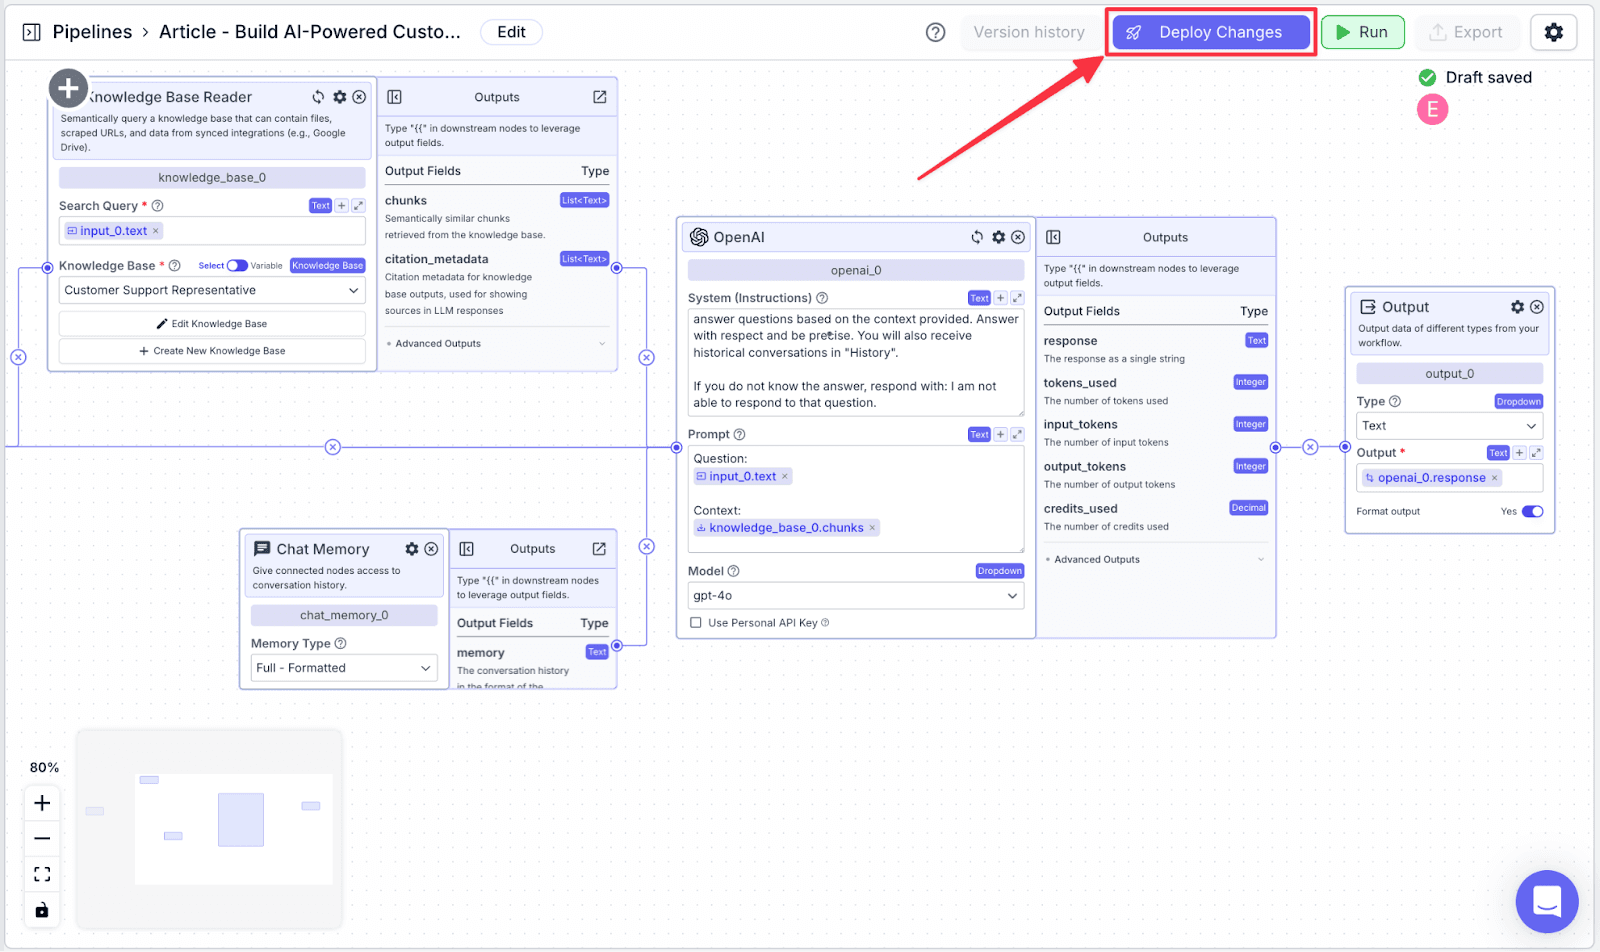
Deploying the Pipeline
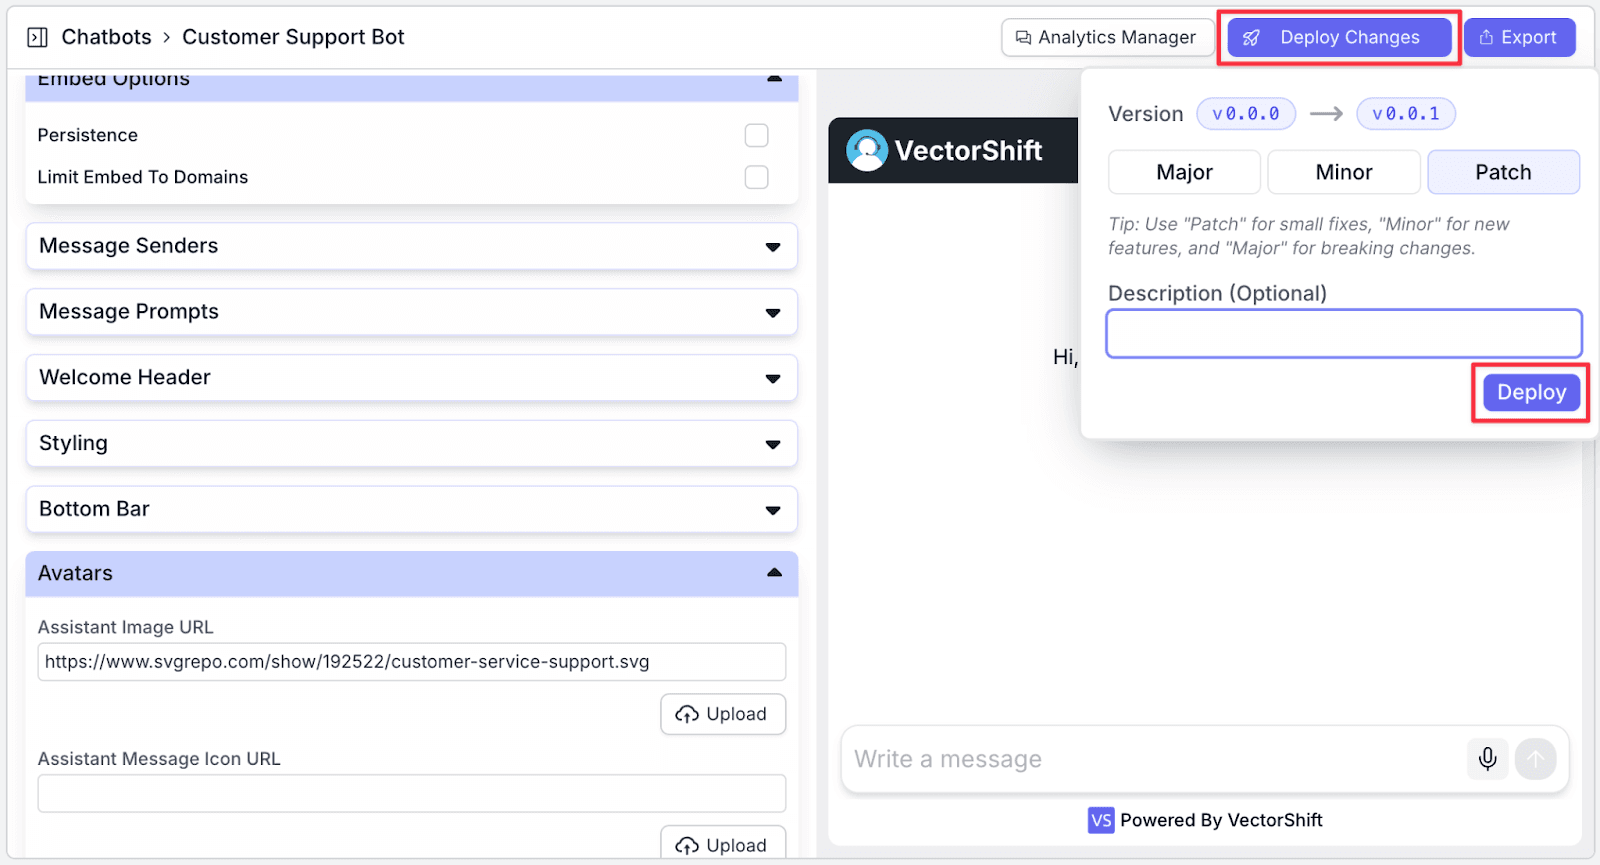
The last thing you need to do is to deploy the pipeline. This allows you to track your pipeline versioning in case you want to revert to the previous version. Click “Deploy Changes” to continue.
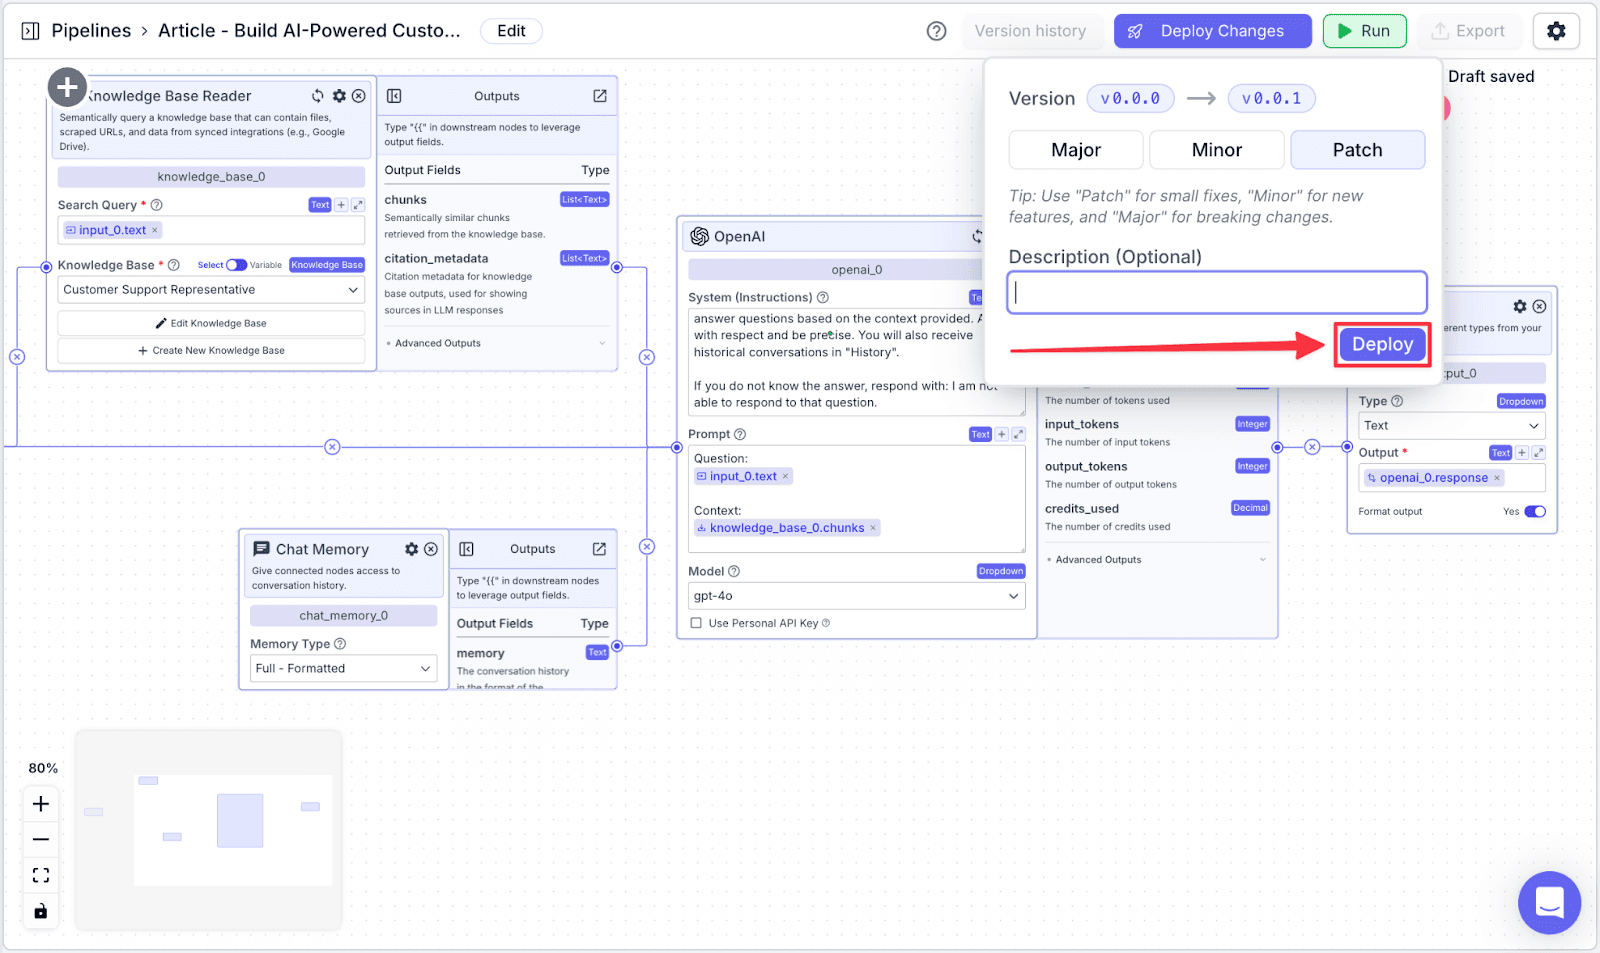
In the deployment interface, you will be given the option to add a “Description (Optional)” to your deployment and its version. This helps you to track what changes each version. Click on the “Deploy” button to apply the changes.
3. Exporting the Pipeline
Before we can integrate the pipeline with our website, we need to export it as a chatbot.
Export Pipeline
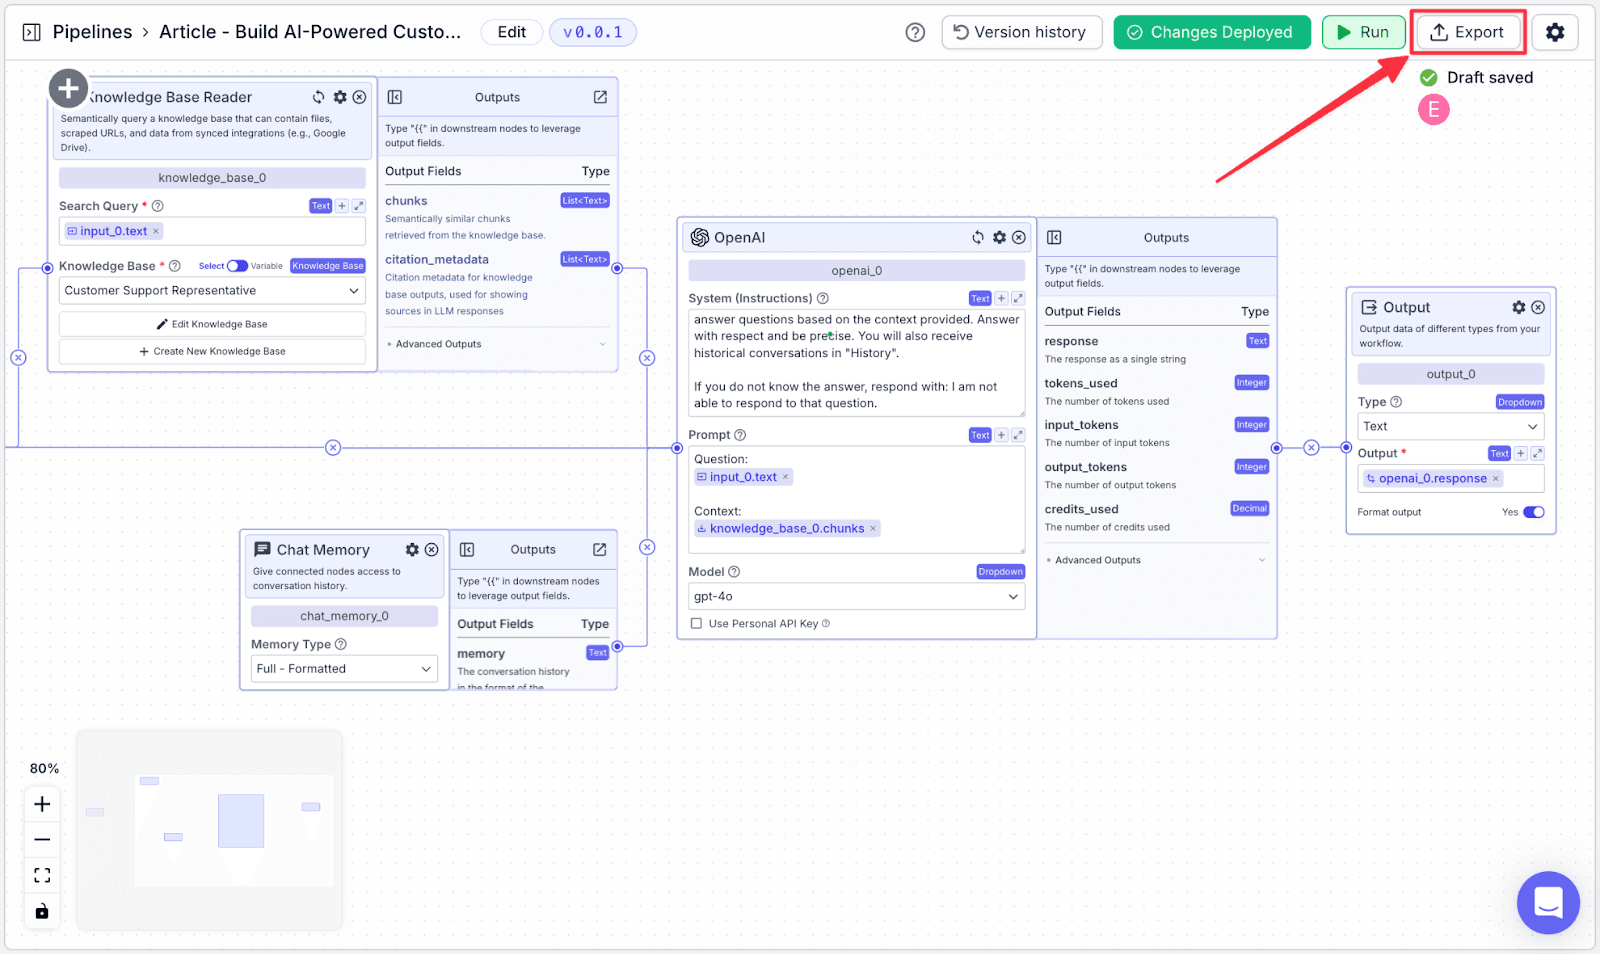
Step 1: Click on the “Export” on the top right.
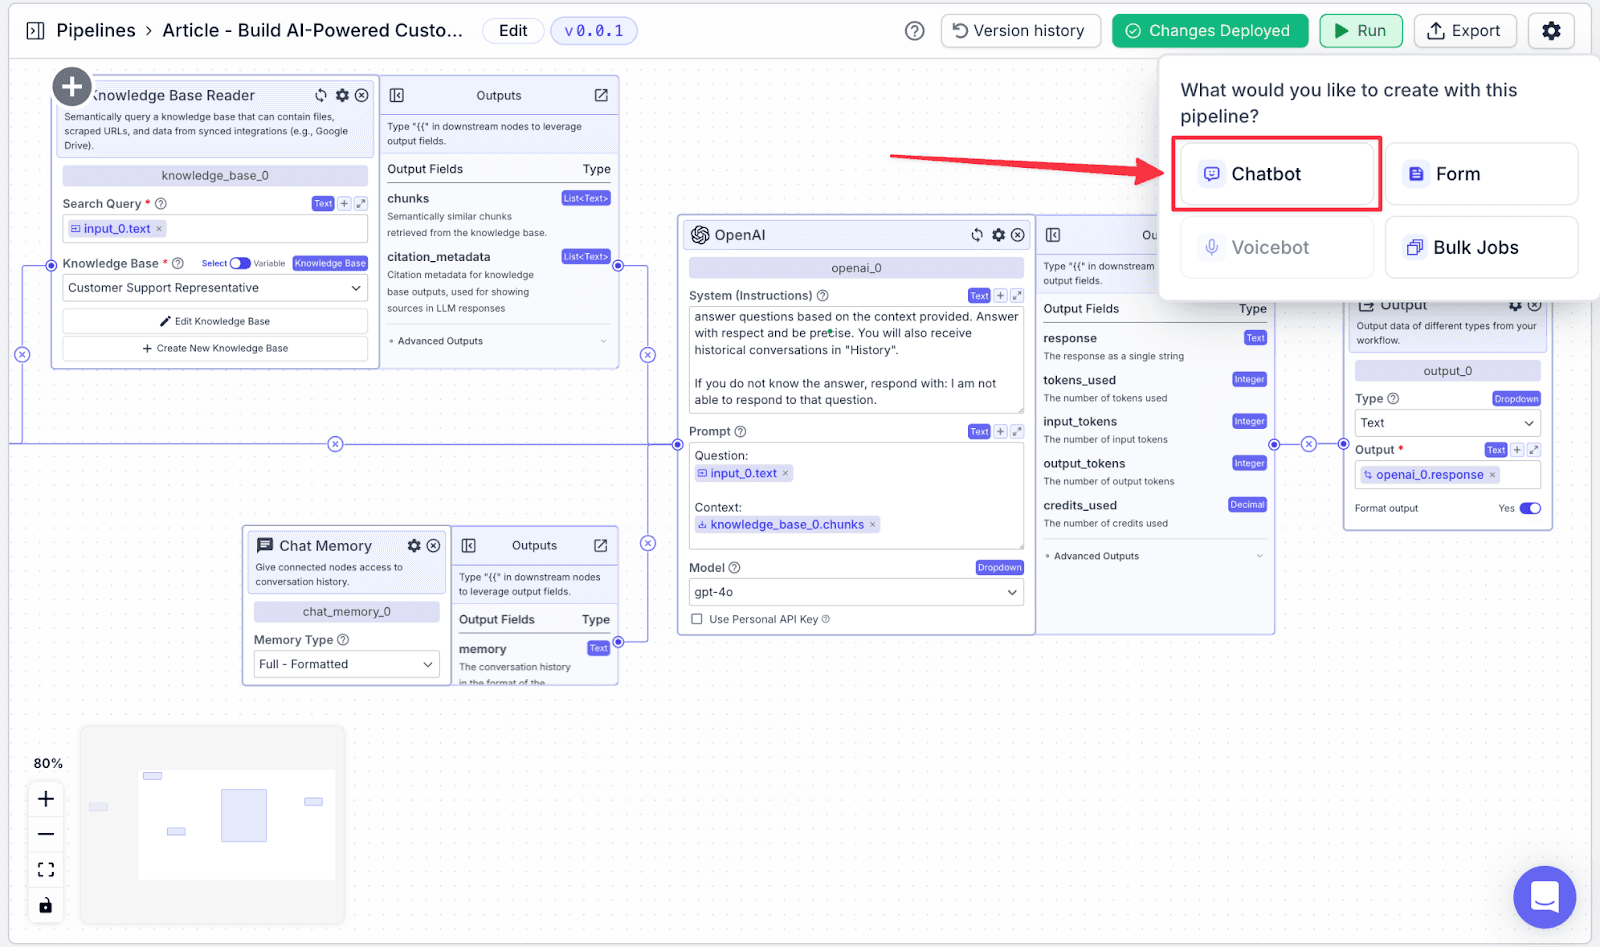
Step 2: You will see some options to export your pipeline. For this article, click on “Chatbot”.
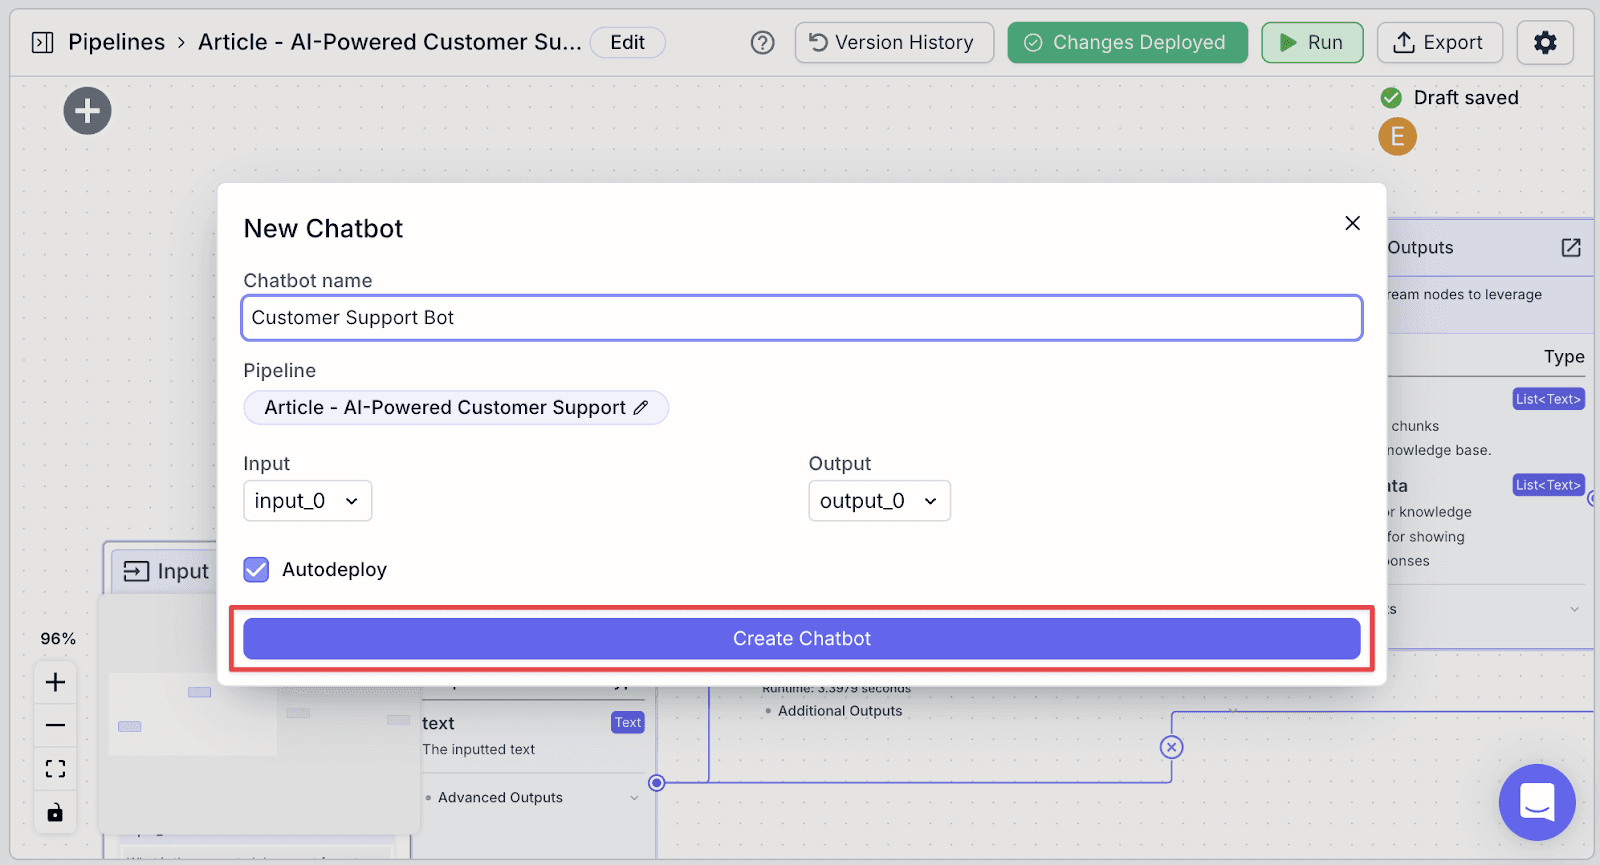
Step 3: Give a name to the chatbot name then click “Create Chatbot”.
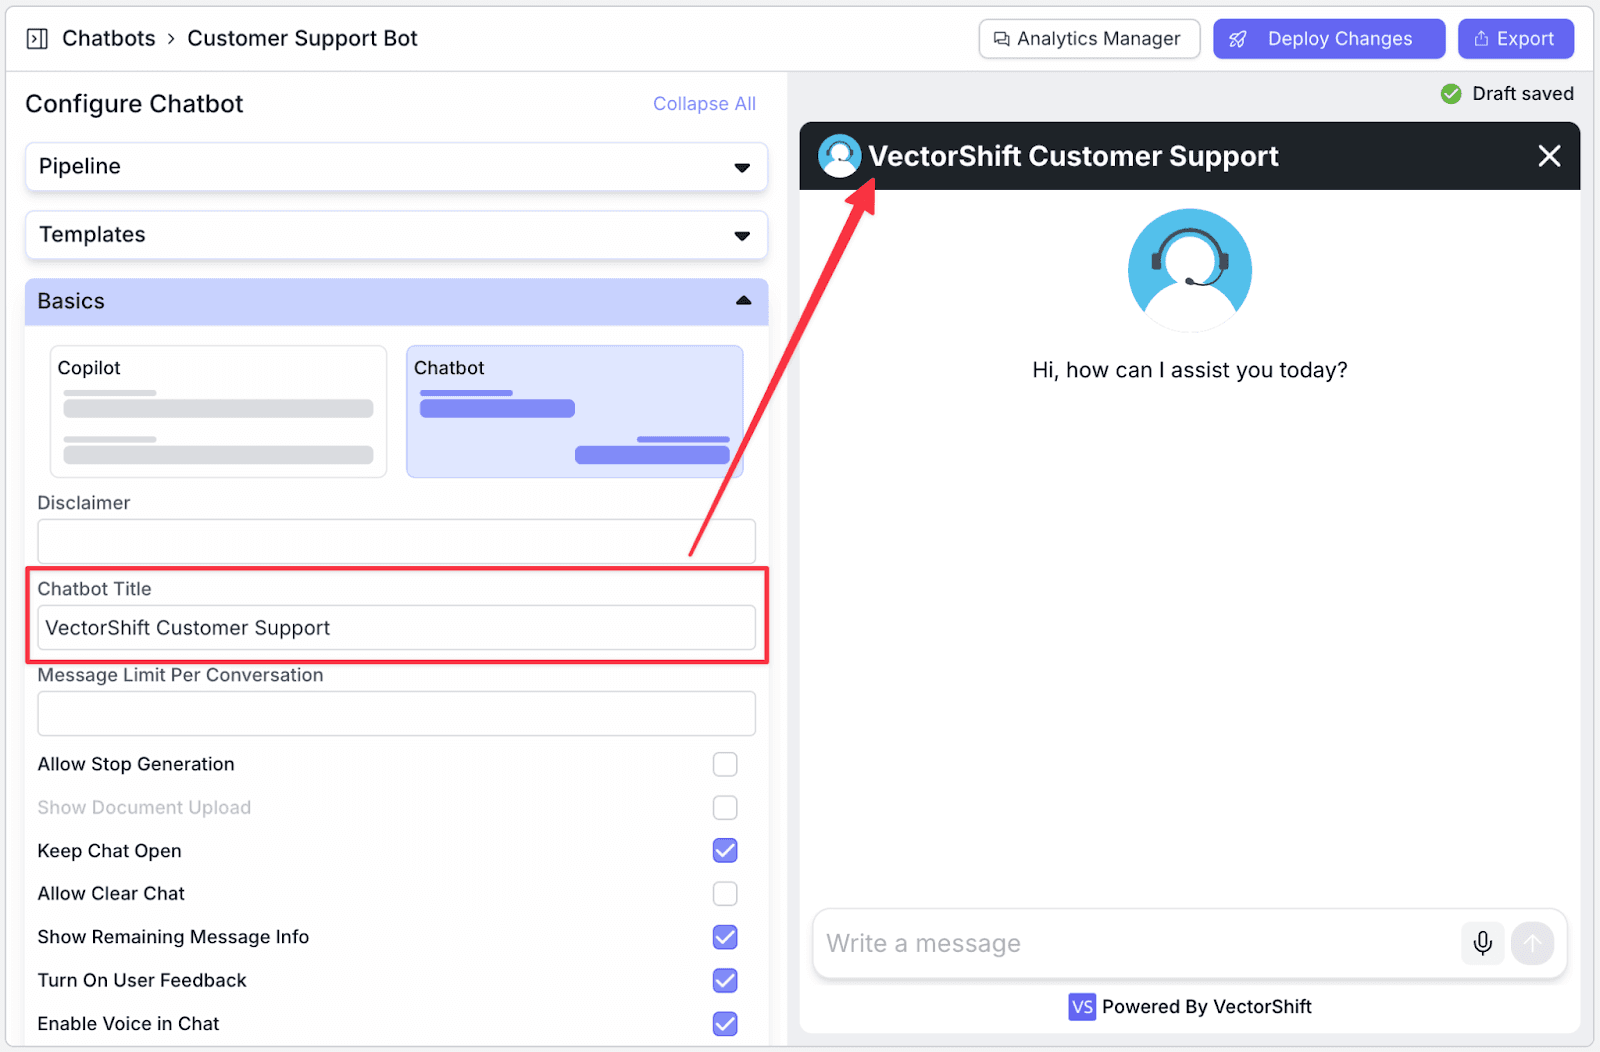
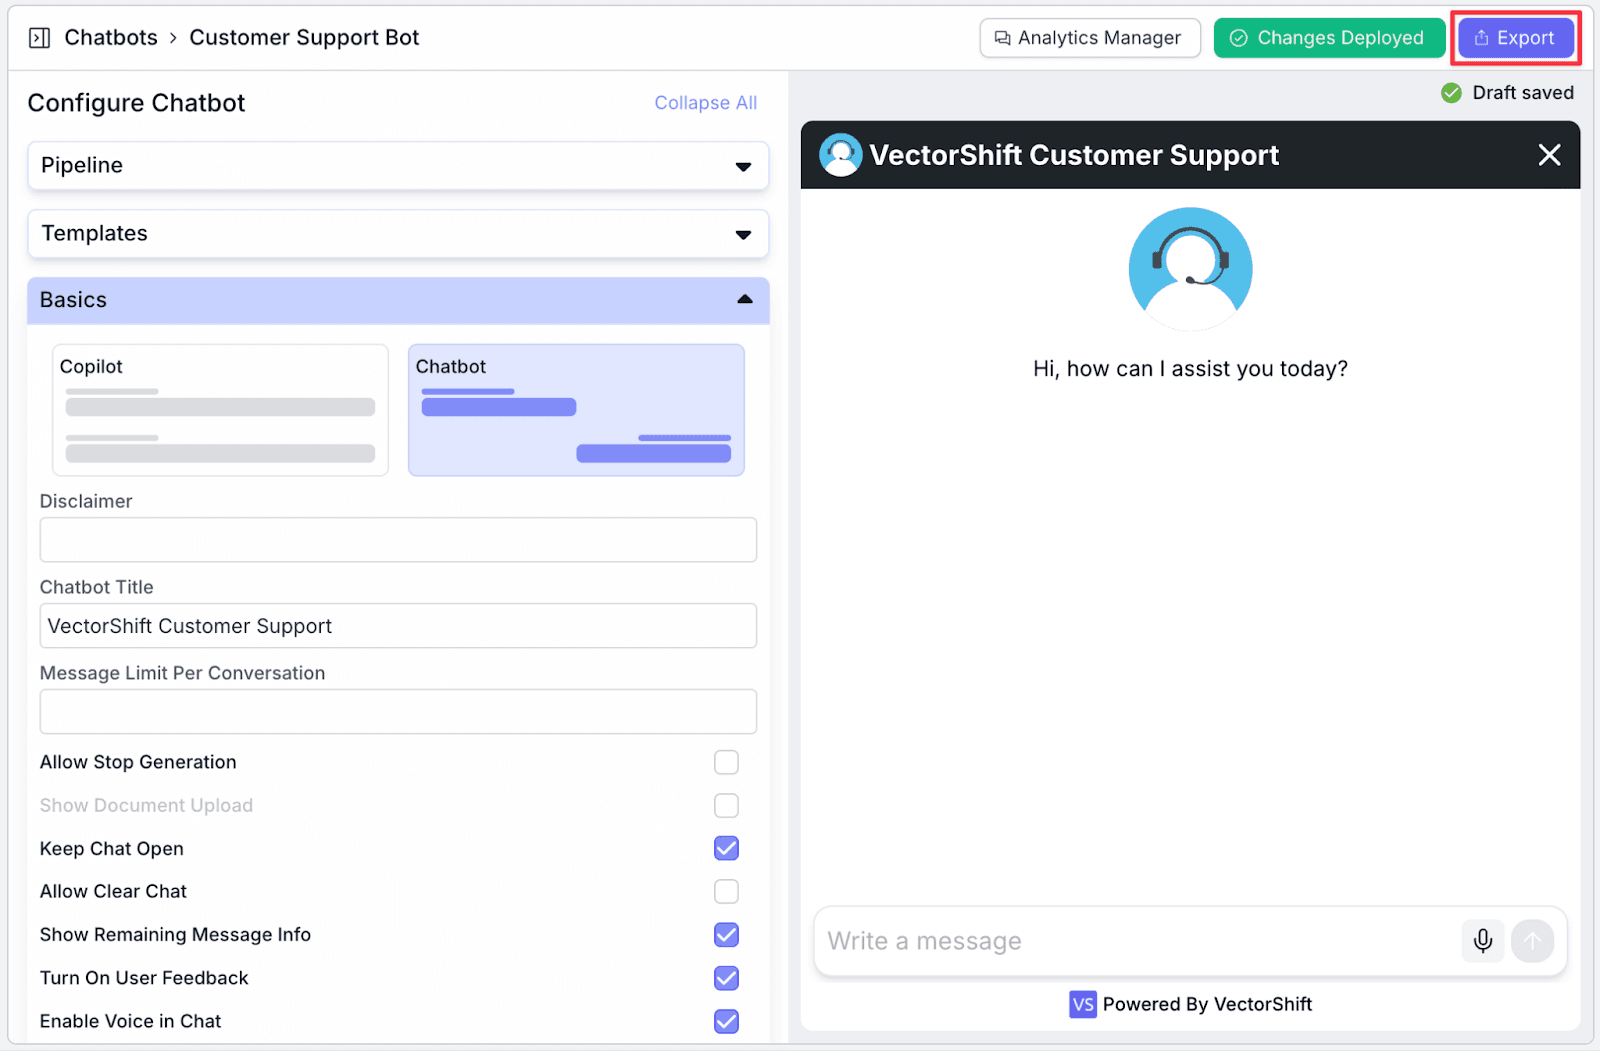
Step 4: Make any relevant cosmetic configurations in the left pane. For example, if you want to change branding, within the Avatar section, you can change the “Assistant Image URL” by uploading a new image. You will see the changes immediately.

Additionally, you can give the chatbot a title to match your brand name. Go to the “Basics” section and then change the “Chatbot Title”.
Step 5: After finishing making changes, click on “Deploy Changes” to deploy the latest update.
Just like deploying a Pipeline, you can also add “Description” to the version you want to deploy. After that, click “Deploy”.
Get the Embed Code
Step 1: After deploying the changes, click “Export” to continue to the next step; get the embed code.
Step 2: Go to “Embed Chatbot”, then copy the script snippet code in the first row. Now we’re ready to integrate the chatbot with our website.

Note: you can also deploy your chat assistant as a Slack app or as a WhatsApp / SMS bot! You can also call chatbots via API.
Embed the Code
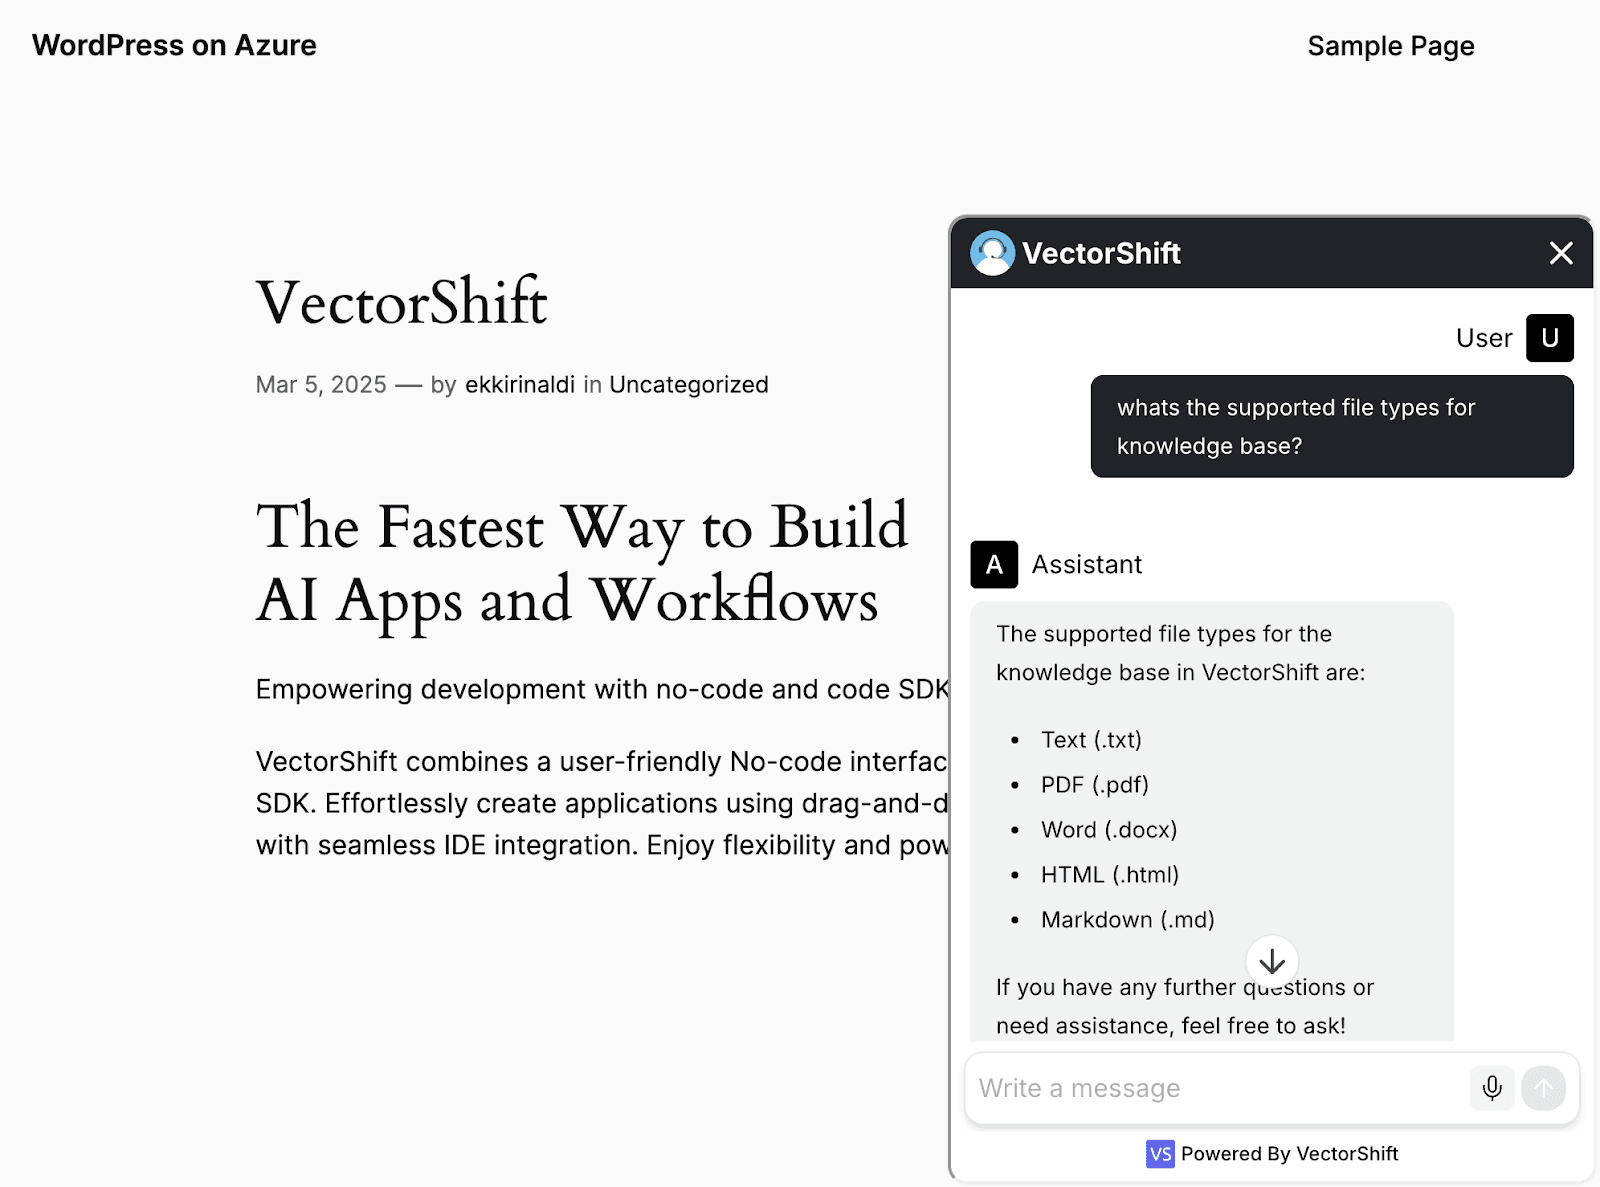
For the next step, we will add our AI-powered customer service chatbot to our website.
For demonstration purposes, we will embed the code to a WordPress site.
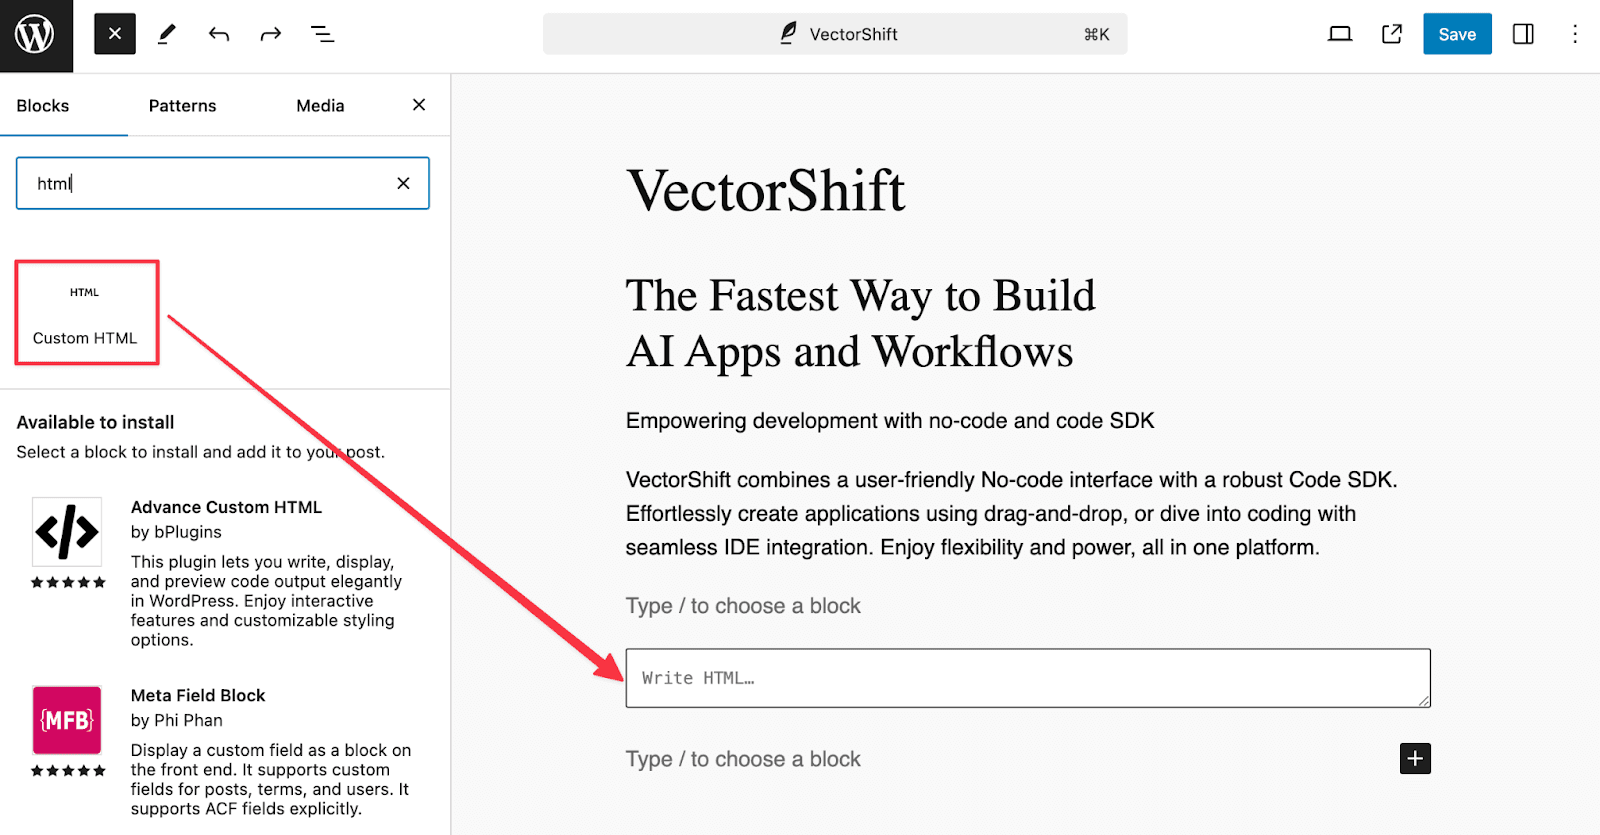
Step 1: Go to your WordPress site, select “Blocks”, then click the “Custom HTML” block. You will see the HTML block has been added to the page.
Step 2: Paste the script from the embed chatbot to the HTML block. Finally, save the changes.
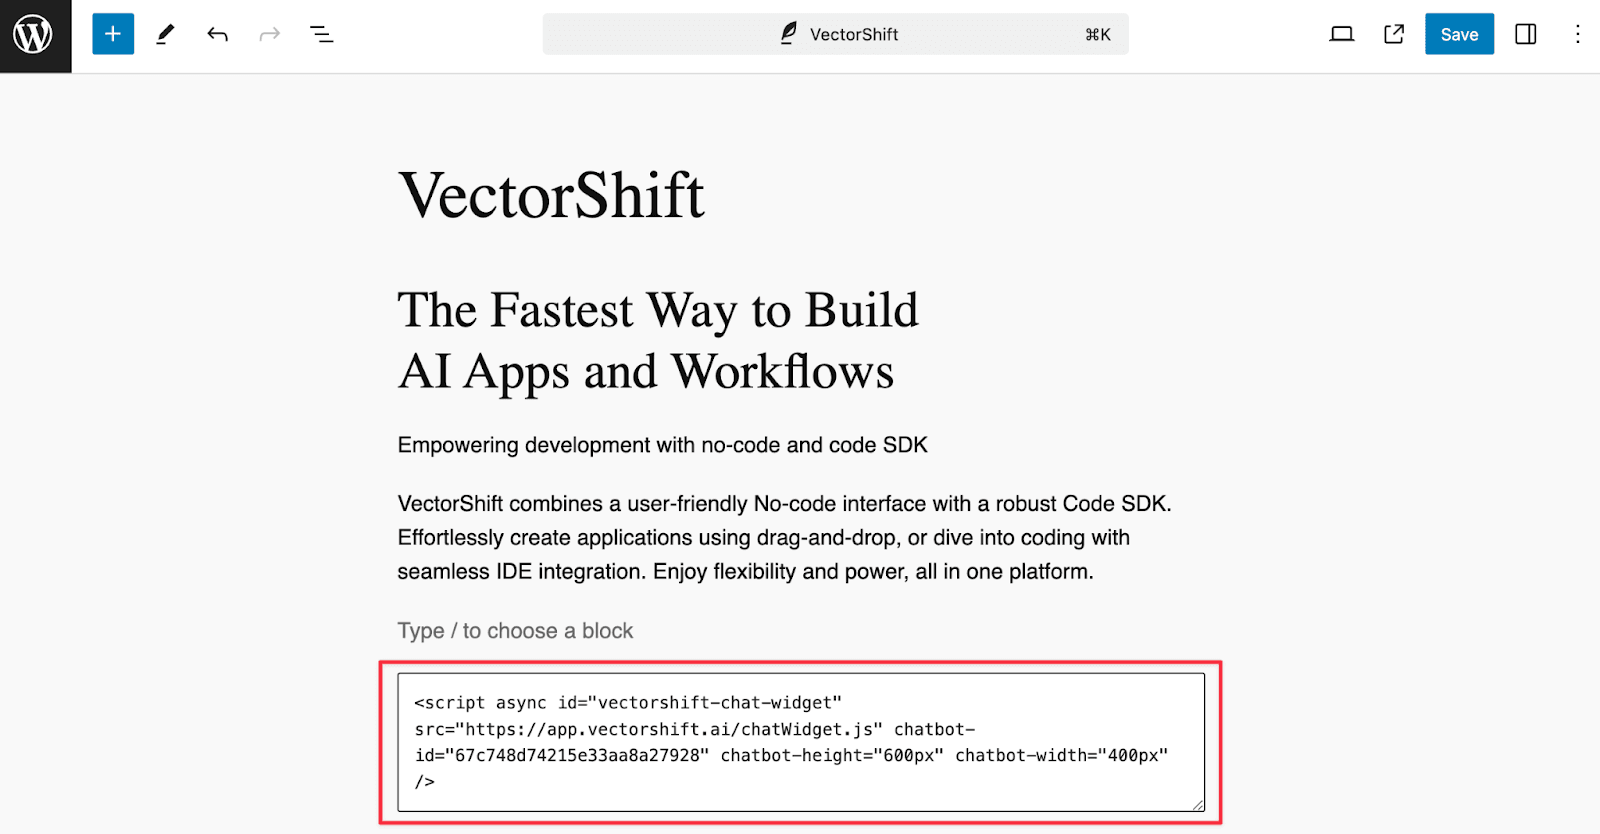
You will see the changes on your WordPress page.
Conclusion: A Scalable Way to Handle Customer Support
For further development, you can enhance your AI assistant by integrating additional data sources, such as Google Search, or internal data from various applications (e.g., OneDrive).
Looking to get started? Create your free account and start scaling your business, or talk with our team!

Albert Mao
Co-Founder
Albert Mao is a co-founder of VectorShift, a no-code AI automation platform and holds a BA in Statistics from Harvard. Previously, he worked at McKinsey & Company, helping Fortune 500 firms with digital transformation and go-to-market strategies.